During the Design Consultation, we look at (and draw all over) lots of inspiration images. When you are searching for inspirations instead of shopping for a dress, you have a lot of freedom! You can play around with bits and pieces of many dresses rather than searching in stores for “the one”.
Getting to know the bride and learning about her personality and style is imperative to my design process. Rather than making her a “wedding dress”, I want to showcase the beauty of who she is as a person. I love uncovering individual style and creating garments that are perfect only for the one specific woman who will be wearing it.
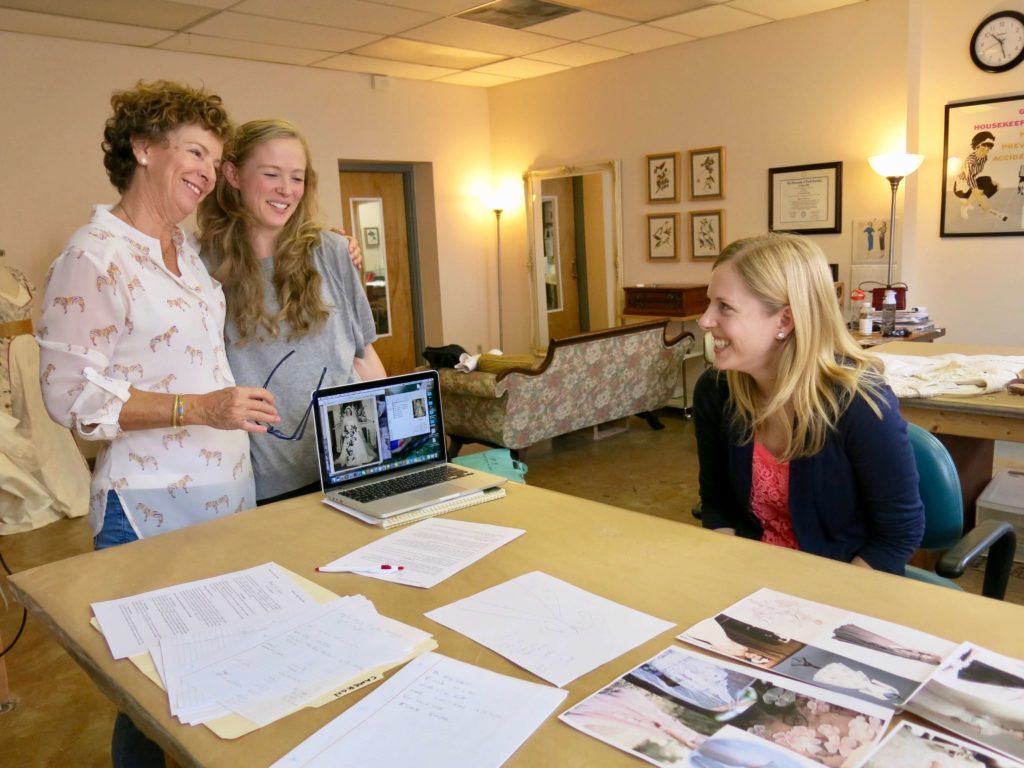
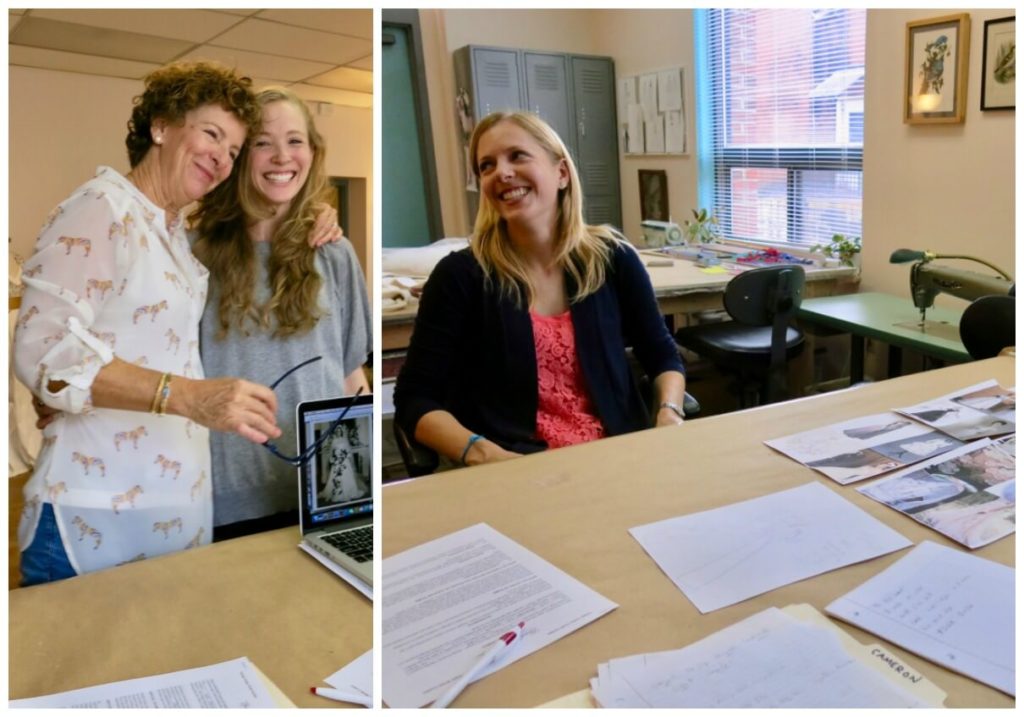
Consulting with Cam and her Fam
A list of adjectives guided our process as we looked through images we collected. Before discussing specifics like hemlines and necklines, I asked Cameron for adjectives of how she’d like to look and feel on her wedding day. She chose Elegant, Light, Simple, Sleek, and Joyful.
The venue (a gorgeous hotel in Scotland), the time of year (Spring), and the bride’s vintage Hollywood style also helped determine what her custom dress might look like.
We all had a blast brainstorming together! “I like a sleeve kinda like this…”, “This neckline, but without the collar…”, “Maybe a floral print…”, “Maybe gardenias!”…
The Underdress for the Overdress
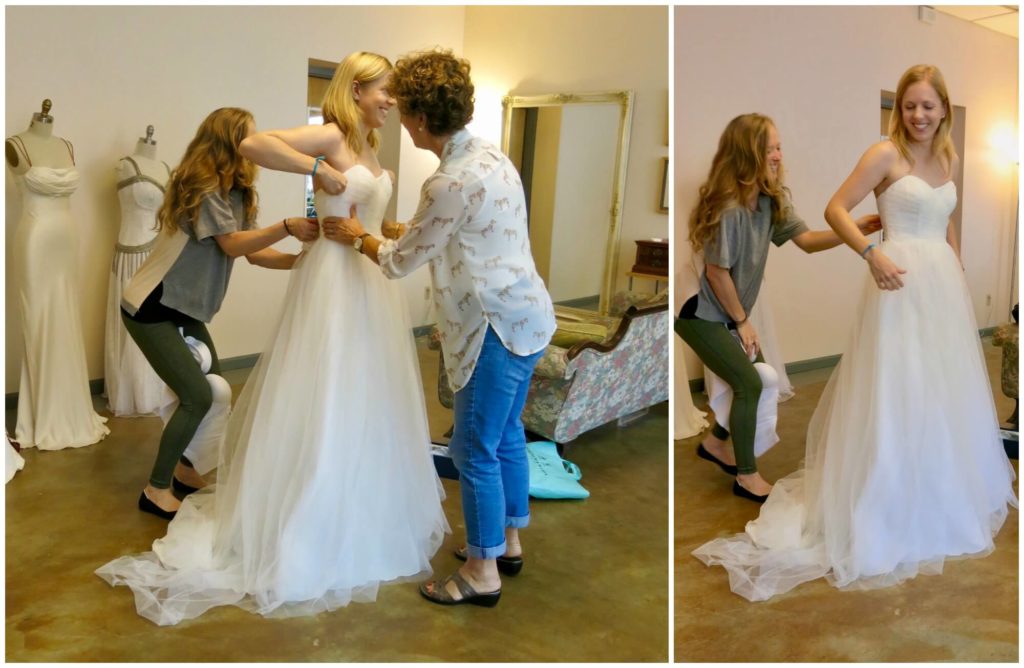
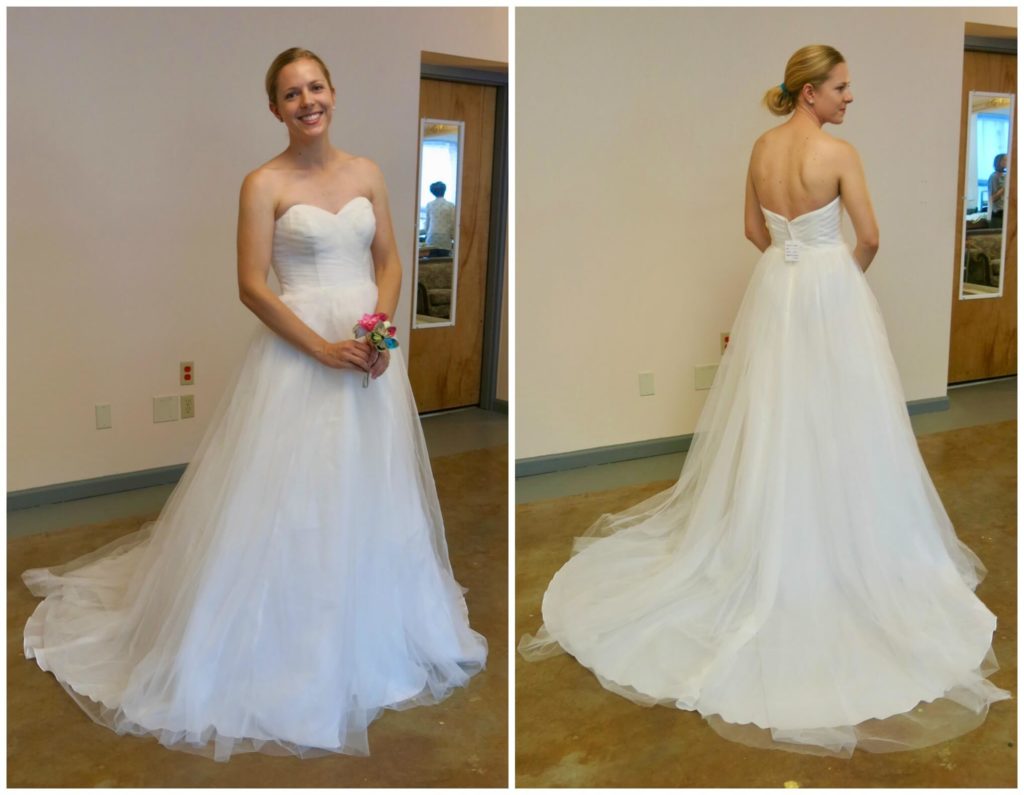
Also to be considered in the design- Cameron already had a wedding dress!
What Cameron loved most about her grandmother’s long-gone 1949 Dior dress was the beautiful sheer layer with fitted waist and sleeves that was worn over a plain dress with a sweetheart neckline. Since her budget was tight, Cameron bought a plain strapless dress at a big box bridal store and our consultation was to design and create a unique custom “overdress” to almost completely cover it up.
So in order to draw my custom sketches (and take measurements), I’d need to work with Cameron in the underdress!
Her mom and sister were happy to help her get into it. The smiles were contagious!
Before we all left for a fun fabric inspiration trip to Mulberry Silks (which I forgot to photograph), I snapped these gorgeous shots of Cameron to use for her custom wedding (over)dress sketch!
Sketching for Cameron
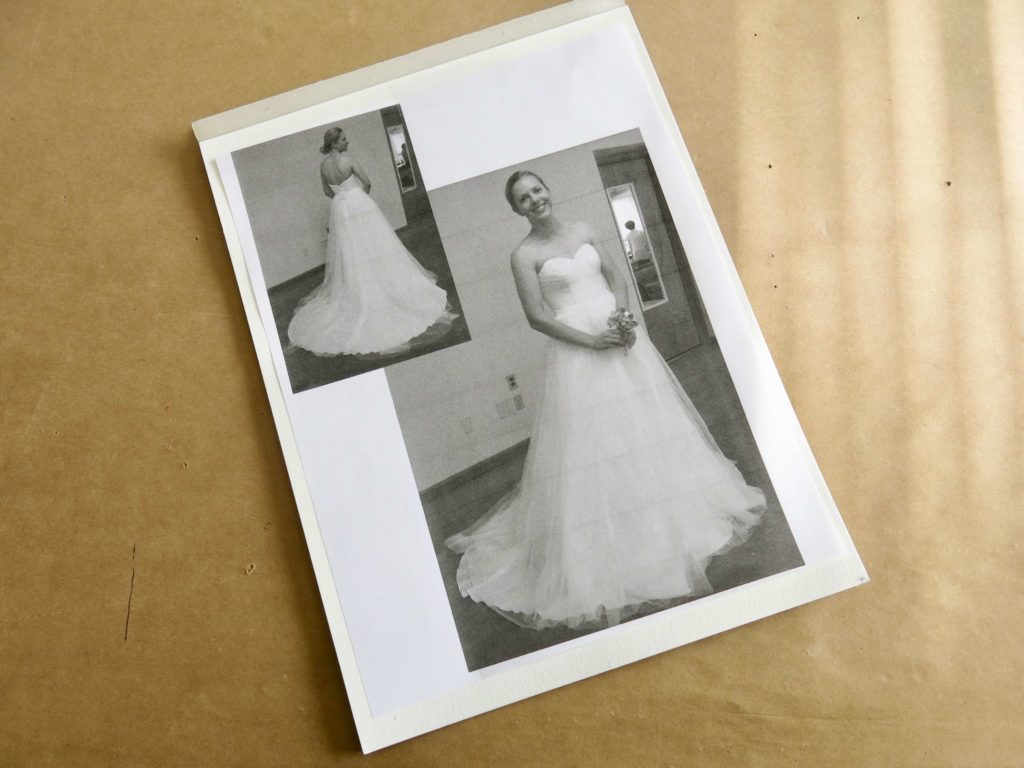
Once the studio was quiet and I was all alone again, I spent a lot of time thinking about everything we discussed together. I was now feeling pretty confident about what would fit Cameron’s style and personality, so it was time to take those ideas and see what would fit Cameron’s body.
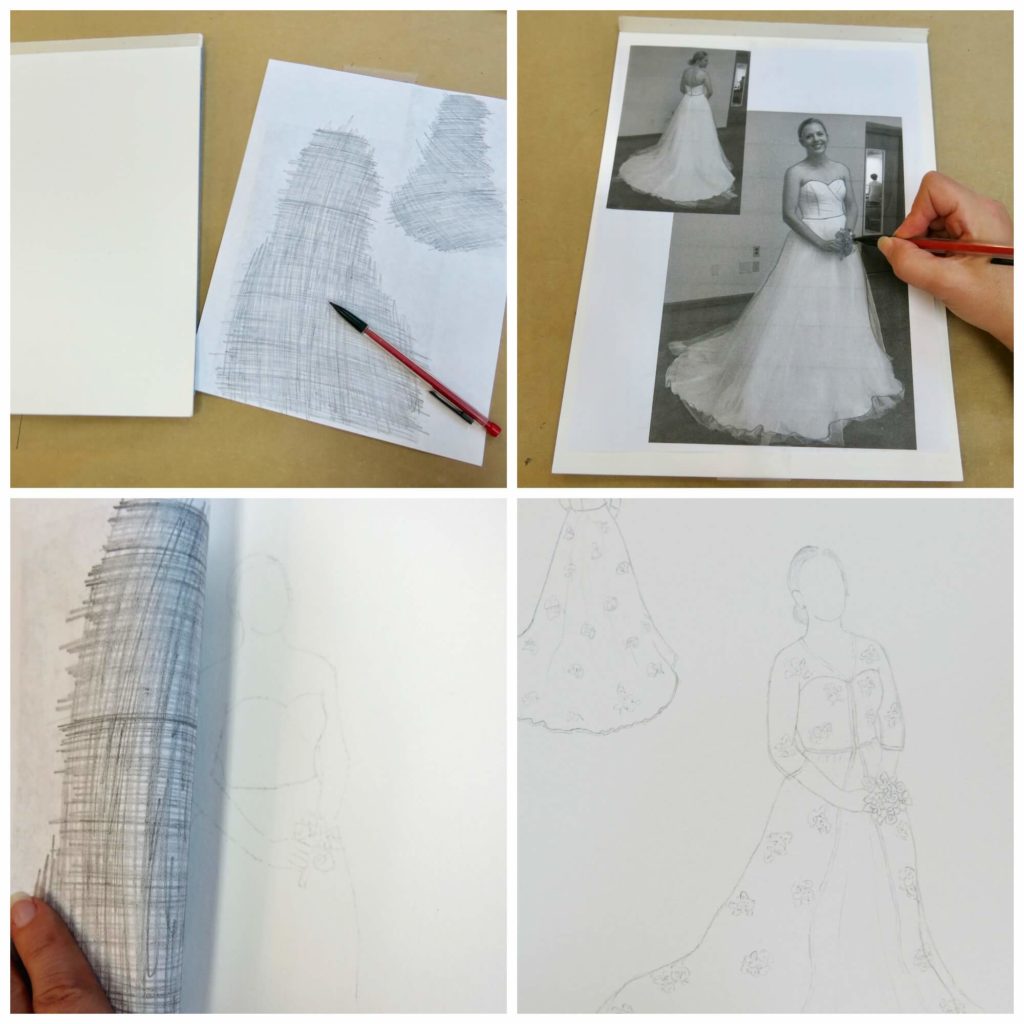
Since I am a custom dressmaker and not a fashion designer, my sketches begin with my bride’s silhouette instead of a stylized model coqui. I took the posed photos of Cameron and printed them out on a sheet of plain paper.
I then scribbled all over the back of the printout, taped it scribble-side-down to some watercolor paper, and traced around Cameron’s outline. This leaves very faint pencil lines on the watercolor paper that become my basis for the brand new sketch.
I love this part of the process, playing around with ideas and proportions. As I make decisions, I gradually erase or darken my lines until a new design slowly emerges…
Sketching while using the individual’s actual silhouette is an excellent way to “try something on” that doesn’t exist yet!
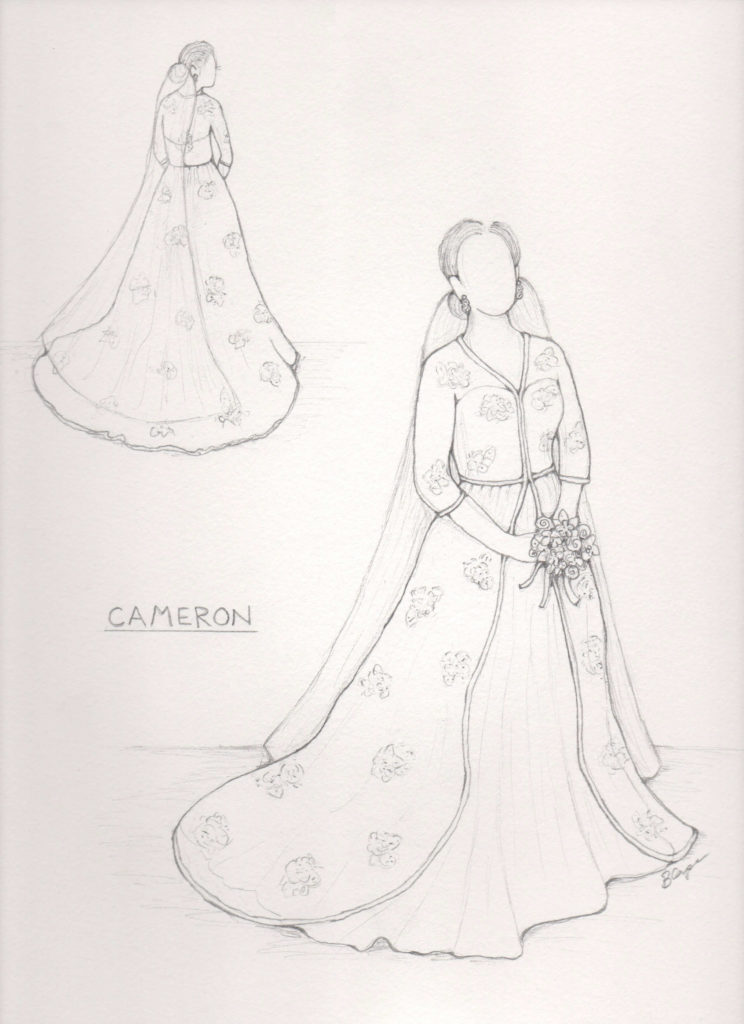
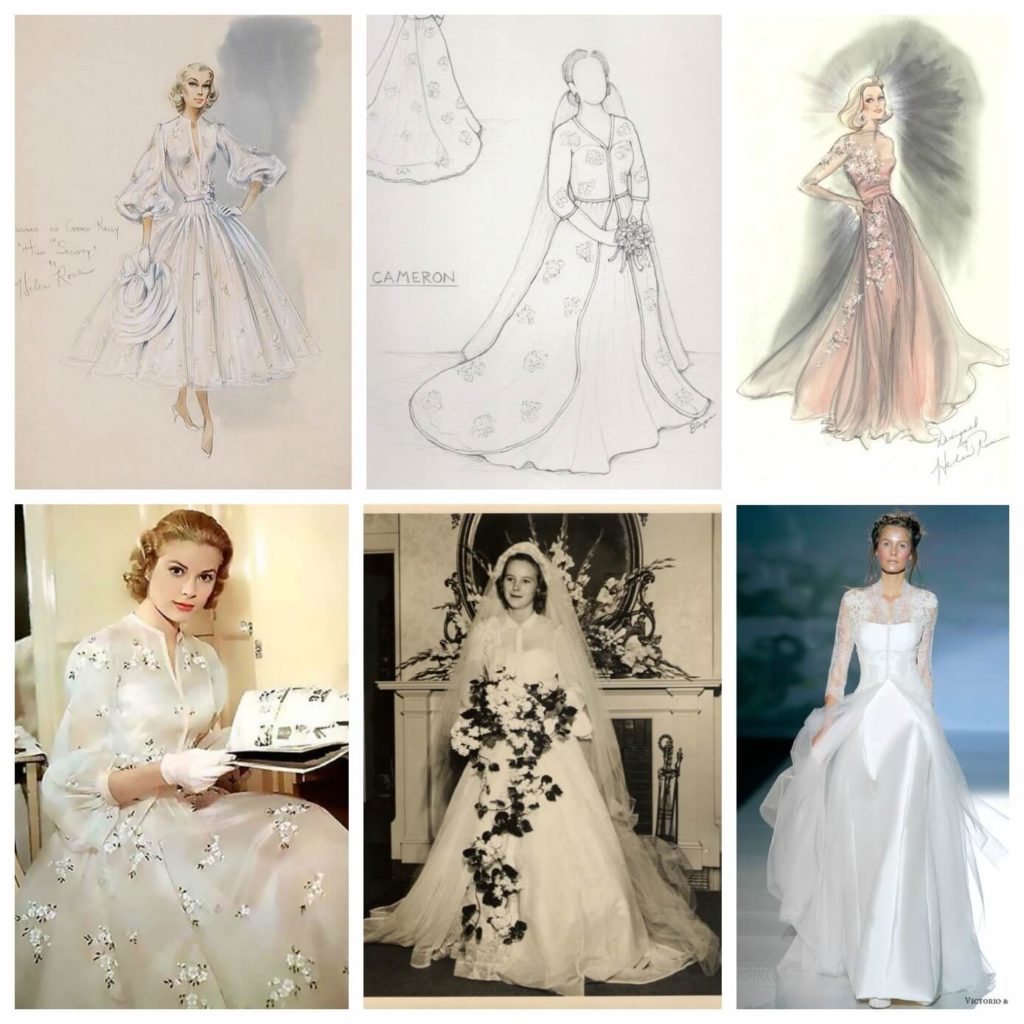
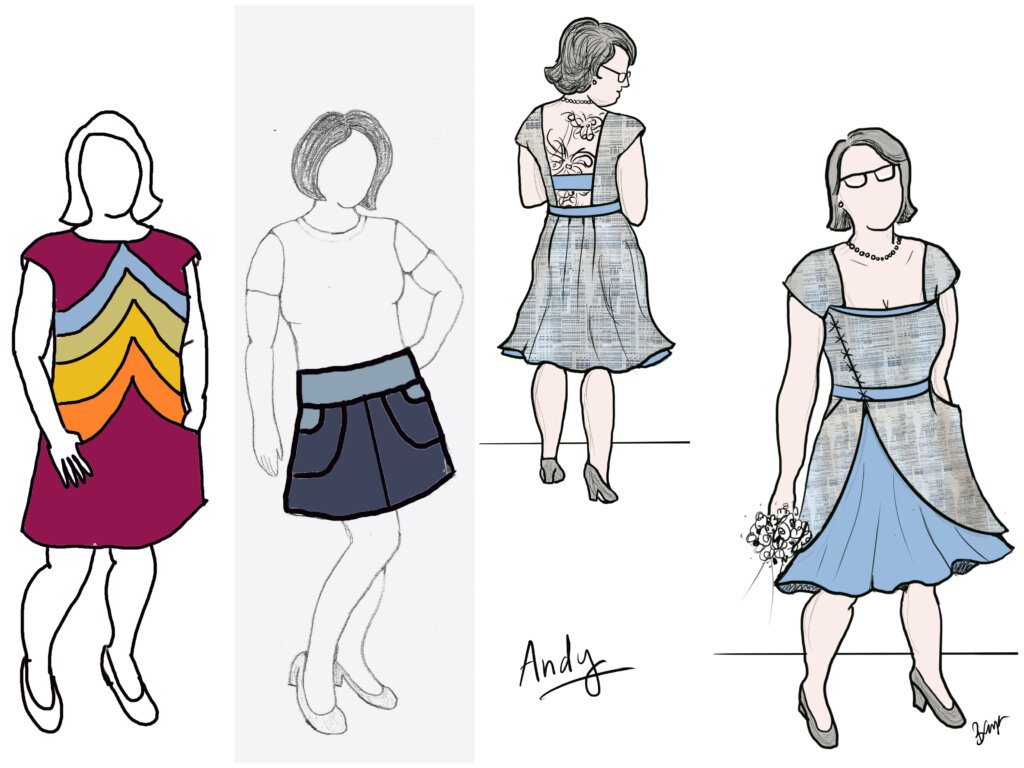
Cameron’s Sketch and Design Proposal
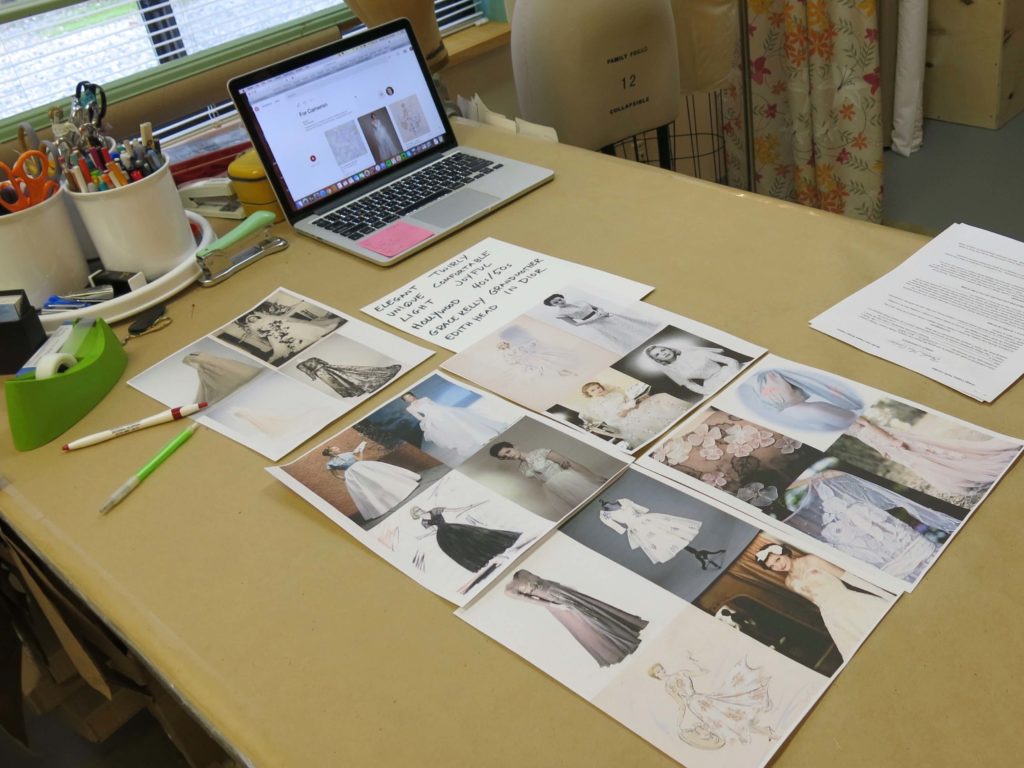
Here’s a peek at the Design Proposal I sent to Cameron with her custom sketch and many of the inspirations that led me to create it…
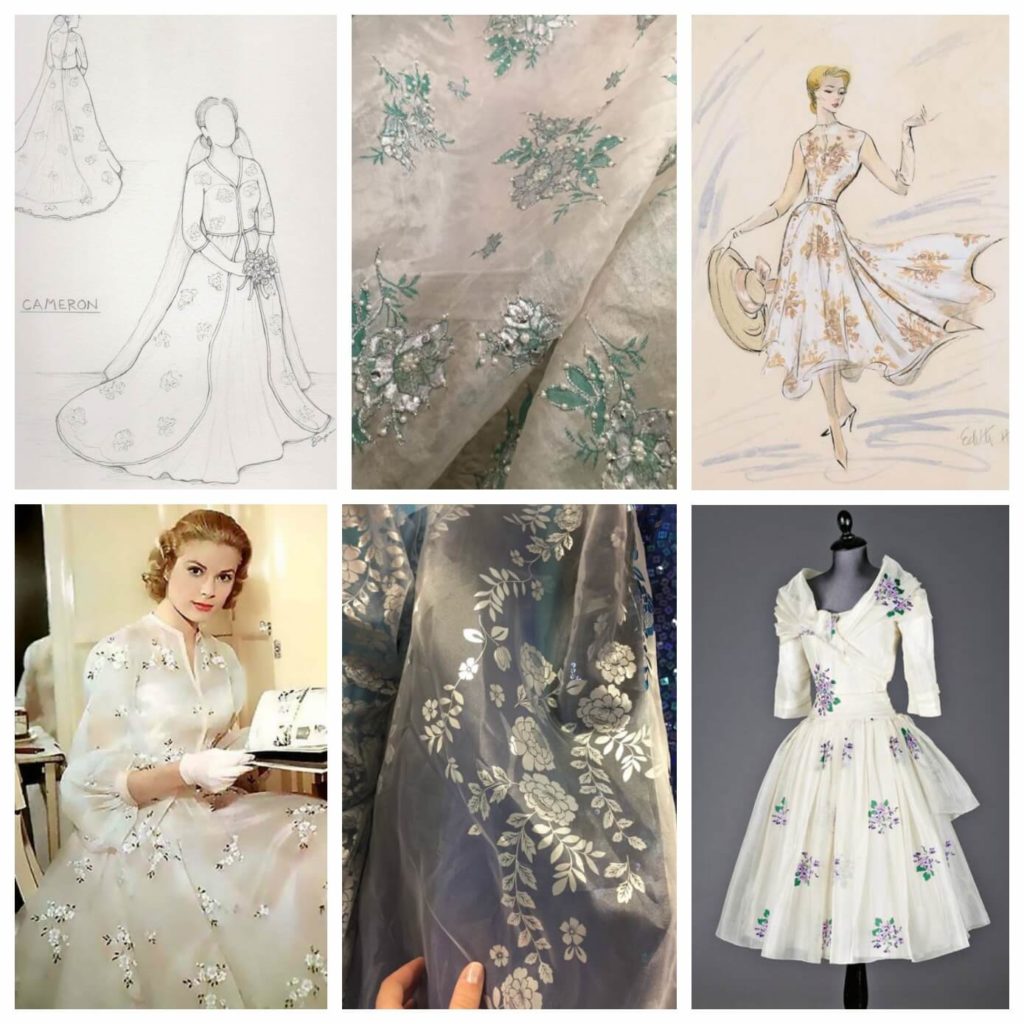
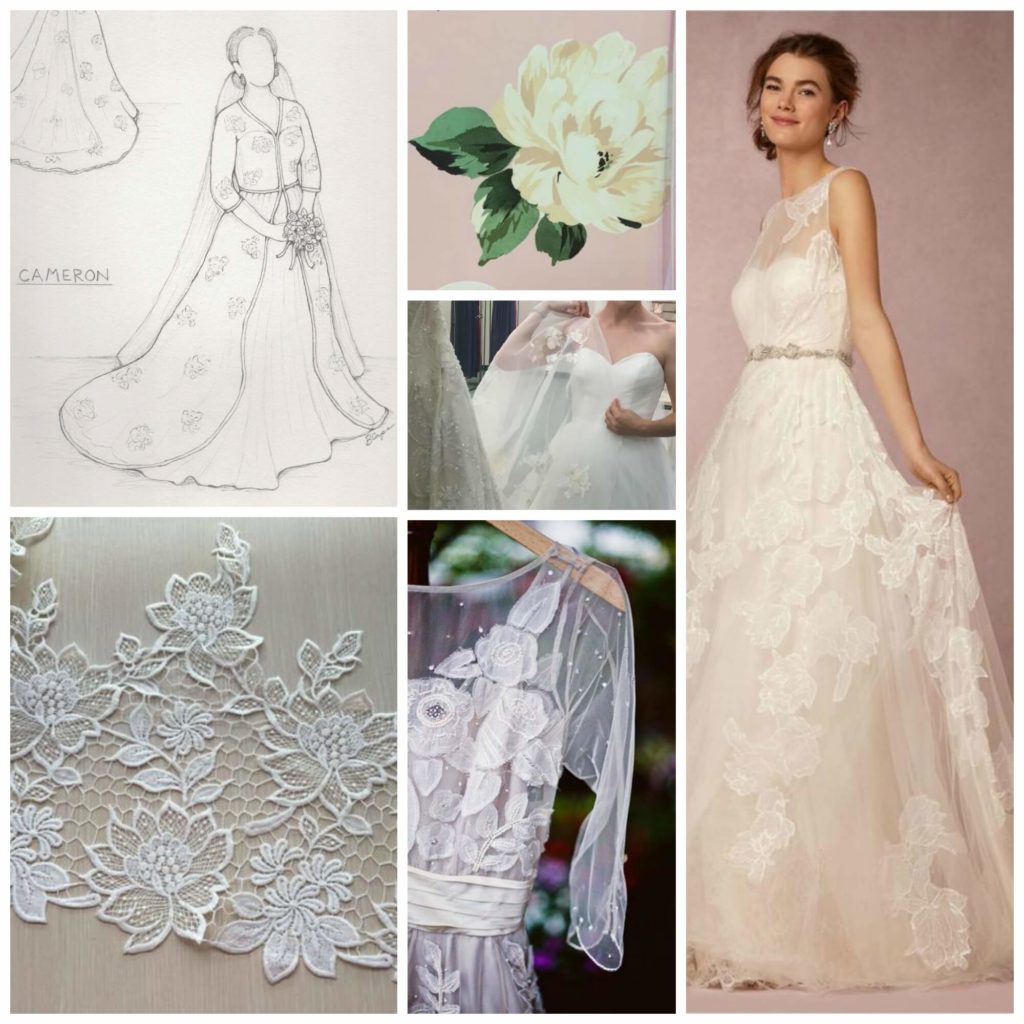
A soft sheer custom overdress inspired by her grandmother’s Dior wedding dress and Grace Kelly. The overdress features a V-neck with simple front closure and 3/4 sleeves. Edges are finished with a sleek 1/2″ bias binding. The custom overdress will feature a floral design, either in the fabric itself or with custom-made flowers or appliqués added to a plain fabric.
Design Inspirations
Design Inspirations include the Dior dress worn by Cameron’s grandmother featured in the bottom middle and two dresses worn by Grace Kelly in “High Society”. One “High Society” dress inspired the fabric and simple bound edges, the other the slimmer sleeves. The grandmother’s dress inspired the overall feel and shape. The modern bride shows a hint of the V-neck style and the open front of the overdress.
Fabric Inspirations
Over the next few months, we will be searching for the perfect fabric. We’ll be looking for floral motifs that are spread out (not densely packed) across a soft sheer fabric. Preferably the flowers will be white with hints of green and gold.
If the perfect fabric can’t be found, the flowers can be handmade (or cut from another source) and applied to a sheer fabric. These images show some inspirations for making fabric flowers or applying bits of trims. Preferably a gardenia-shaped flower. We can play around with placement by creating a regular pattern or having some areas more dense than others.
I guess there is no real spoiler that Cameron said “yes!” to the proposal and the dress! We were both thrilled to add her custom overdress into my calendar and to get started making the sketch a reality.
Oh my! Your method of taking photos and developing the custom croquis is how I’m doing it too! I take pictures of myself in undergarments, print them them trace around the borders to get an outline. I “designed” my first straight skirt I’m working on at the moment using this method.
Sorry for making a mess on your beautiful blog. I’m just excited!
I’m a former professional costumer and couture dressmaker for one-of-a-kind bridalwear located in rural North Carolina, who teaches custom garment sewing to sew-curious solo-sewists online.
My blog mostly follows along with the couture process of how each heirloom-quality custom wedding dress was made from idea to wedding day, as well as personal sewing projects and other couture curiosities.
Welcome to my (temporary) Sewing Studio! Come on in! I love seeing other people’s workspaces and tools, so I thought I’d show you mine. I cleaned up after a big...
Duplicating the Vintage Dress’s Pattern (without taking it apart)
In my previous post, I introduced Jenn and the custom bridal wear project(s) for her wedding weekend. Check out the full story for all the deets, but to catch you...
I Made Myself the Coolest Dress pt. 1 – Pattern Design & Mockup
Though my personal wardrobe is mostly “the dressmaker has no clothes”, when I do make something for myself, it’s usually an epic project. I’m so excited to finally share this...
I’ve been blogging for TEN YEARS now, ya’ll! In “My 10 Year Blogiversary pt. 1”, I share links to each bridal blog series that I’ve created over the past decade....
It’s finally time to share about Deborah’s wedding day! HOORAY! Deborah and Blake were married in November 2017 at a church in Greensboro, NC with the reception at a nearby...
New Bridal Blog Series: My (kinda famous) friend Jenn!
Brooks Ann, Jenn, & Charles January 2017 Going Way Back… To begin my next bridal blog series, let’s head into the Way-Back Machine. And we’ll head farther back than this...
The bridal blog series is back! In each bridal blog series, you meet a new bride and I slowly post-by-post recount the process and share the behind-the-seams story of creating...
The bridal blog series is back! In each bridal blog series, you meet a new bride and I slowly post-by-post recount the process and share the behind-the-seams story of creating...
The bridal blog series is back! In each bridal blog series, I recount the process and share the behind-the-seams story of creating a one-of-a-kind custom couture wedding dress from start...
Sally is someone special. Back in December, I got an email from a dear friend named Sally that I had lost touch with. The subject line: “dear lord i’m getting...
As it starts to get cold, it sure is nice to think about summer! Gin and tonics… BLTs… beach trips… seersucker… Earlier this year, I worked with a bride who...
They say documenting the process triples the production time. (And I work more slowly than most.) My Nimbus was cold.She needed a new coat, sooner than later.
Welcome to Part Two! I’m back to share the nerdy behind-the-seams details of creating my Vanishing Tie Top for the Precious Fabric Challenge. But this photo-filled blog post doesn’t feature...
Do you have a fabric that you’ve been SAVING instead of SEWING? Yeah. Me too. So when Whitney Luckenbill of TomKat Stitchery asked me to be a part of her...
Welcome to my (temporary) Sewing Studio! Come on in! I love seeing other people’s workspaces and tools, so I thought I’d show you mine. I cleaned up after a big...
Welcome back! It’s the series finale! In this third and final post of My Warmup Jacket series, I share the behind-the-seams details of my jacket’s construction and finishing stories!
In this second post of My Warmup Jacket series, I share the behind-the-seams details of my jacket’s patternmaking and mockup stories! And after putting this patterning post together (which was...
Welcome to a somewhat meandering story of three custom garments! This blog post loosely threads between my previous tutorial post on creating custom croquis, a couple of my “Custom...


2 Responses
Hi Brooks Ann,
Oh my! Your method of taking photos and developing the custom croquis is how I’m doing it too! I take pictures of myself in undergarments, print them them trace around the borders to get an outline. I “designed” my first straight skirt I’m working on at the moment using this method.
Sorry for making a mess on your beautiful blog. I’m just excited!
Angelina
(Beginner amateur patternmaker)
Awesome! It’s so simple and really doesn’t make sense to do it any other way. Glad you enjoy the method too!