I Made Myself the Coolest Dress pt. 1 – Pattern Design & Mockup
Though my personal wardrobe is mostly “the dressmaker has no clothes”, when I do make something for myself, it’s usually an epic project. I’m so excited to finally share this super-cool custom-designed self-drafted hand-dyed color-blocked dress with all of you!
The Event
Back in olden times (over a year ago), I was working with two brides at once (each will have a bridal blog series coming soon!) (Well, soon-ish...) I needed something for myself to wear to one of the weddings and to Asheville Frocktails. Frocktails is a magical event that started popping up all over the world (back when events were a thing) to give garment sewing enthusiasts a reason to make themselves something super-special to wear while meeting others who love to sew.
The Design
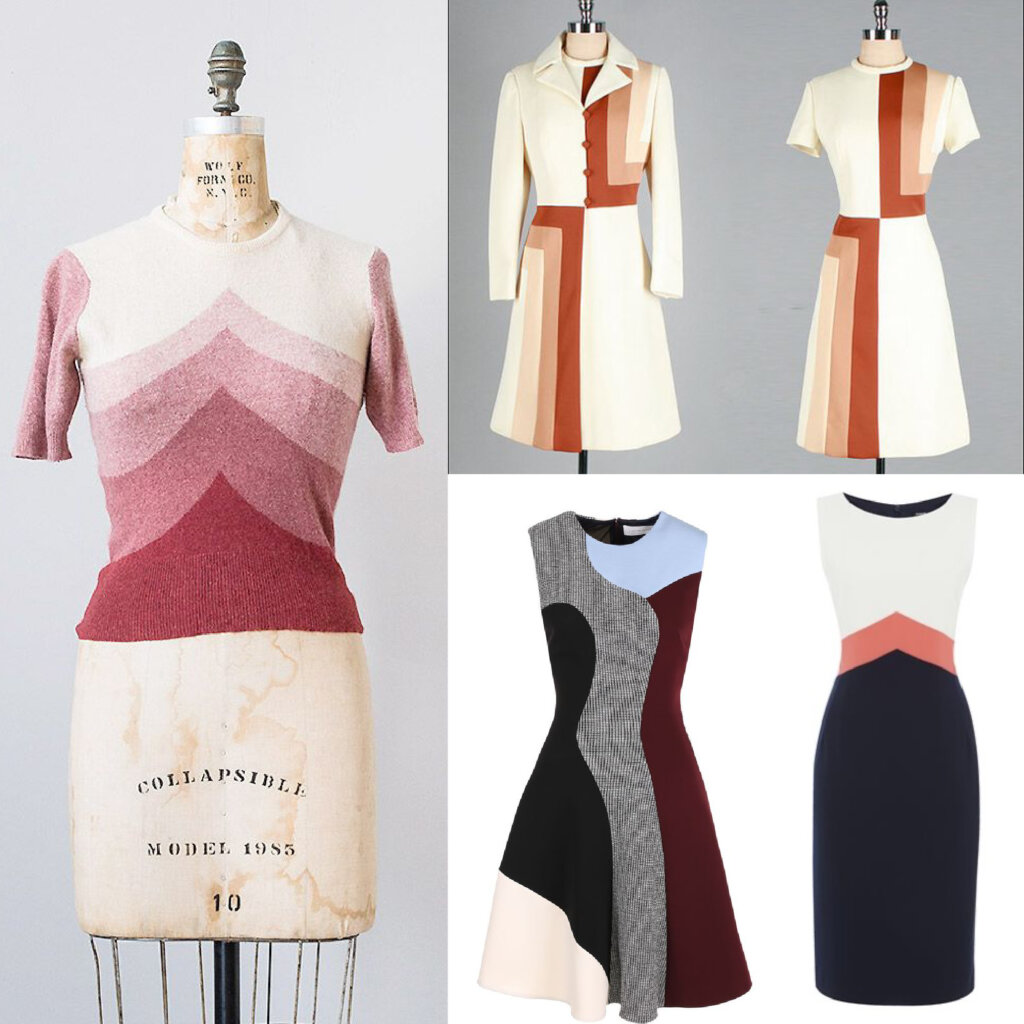
I really wanted to do some fussy custom patternmaking to make a dress that would be unlike anything you’d find via retail. I was inspired by these images to pattern a simple fitted dress and then cleverly cut it into colorful pieces.
My thought processs went kinda like this: A simple short dress could be made without much fabric…. …and as a one-of-a-kind wedding dressmaker, the leftovers in my fabric stash include some gorgeous white fabric.. …so I could to dye my own… with each piece dyed a single color of a slightly different strength to create an ombre effect…
And I was off to the races…(Dyeing will be in pt 2!)
The Patternmaking
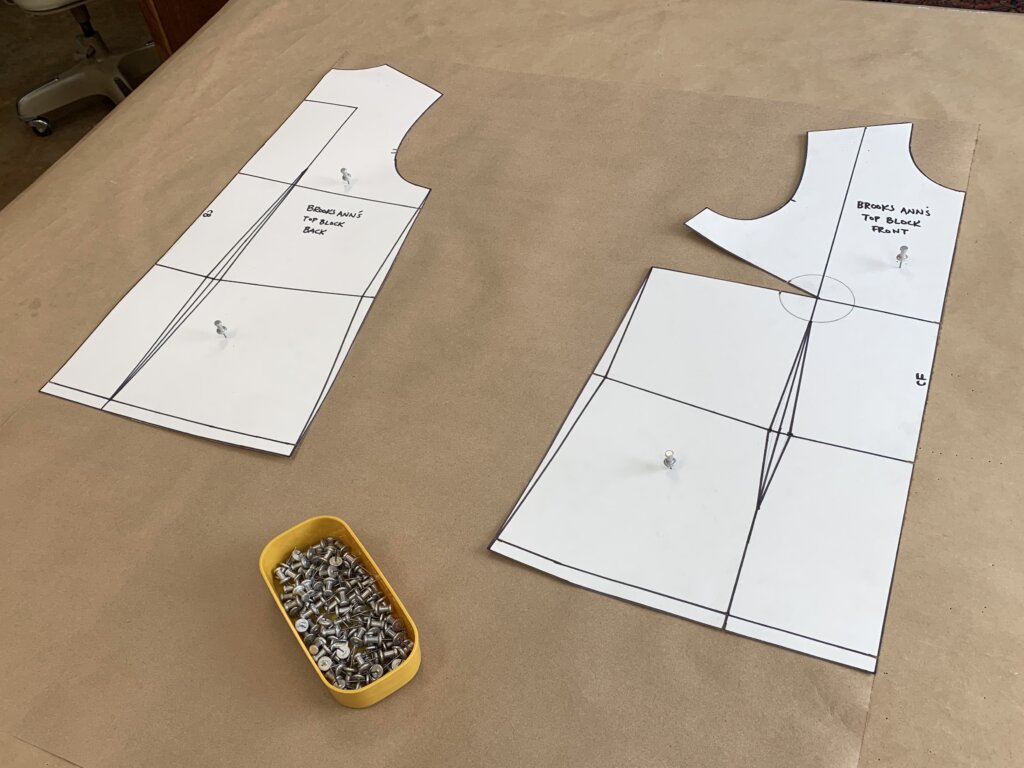
To get started, I grabbed my custom top block (created step-by-step on-camera in my self-produced eCourse Top Class). This is a blank Size-Brooks Ann template that allows me to design and draft my own patterns with a custom fit. Tracing a copy gave me my foundation.
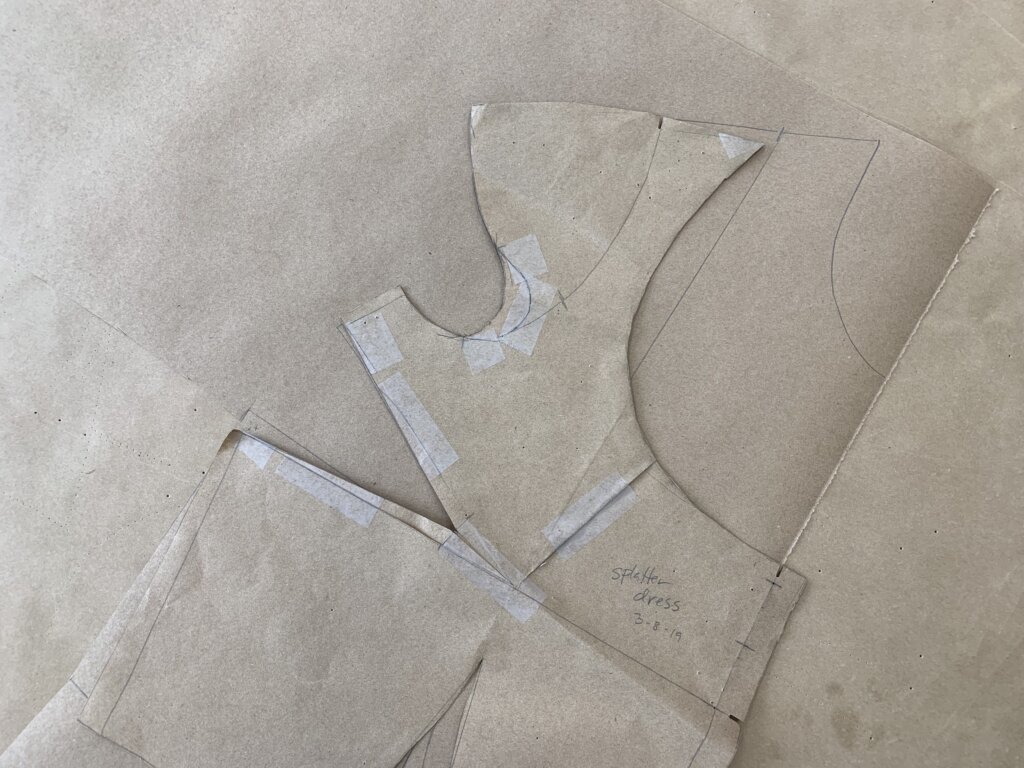
Next, I designed a new neckline and used my contouring map (also made during my eCourse Top Class) to help predict bits of my pattern that might need tiny fitting tweaks before moving into fabric. My contoured body map predicted that the cut of this design would fit best with a slightly different slope at the shoulders. Before teaching Top Class, I had never taken the time to create a contoured body map for myself (I’d just pinch out anything weird during my mockup fitting) but now I really dig having this tool for a truly custom fit.
For the next bit of patternmaking, I added a little bit of length and a little bit of style to quickly turn my “top” into a dress. And then I played around… (and must have been too “in the zone” to take photos).
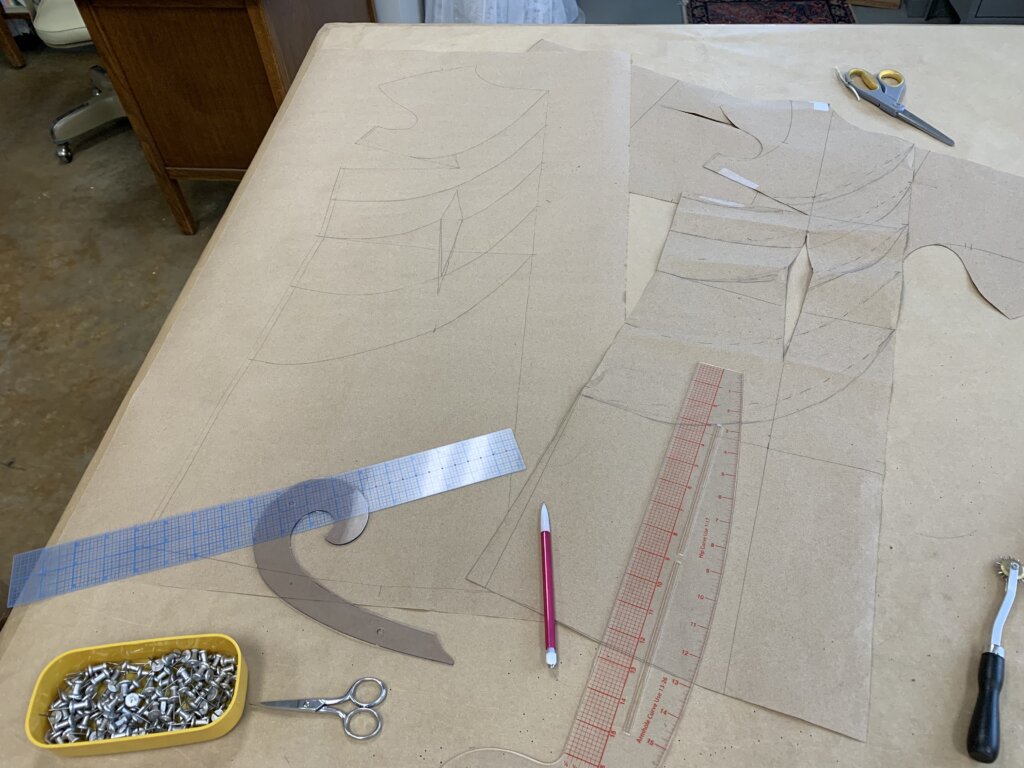
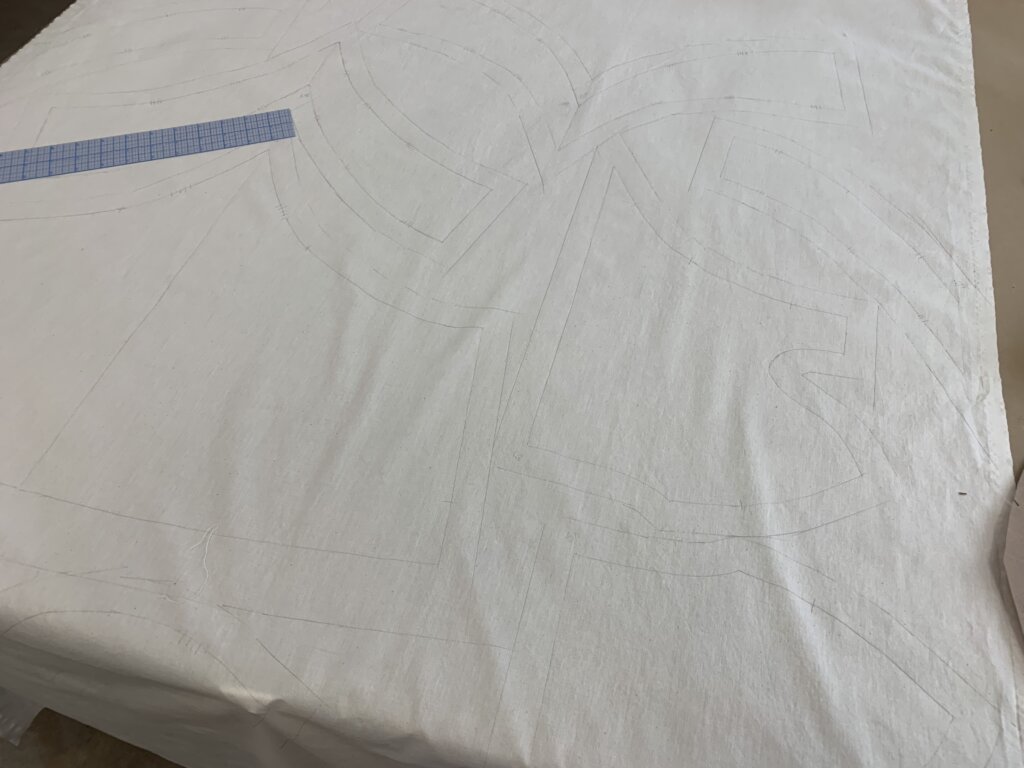
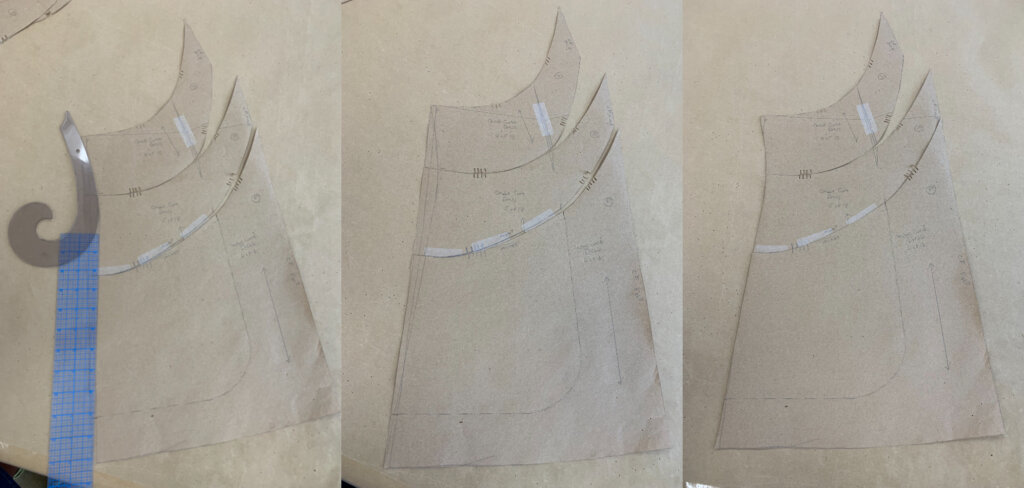
To figure out my piecing plan, I scribbled around for one million years (approximately) until I came up with something I was interested in testing. I had to use my imagination somewhat since the dart intakes will be rotated out of the pattern. There are so many seams that, with clever patternmaking, the custom block fit can be recreated without any darts.
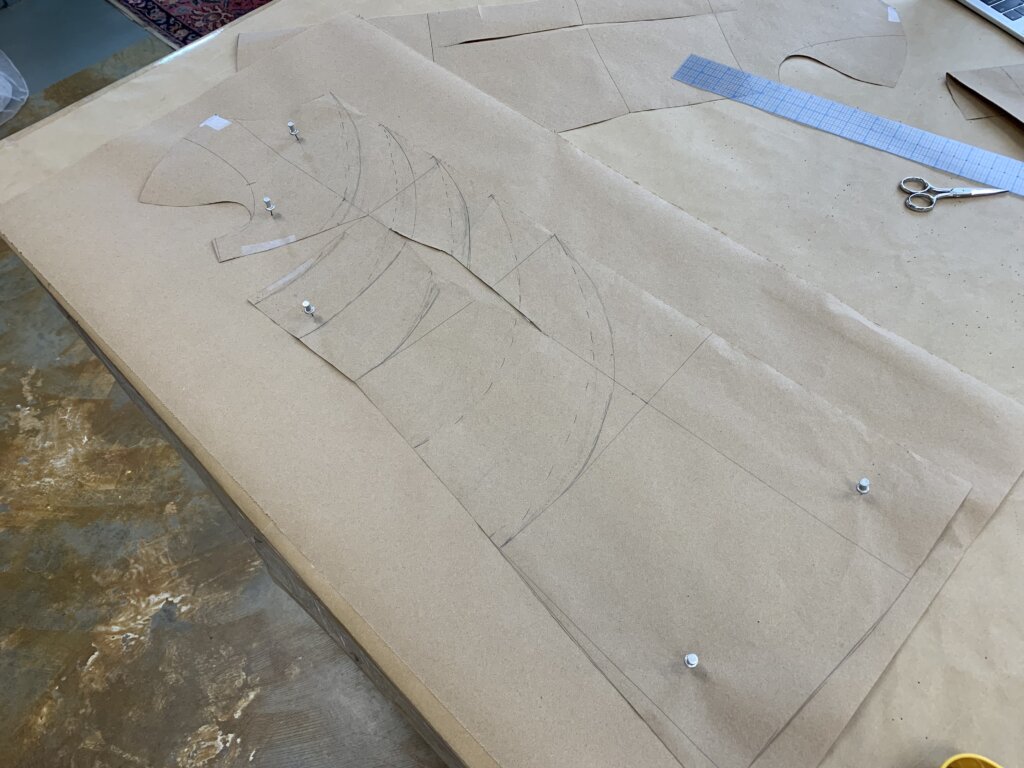
Once I was happy with my mess of lines, I copied it to a fresh piece of paper…
…giving me a messy “Master” and a clean copy to start cutting up into curves.
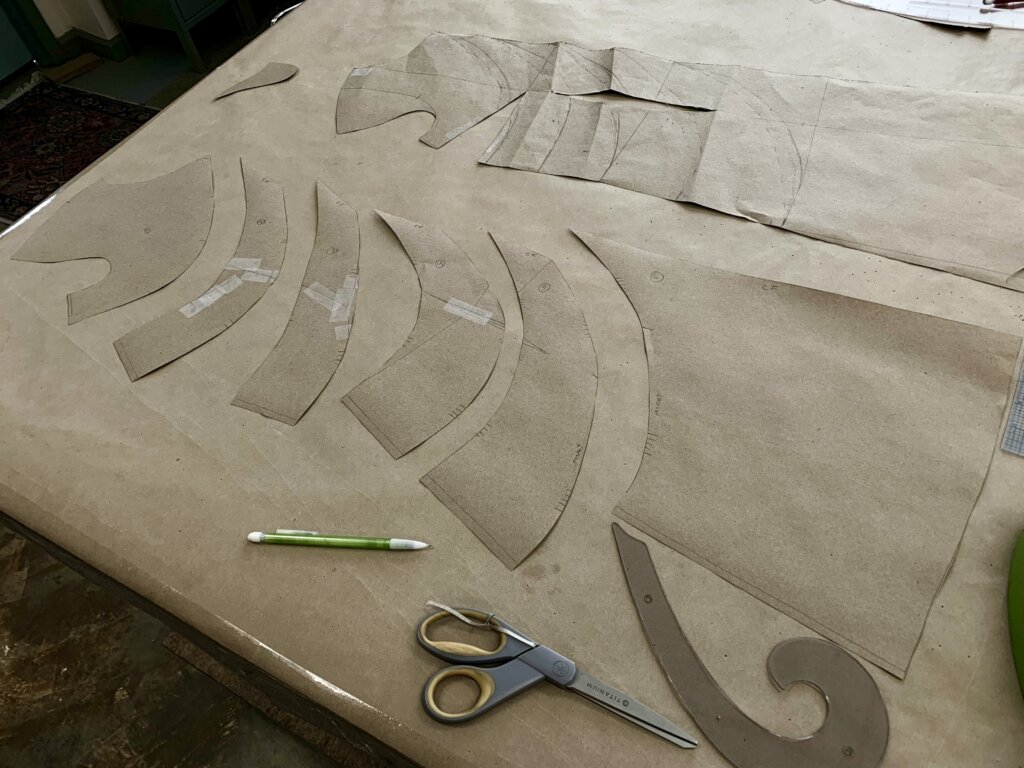
Next, I cut along my desired lines. Though some of my styled curves were disrupted by darts in the original, the cut edges of the darts were taped together to be beautifully blended into a single piece.
Same fit. No darts. New shapes.The front was looking so cool!
Next, I did the same for the back (though the back of my body has a lot less shaping than the front of my body.) I designed each curve to meet at the side seam at a right angle. Since I know this block fits my body, my only fitting adjustments will likely be about testing my preferences for “ease”- which in this dress will likely be a simple “take in” or “let out” at the sides. Designing the seams that intersect each side to meet straight-on would allow me to easily adjust the fit without disrupting my design.
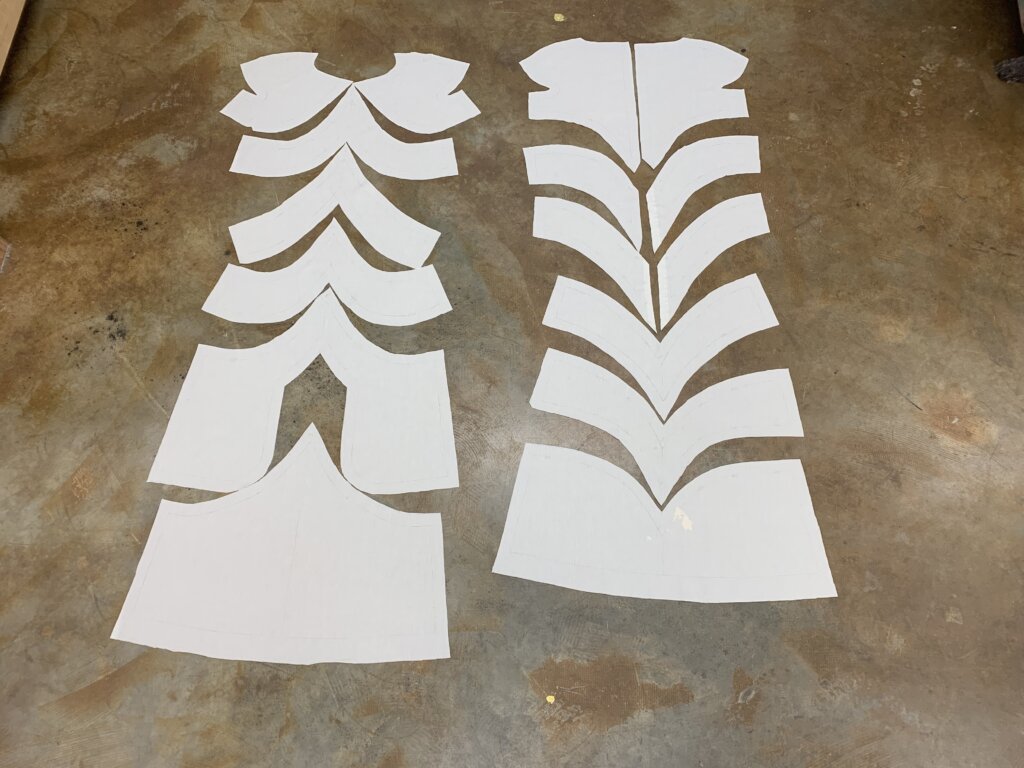
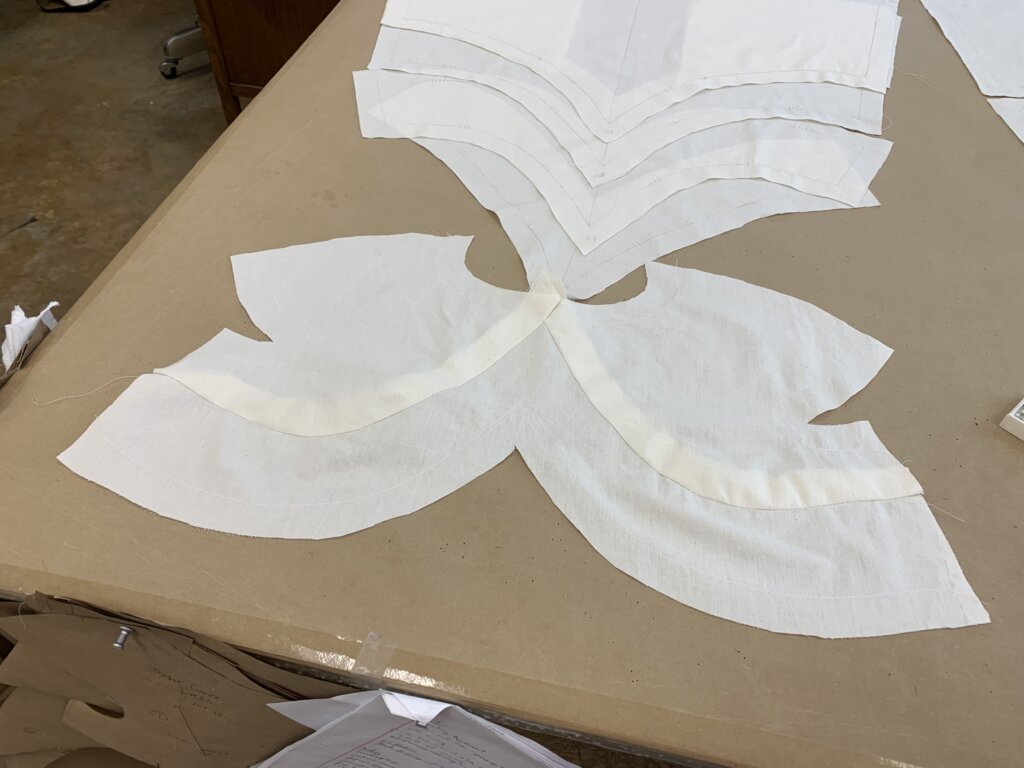
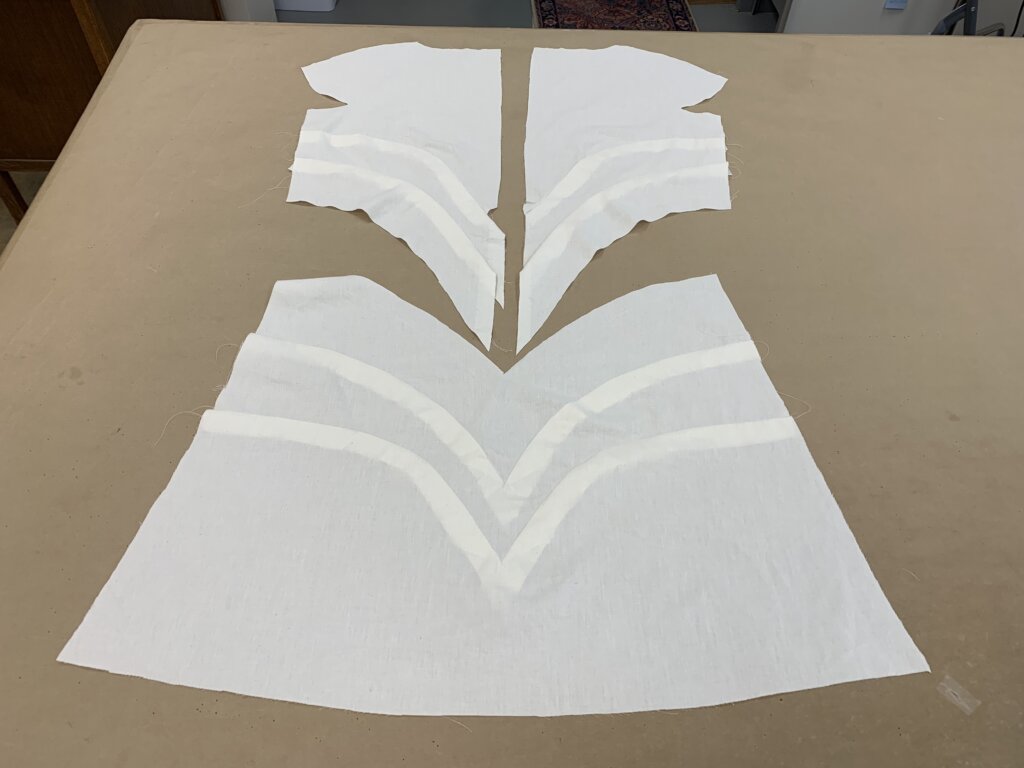
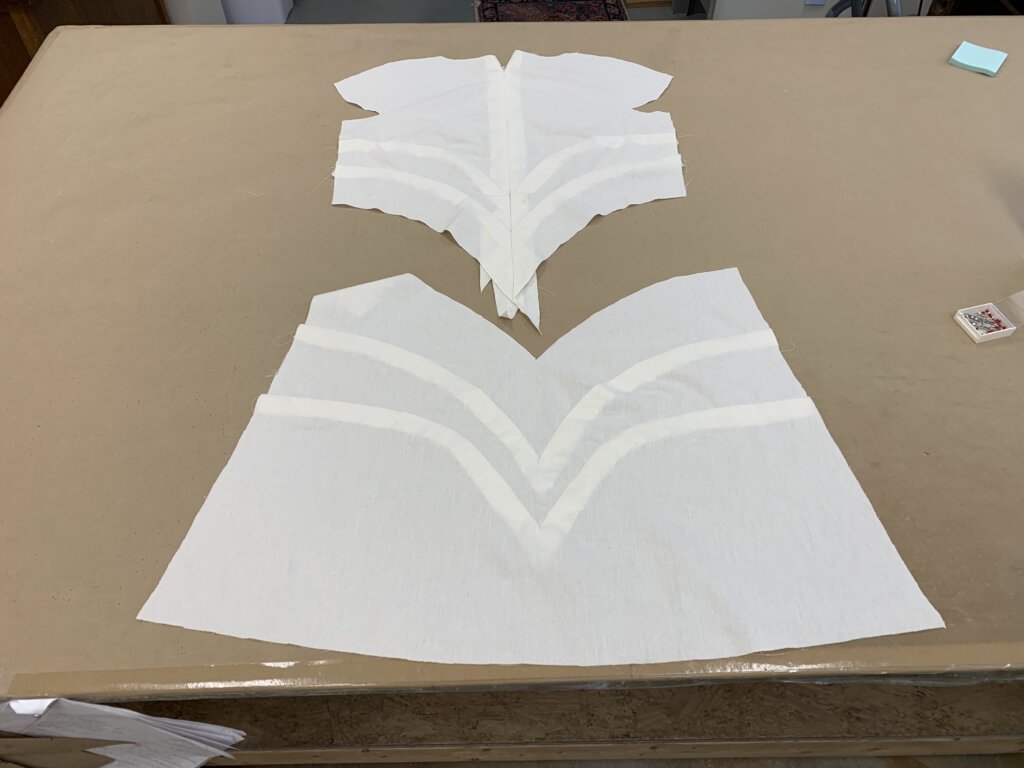
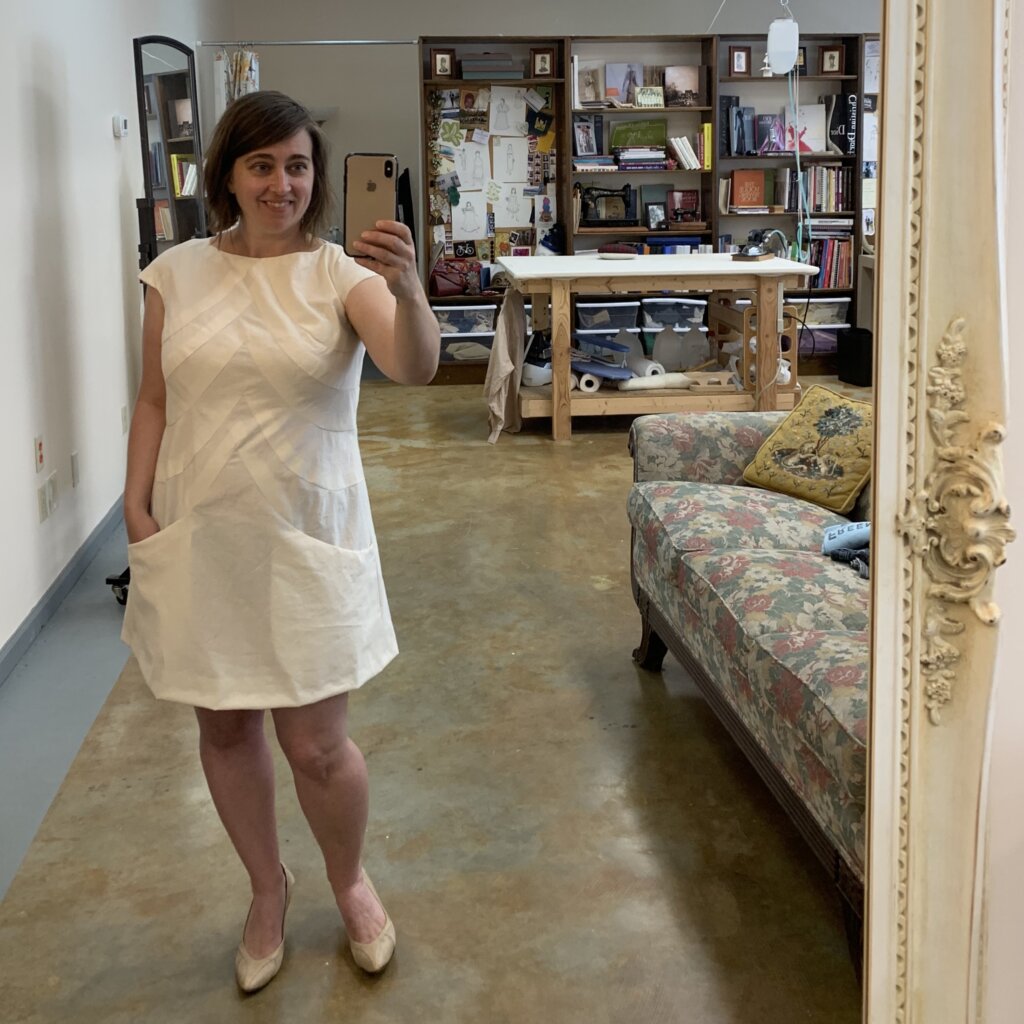
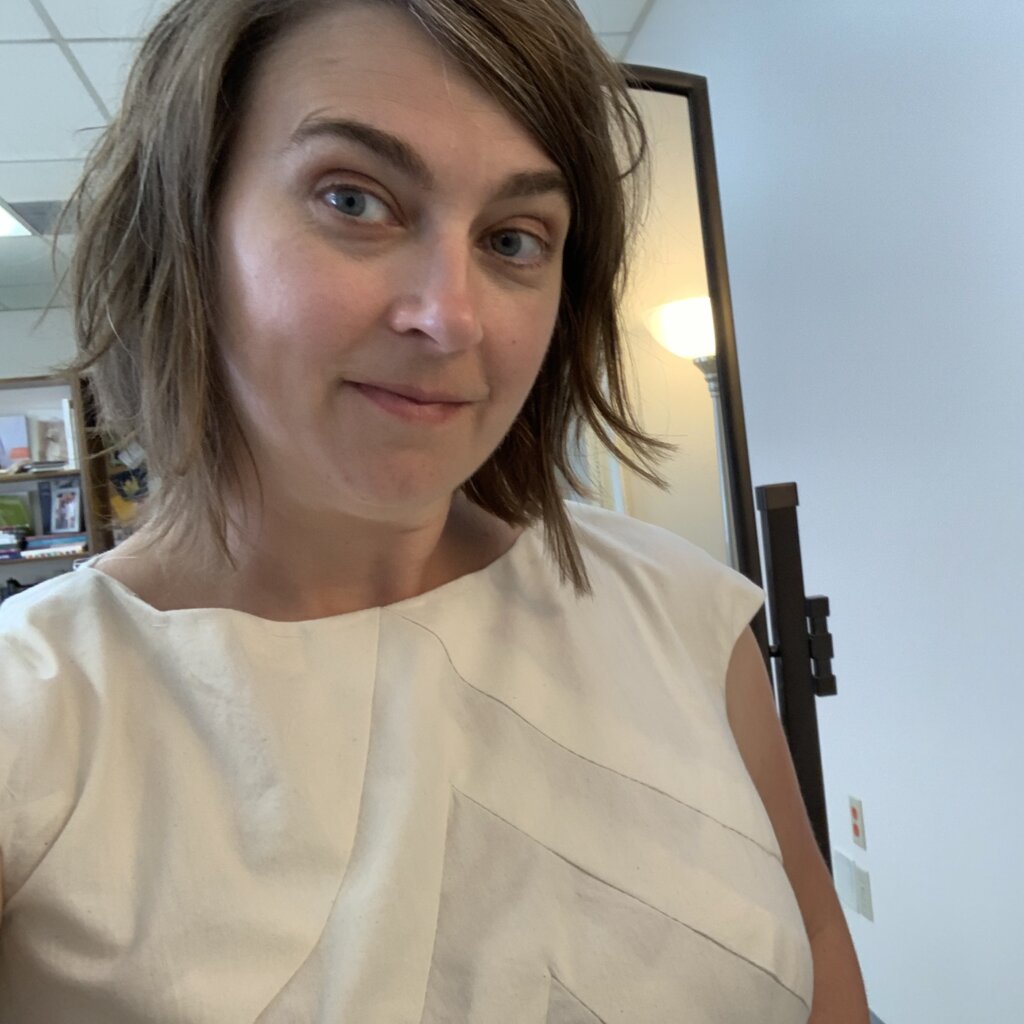
OMG! I created the coolest looking pattern pieces! (Shown on the muslin for color contrast) I love how it looks like bones. And it sets my pattern nerdy heart all aflutter to see how the front pieces look really different from each other when flat, but should appear similar when I am wearing it…
And yes, some of those pieces are pockets (!!!)
The Mockup
Next up, the mockup! The mockup stage is most often my favorite part of the custom process. It’s the laboratory time where you get to test your new pattern and your new theories. You get to find the answers to most of your questions and you get to develop and practice how everything is going to come together. With enough careful preparation, the construction of the actual garment can be very enjoyable- with little need for redos or unpicks or nervousness.
A mockup is a temporary garment made with temporary stitches. Before any dyeing and cutting adventures with my special silk fabrics, I was excited to give my new pattern a thorough test in a no-risk way!
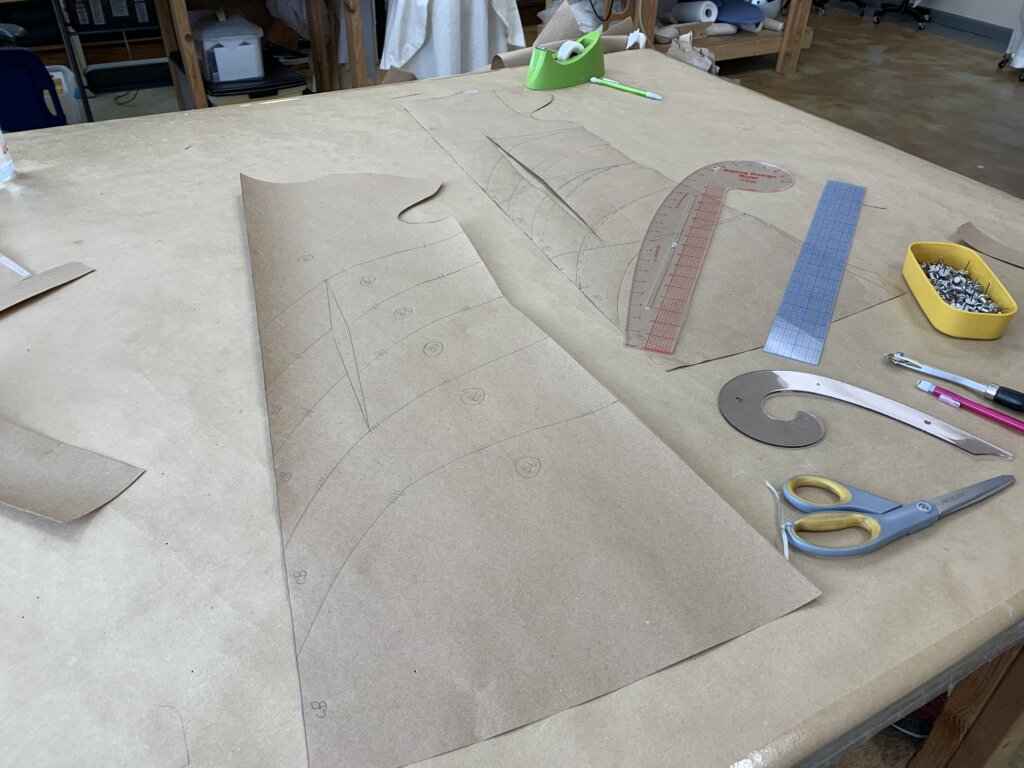
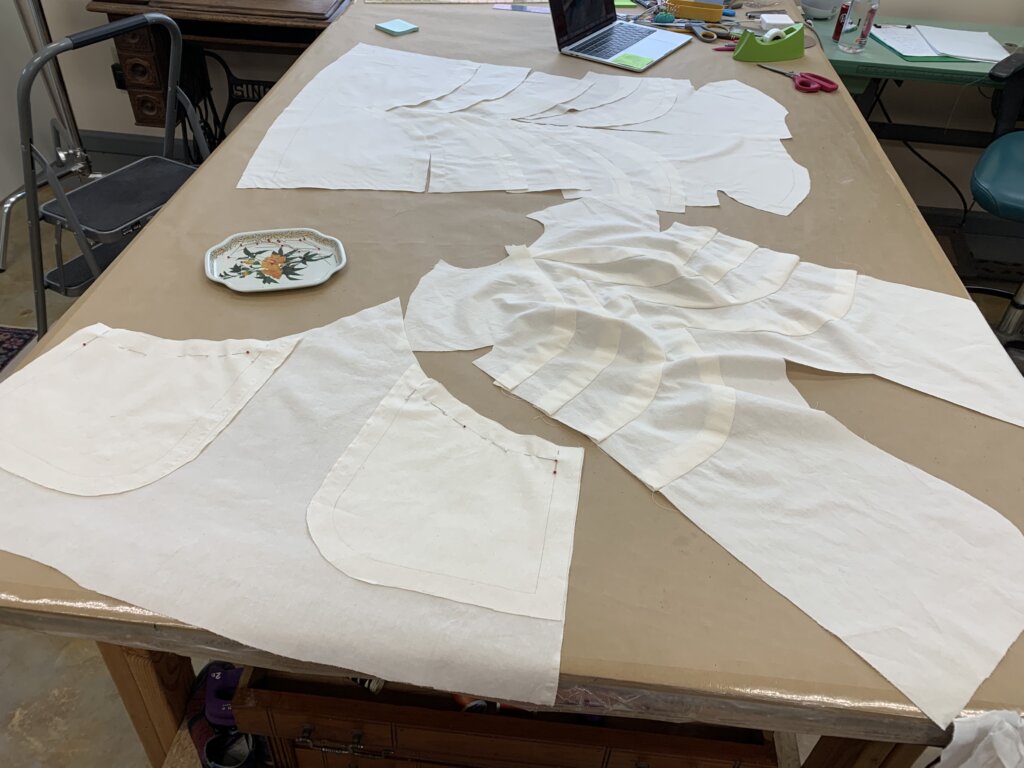
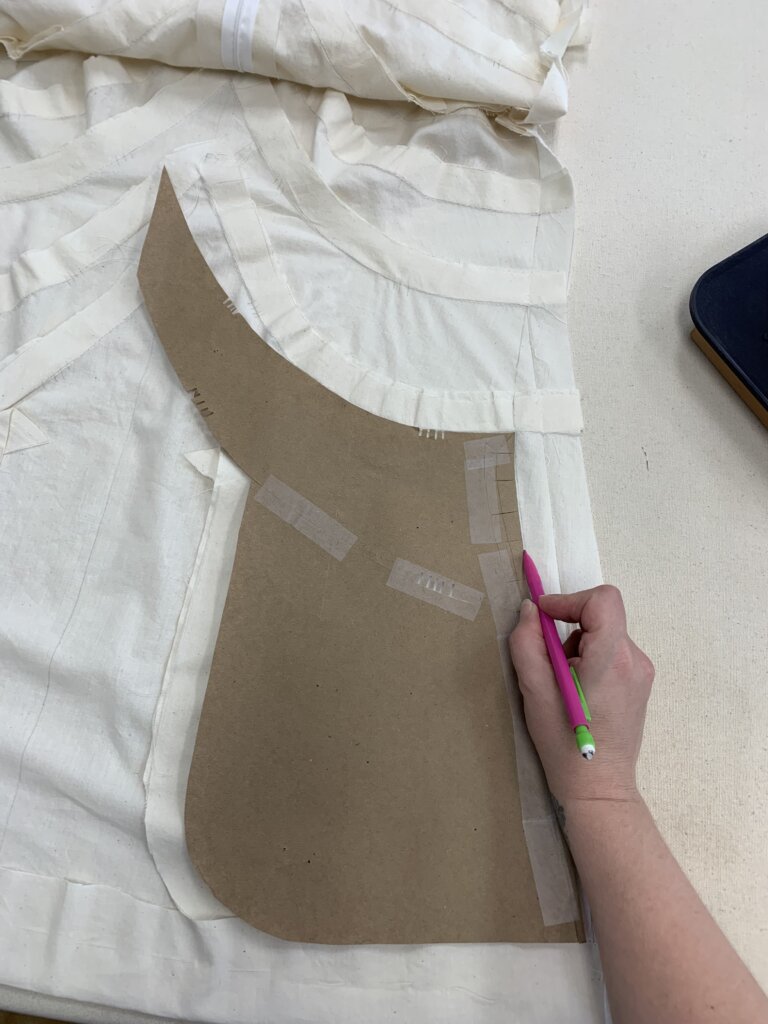
With a regular pencil, I traced around each edge of each pattern piece onto a single layer of plain muslin fabric (purchased from Mulberry Silks) while adding a 1″ border for allowances. I thoroughly enjoyed playing Tetris with my crazy shapes for maximum fabric conservation.
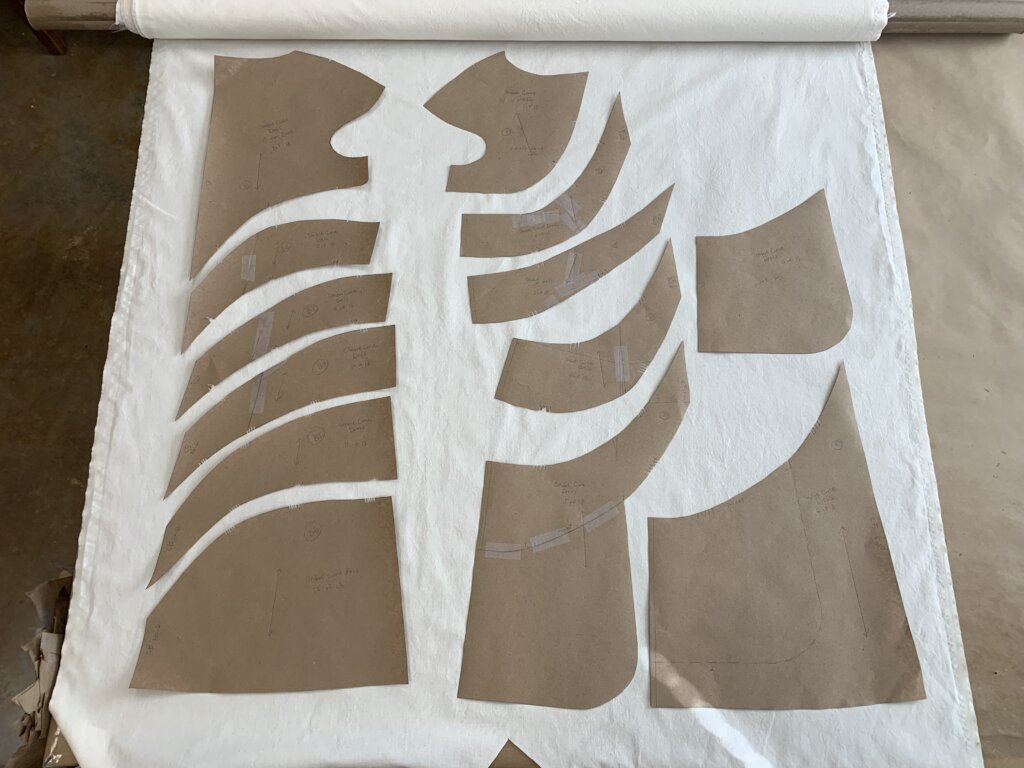
Once cut, the opposite side of the “rib bones” emerge… The peculiar shapes at the lower front will be the pockets. The upper back is split for an invisible zipper. (Aren’t the pieces so cool!?)
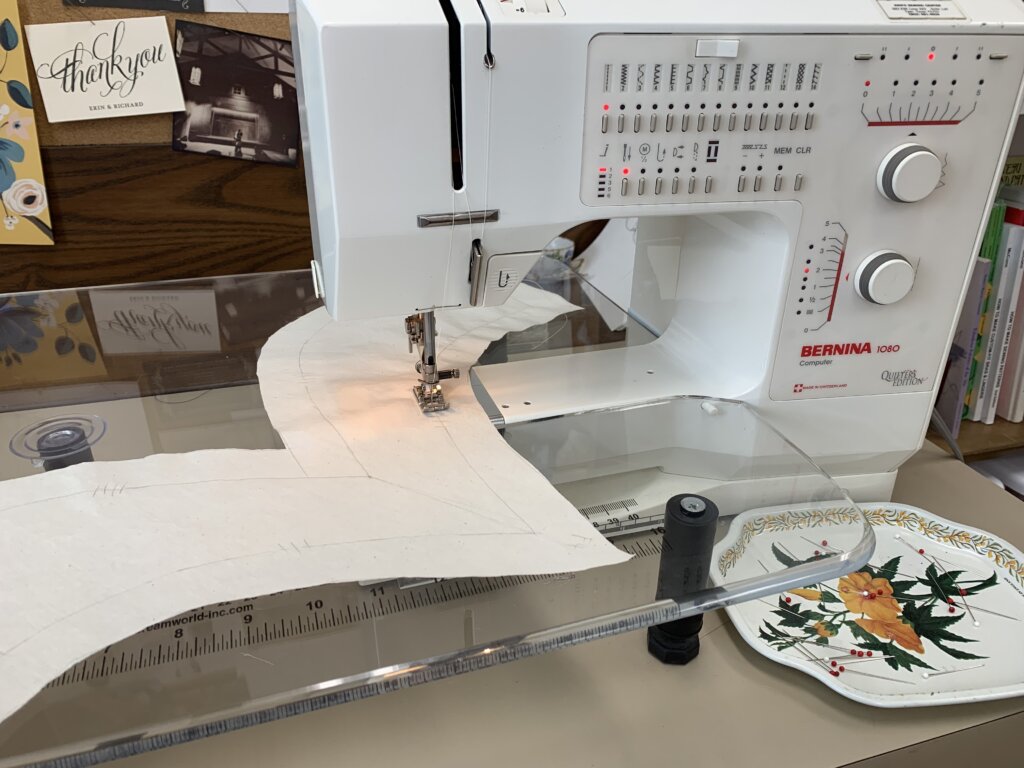
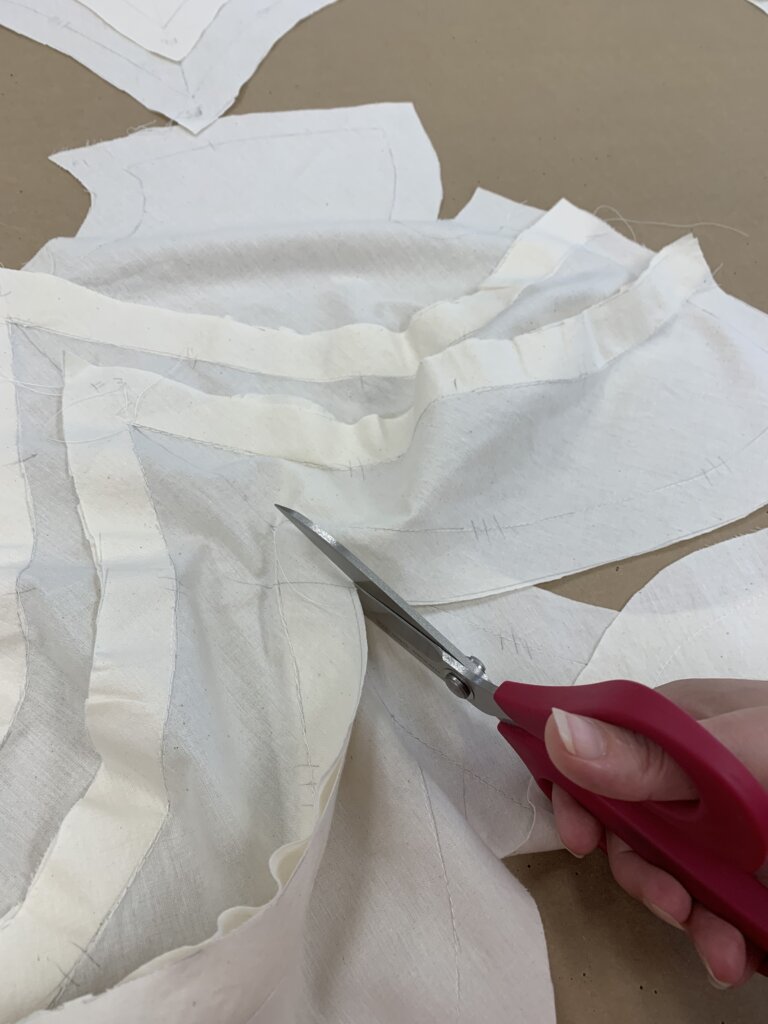
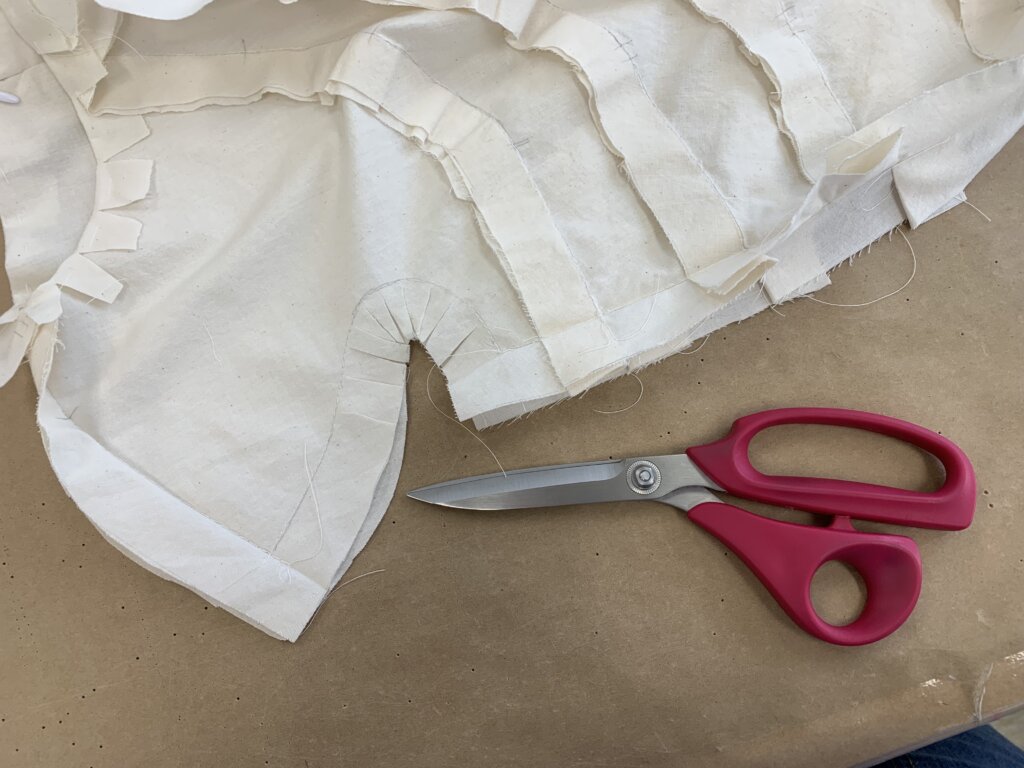
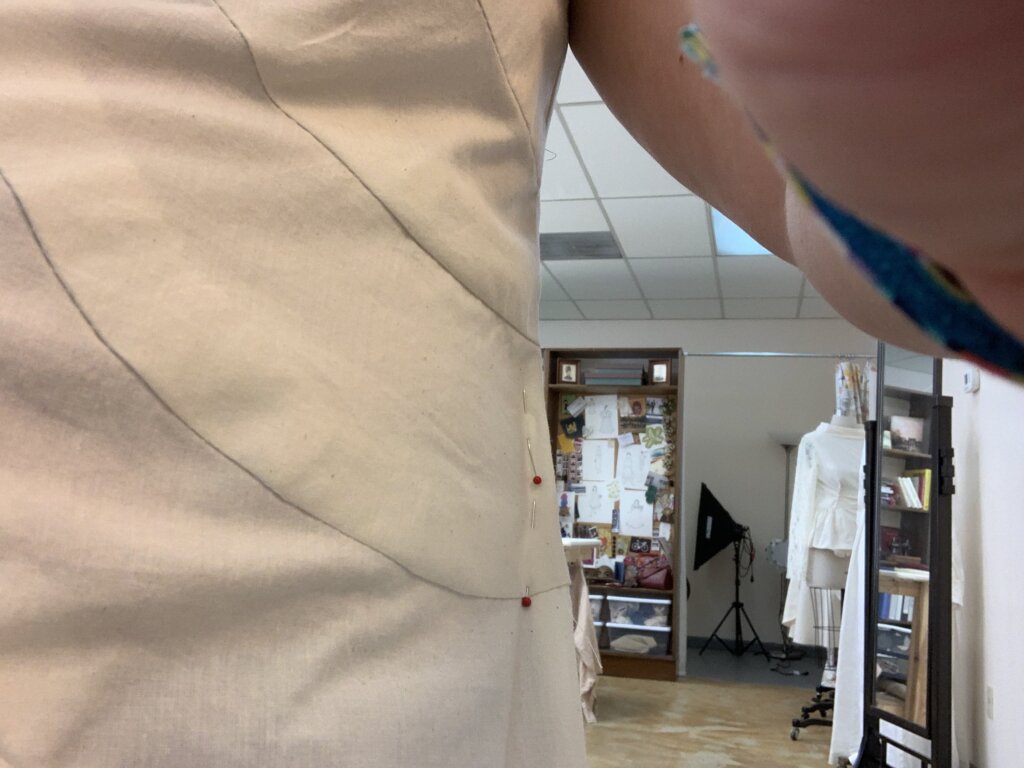
As soon as any a piece of fabric is cut, it starts to distort- and cut curves are the most susceptible to distortion. To minimize distortion to my curvy stitching lines during construction, I followed each curve with a line of “security stitches” (via a technique called “stay-stiching”).
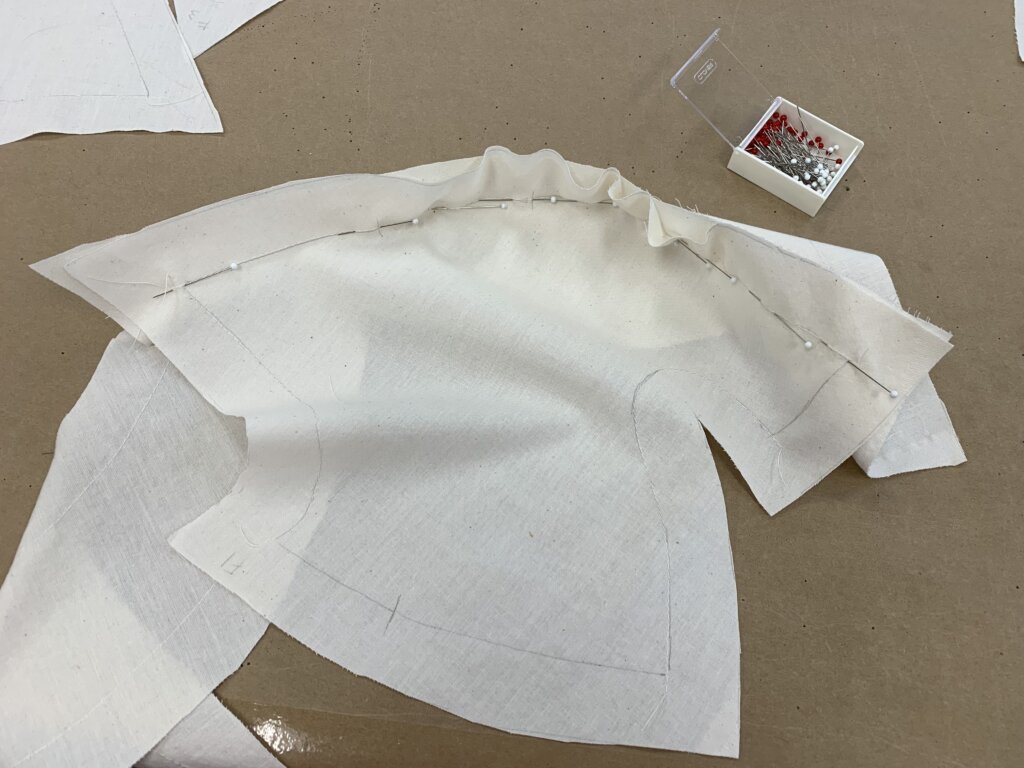
Ok! Now I’ve got a lot of pieces that look super similar but are all slightly different… To keep myself organized, I carefully and thoughtfully set up each piece where it corresponds to the dress.
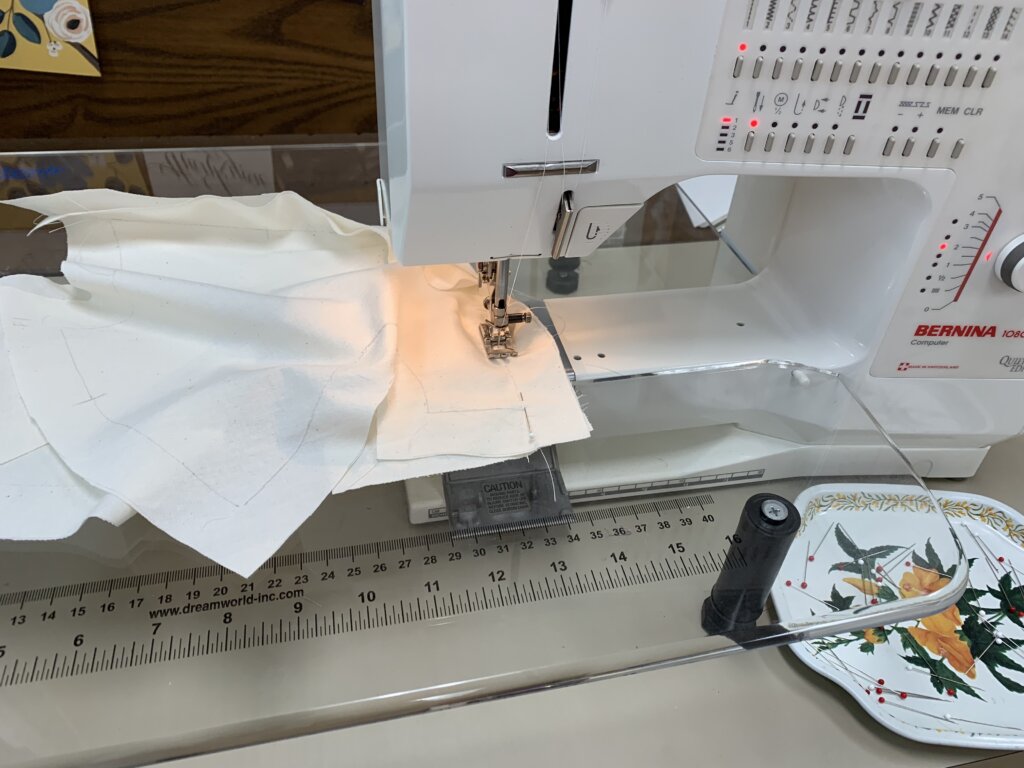
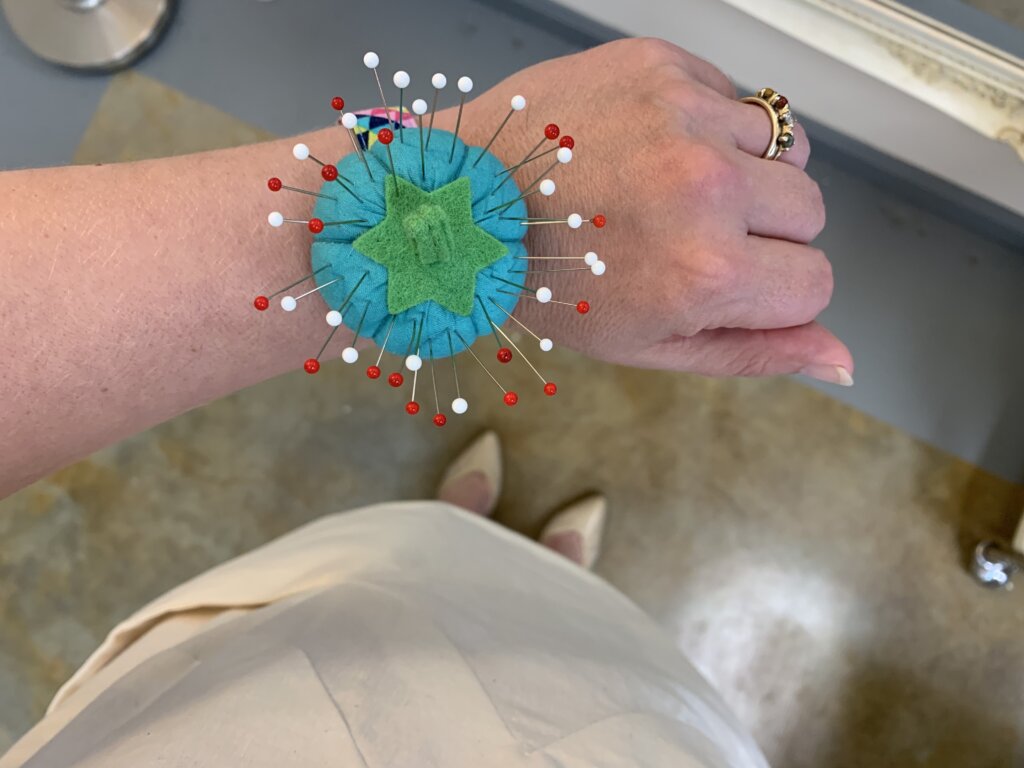
Then one curve at a time, I pinned…
(…and peeked…)
…and stitched them together, line-to-line.
One done! But that was the easy one…
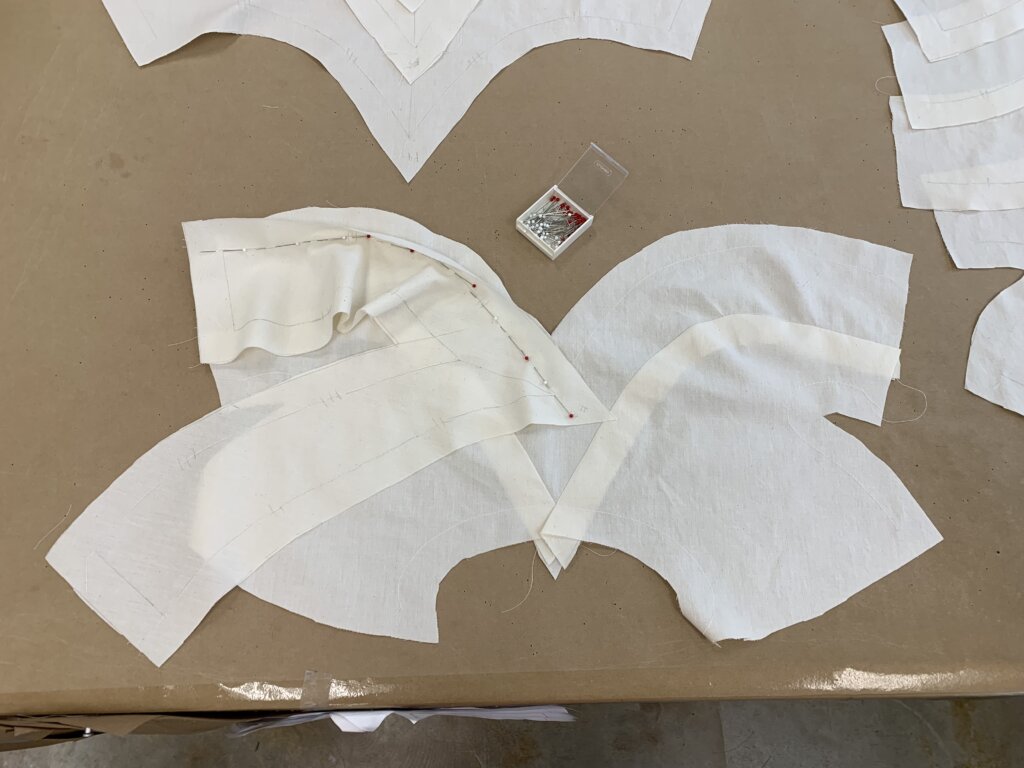
With the exception of the curve that joins at the Center Front neckline, each pattern piece curves to an inward and an outward point. For these, I pinned and stitched one side…
…then clipped through the allowance at the point on the adjoining side. This allowed me to open it up to pin and stitch the curve on the opposite side of the body, before pressing all of the allowances up.
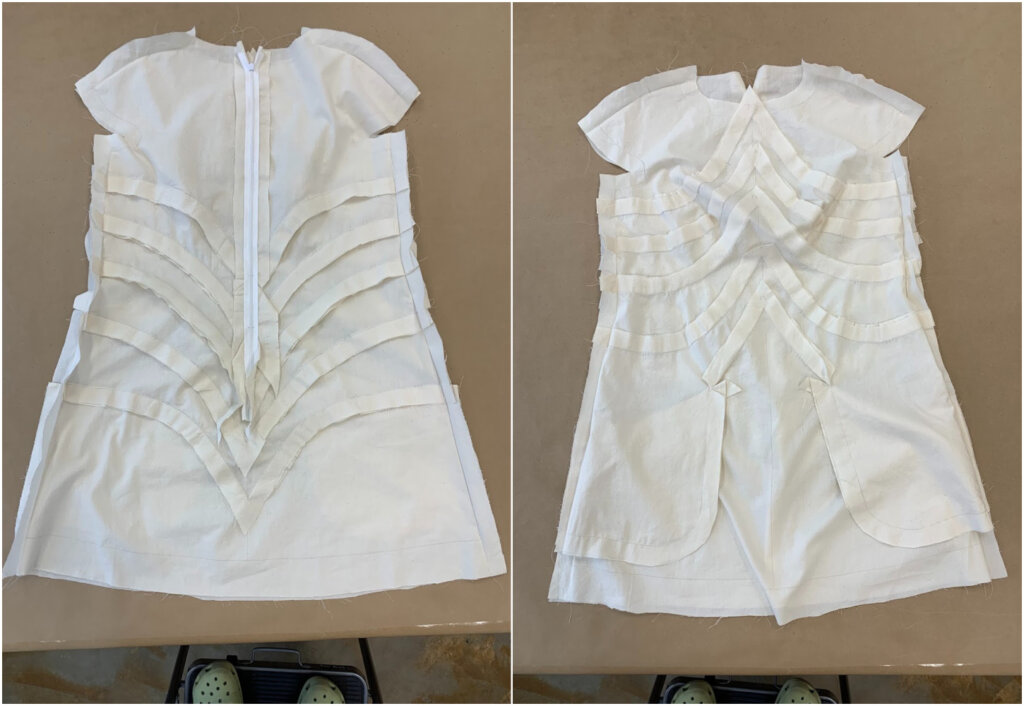
Seams and pockets in progress!
I assembled the back into 3 pieces…
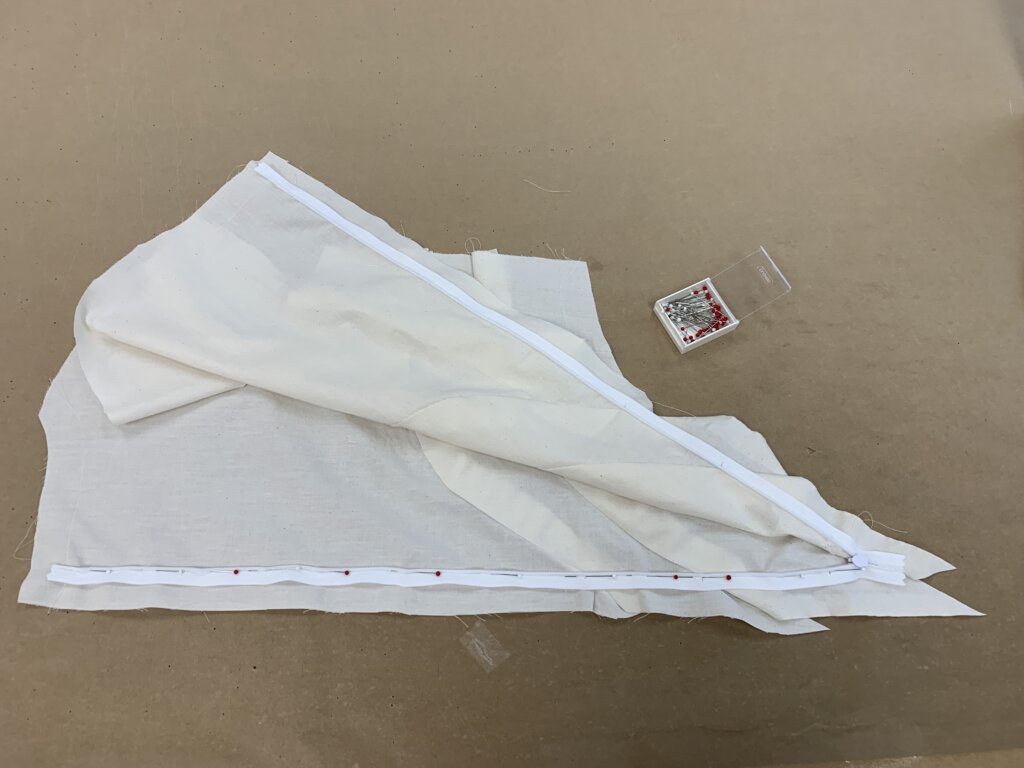
…before installing the invisible zipper…
…and joining the final curve.
The guts! (I didn’t even take a pic of the public side. To me, the insides are often the showcase!)
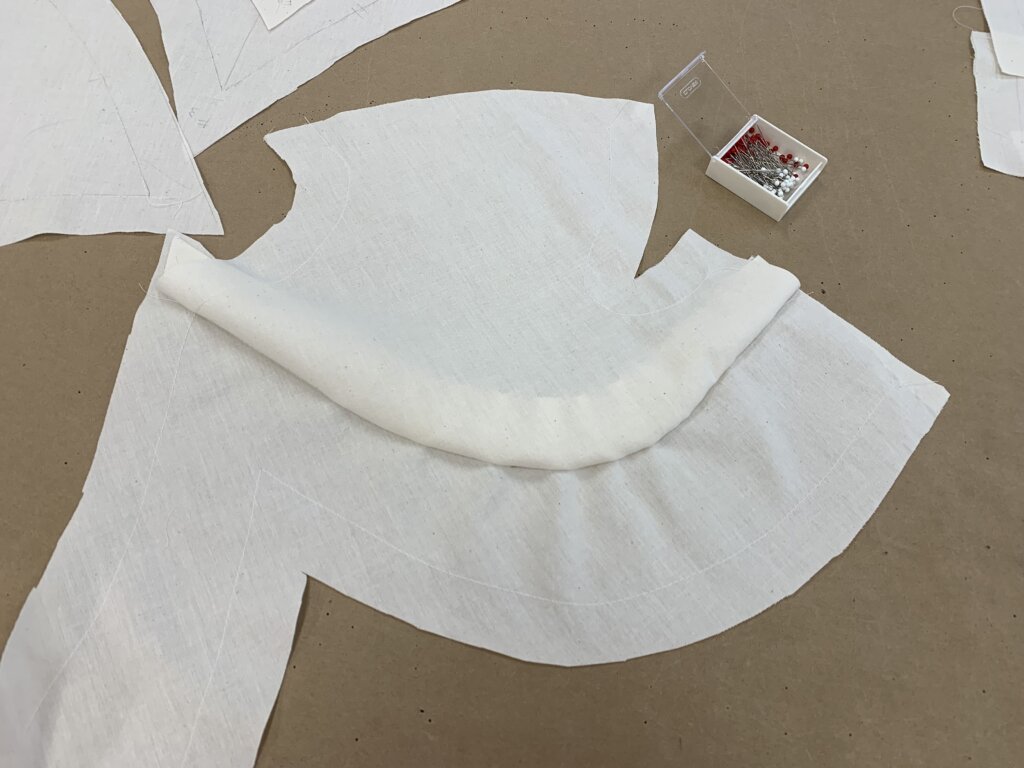
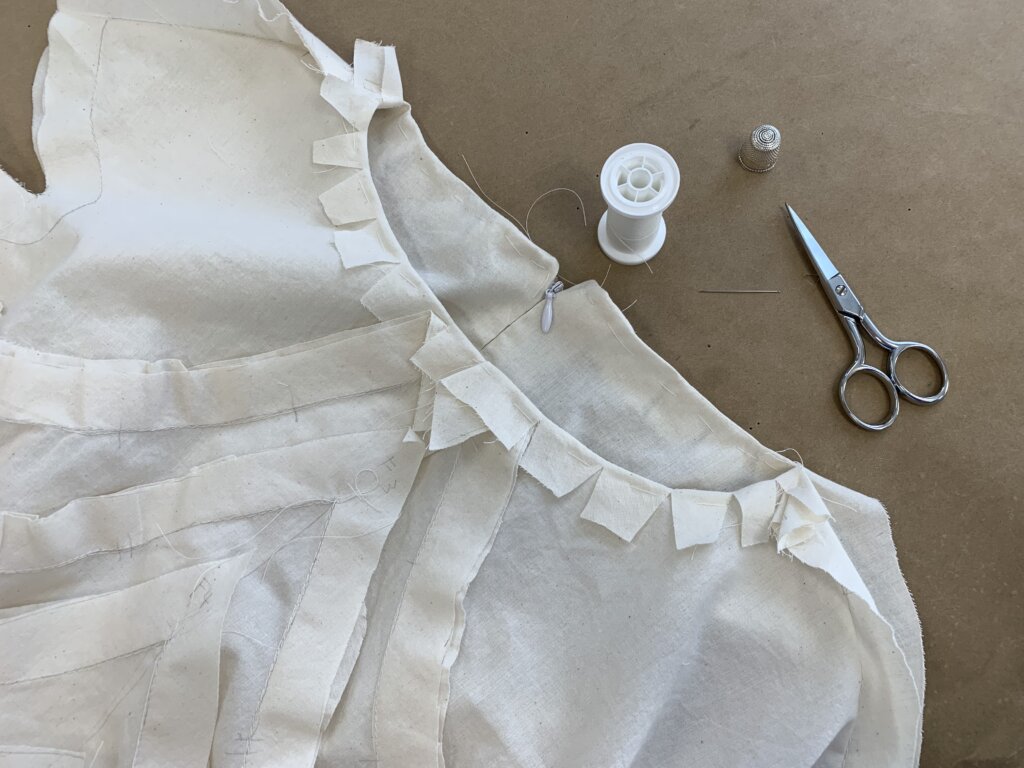
Next, I tended to the edges by clipping and hand basting back the neckline…
…and the sleeve/armhole. These were the final steps before this mockup was ready to try on!
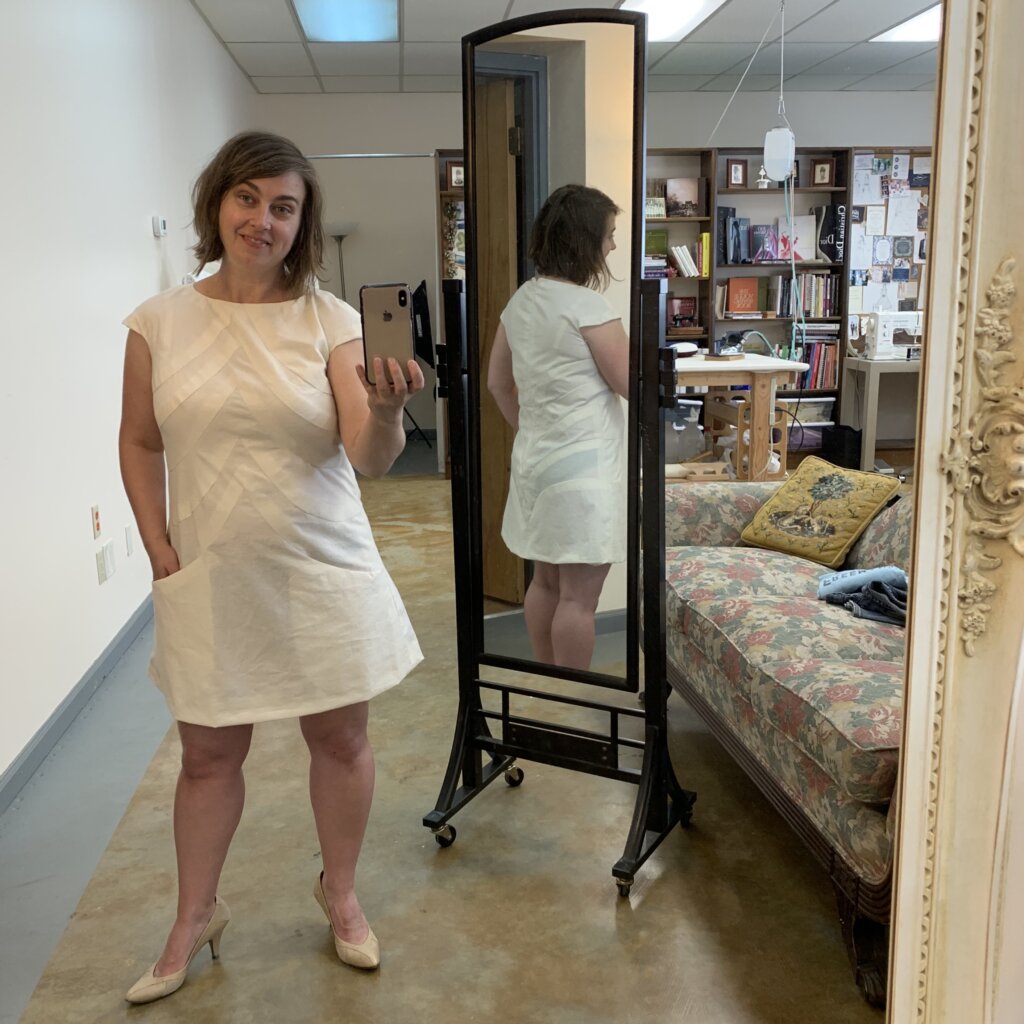
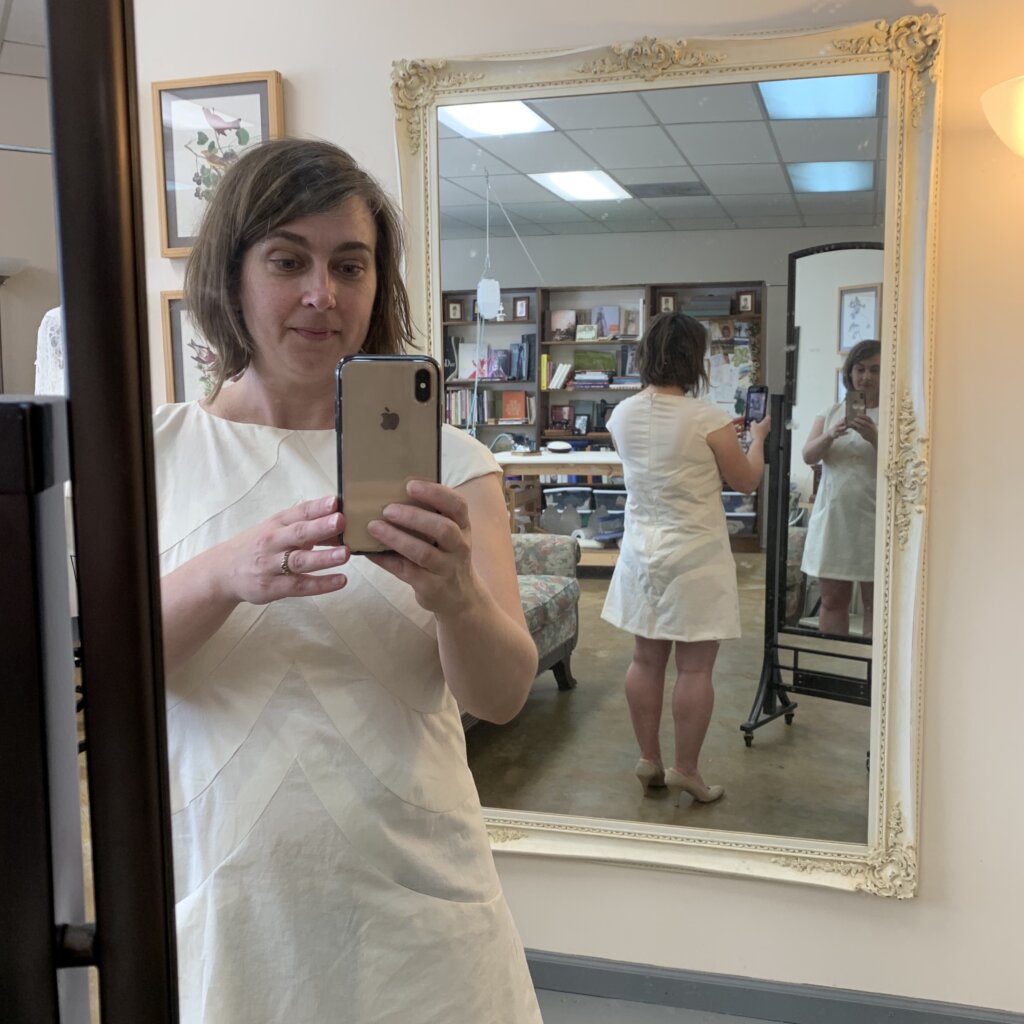
The Fitting
Ya’ll….. I loved it so much!
Though my mockup has already taught me a lot (andwill become part of the dress too!) and the fit is pretty much flawless,this is a fitting. Let’s fit!
I love fitting, so I’m often sad when something just fits, but I did feel like adjusting for a little less roominess in my design. (Behind me: a sneak peek of a mockup to be shared in my next bridal blog series.)
I transferred my improvement to the pattern pieces (including the pocket)…
… before quickly releasing the basted side seams and transferring my corrections back to the fabric to sew it up and…
I’m so impressed with your skills in sewing and all your hard work wow! From making the clothing patterns, mockup, and the dye of the dress. It’s cool to see how you made the dress from scratch. It came out amazing and looks great on you!
I’m a former professional costumer and couture dressmaker for one-of-a-kind bridalwear located in rural North Carolina, who teaches custom garment sewing to sew-curious solo-sewists online.
My blog mostly follows along with the couture process of how each heirloom-quality custom wedding dress was made from idea to wedding day, as well as personal sewing projects and other couture curiosities.
Welcome to my (temporary) Sewing Studio! Come on in! I love seeing other people’s workspaces and tools, so I thought I’d show you mine. I cleaned up after a big...
Duplicating the Vintage Dress’s Pattern (without taking it apart)
In my previous post, I introduced Jenn and the custom bridal wear project(s) for her wedding weekend. Check out the full story for all the deets, but to catch you...
I Made Myself the Coolest Dress pt. 1 – Pattern Design & Mockup
Though my personal wardrobe is mostly “the dressmaker has no clothes”, when I do make something for myself, it’s usually an epic project. I’m so excited to finally share this...
I’ve been blogging for TEN YEARS now, ya’ll! In “My 10 Year Blogiversary pt. 1”, I share links to each bridal blog series that I’ve created over the past decade....
It’s finally time to share about Deborah’s wedding day! HOORAY! Deborah and Blake were married in November 2017 at a church in Greensboro, NC with the reception at a nearby...
New Bridal Blog Series: My (kinda famous) friend Jenn!
Brooks Ann, Jenn, & Charles January 2017 Going Way Back… To begin my next bridal blog series, let’s head into the Way-Back Machine. And we’ll head farther back than this...
The bridal blog series is back! In each bridal blog series, you meet a new bride and I slowly post-by-post recount the process and share the behind-the-seams story of creating...
The bridal blog series is back! In each bridal blog series, you meet a new bride and I slowly post-by-post recount the process and share the behind-the-seams story of creating...
The bridal blog series is back! In each bridal blog series, I recount the process and share the behind-the-seams story of creating a one-of-a-kind custom couture wedding dress from start...
Sally is someone special. Back in December, I got an email from a dear friend named Sally that I had lost touch with. The subject line: “dear lord i’m getting...
As it starts to get cold, it sure is nice to think about summer! Gin and tonics… BLTs… beach trips… seersucker… Earlier this year, I worked with a bride who...
Welcome to Part 2 of the story behind making Andy’s 2019 wedding dress, where I’ll recount the testing phase of the custom process. If you’ve been following my blog for...
They say documenting the process triples the production time. (And I work more slowly than most.) My Nimbus was cold.She needed a new coat, sooner than later.
Welcome to Part Two! I’m back to share the nerdy behind-the-seams details of creating my Vanishing Tie Top for the Precious Fabric Challenge. But this photo-filled blog post doesn’t feature...
Do you have a fabric that you’ve been SAVING instead of SEWING? Yeah. Me too. So when Whitney Luckenbill of TomKat Stitchery asked me to be a part of her...
Welcome to my (temporary) Sewing Studio! Come on in! I love seeing other people’s workspaces and tools, so I thought I’d show you mine. I cleaned up after a big...
Welcome back! It’s the series finale! In this third and final post of My Warmup Jacket series, I share the behind-the-seams details of my jacket’s construction and finishing stories!
In this second post of My Warmup Jacket series, I share the behind-the-seams details of my jacket’s patternmaking and mockup stories! And after putting this patterning post together (which was...


10 Responses
So cool!
I love it too…
Comme d’habitude, une démonstration très intéressante…Merci Ann
As usual, very interesting demonstration…Thank you
Thanks for following along!
Wow this is so amazing and great to see the mechanics of it.
Thanks for following along!
Inspired! And inspiring! Great work and beautiful outcome.
Thank you!
I’m so impressed with your skills in sewing and all your hard work wow! From making the clothing patterns, mockup, and the dye of the dress. It’s cool to see how you made the dress from scratch. It came out amazing and looks great on you!
Thanks!