My 7 Year Quest to Custom Jeans (+ more about those pockets!)
Contrary to what you might think, I don’t have a lot of clothes and I tend to wear the same (old) things over and over.
Almost all of my custom garment making is for others. Even the custom clothes I have made for myself were mostly crafted on-screen while sharing with my students.
But I’m not sad about it. This couturier is a denim and t-shirt kinda gal…
Earlier this year, I quickly and quietly made myself a pair of jeans that I wore pretty much every day since the last stitch- until the hot summer weather had me reaching for skirts instead. I love my skirts, but I’m so ready for jeans weather again!
My delicious and completely custom jeans are the culmination of about 7 years of hard work!
RTW is rarely ReadyForMeToWear
Like most of you, I don’t fit into most ready-to-wear jeans.
Maybe a dozen years ago, after tedious shopping and searching (the worst!), I found one style and size of Lee jeans that felt really good on my body. I bought three pair and made only minor alterations.
Then, of course, they discontinued these jeans. The fit I’d learned to love was no longer available.
In 2014, when originally brainstorming my curriculum of online courses designed for those who sew for themselves, I envisioned teaching the three main types of patternmaking while teaching the three main types of garments.
For pants, I intended to teach how to use an existing garment as the custom starting point- via a technique I now call Ghost Patterning. (And you bet, I was going to clone those Lee jeans!)
But when I polled those early Skirt Skills alums, the overwhelming response was to stick with Flat Pattern. Everybody loved making and using their custom blocks!
I even received pleas to “avoid having people start with an existing pattern or pair of pants. Some of us don’t have pants that fit well (or if we do they are made of stretch) and that is probably why we are taking the class.”
And “Please show us how to make close-fitting jeans too. Most pants classes focus only on loose trousers.”
Notes taken.
And as someone who loves jeans and Flat Pattern, I was certainly up for the challenge!
That said, I knew I’d need to invent a whole new way to go about it …
Getting started on Smarty Pants R&D in 2015.
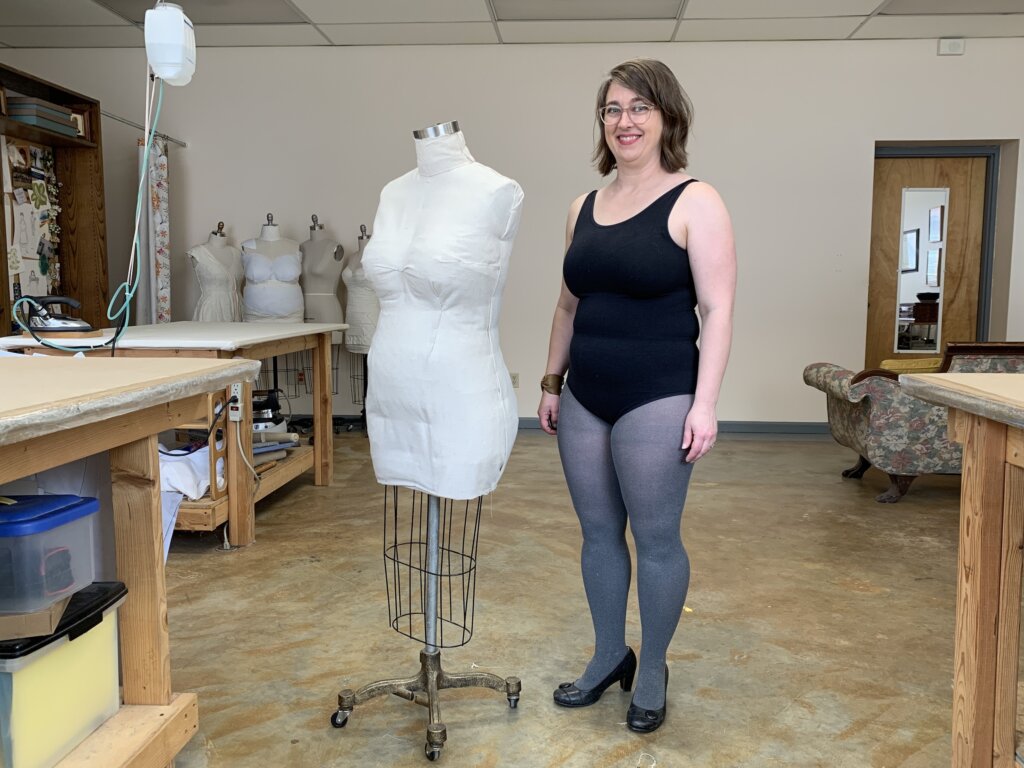
My goal was to create a simple elegant drafting system that could yield various custom pants blocks for any non-standard body by only using information from the one body itself or the wearer’s personal preferences. In all my extensive education and research, I’ve never seen this.
A patternmaking block is basically a flat blank no-style template that represents the size and anatomical characteristics of the fit model. When sewing for yourself, the only “fit model” is you!
Most (all?) block/sloper/moulage/making methods are about customizing a standard fashion formula or about adjusting the patternwork of others. This involves tweaking something originally designed for mass-production. Through my research, I had to stay really mindful to figure out if the author’s info was foundational and anatomical or if it was a “hack” or a standardized assumption.
I needed to painstakingly distill all of the “fashion industry” stuff out of the process. Sizes and ranges and averages and standards are irrelevant when you have the one body you are sewing for in front of you.
And bonus: Solo sewing allows you to do all kinds of weird things you can’t really offer in a fashion textbook!
When you hear about classes on making your own custom block/sloper/moulage, they usually share methods from fashion school textbooks. These methods ARE NOT what you’ll learn with me. Fashion formulas can be totally avoided (and counter-productive) if you are someone who is sewing for yourself! Though most other patternmaking nerds LOVE these resources, they've MADE ME FEEL SO ICKY that I’ve made it my mission to provide you AN ALTERNATIVE.
Long story (not so) short, after 6 years of testing, I was able to produce a process I feel proud to present.Learn more in the intro video for Smarty Pants (which starts in 2015 and ends in 2021!)
After all the R&D, it took me about a year to produce my eCourse Smarty Pants. On camera, I used my custom skirt block from Skirt Skills as the starting point to create my own set of three custom pants blocks: Relaxed, Semi-fit, and Fitted.
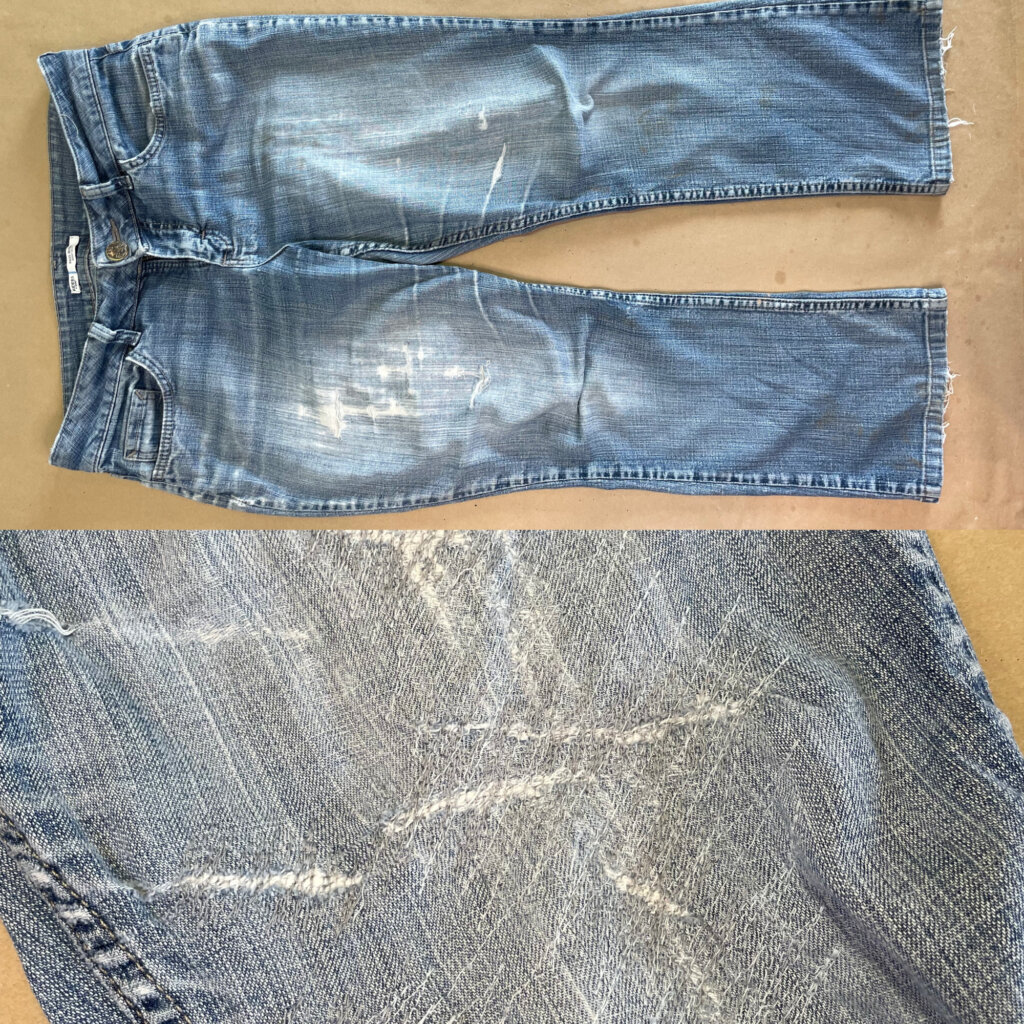
But ya’ll, for all those years, I was still wearing those cheap Lee jeans.
And after at least 10 years of near-daily wear, they were looking embarrassingly ratty. The stretched-out fabric was shredding and full of repairs…
The nature of experimenting is that you think the experiment you are working through might be your last- but it rarely is.
And I never felt inspired to go shopping, since every day I was closer to having a Goldilocks pair of custom jeans from my own self-drafted pattern…. while possibly shaking up the rigid world of fashion sewing in the process!
Worth The Wait
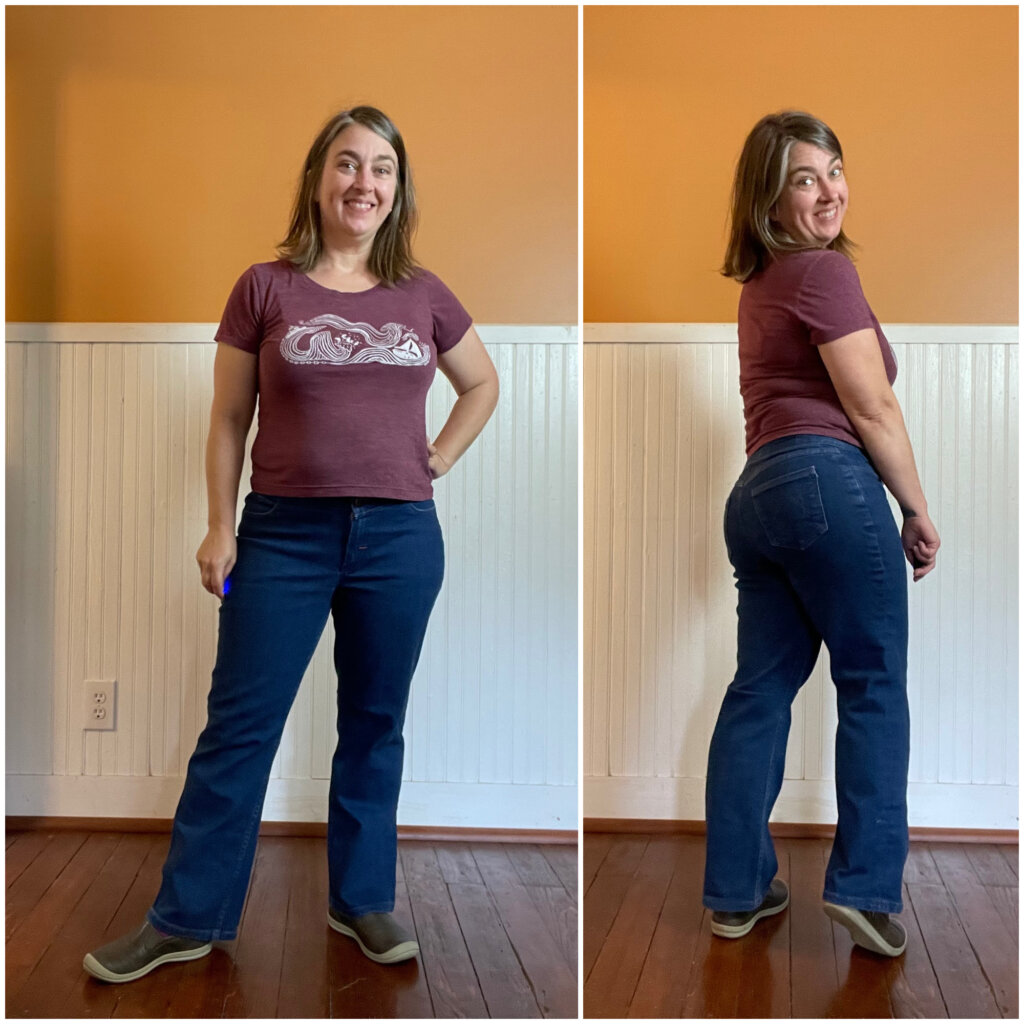
Well, I can happily say that the day arrived! My hard work and perseverance paid off in a fun quick make of the most comfortable pair of secret-pajama jeans I’ve ever worn. I am so excited to make more and to banish store-bought jeans forever!
And bonus: My students can cut to the chase! I can now share everything I learned- so that their journey to custom-fit pants won’t take them 7 years.
Talk about Win-Win!
Behind the Seams
Ya’ll, I tried HARD not to take process shots.
I’ve gotten so used to documenting every moment of my makes to share with you or with my students, that I’m totally out of practice just making myself something. I really wanted to lean into efficiency and resist the urge to share. After a 7 year wait, I wanted to be wearing this pair of jeans.
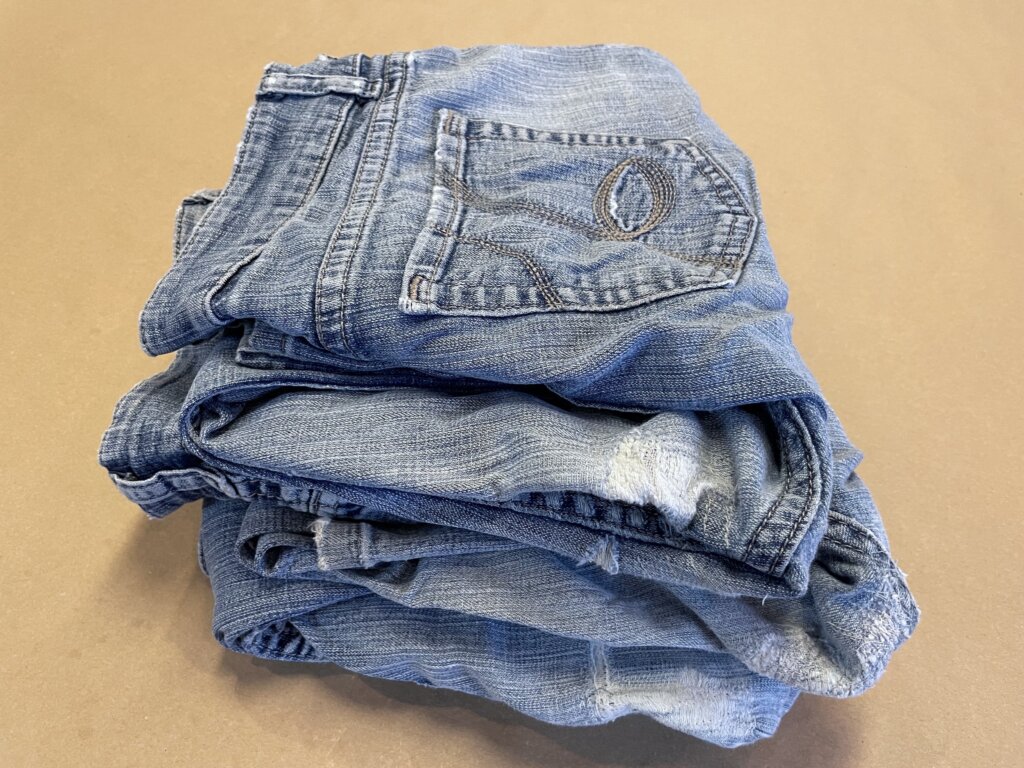
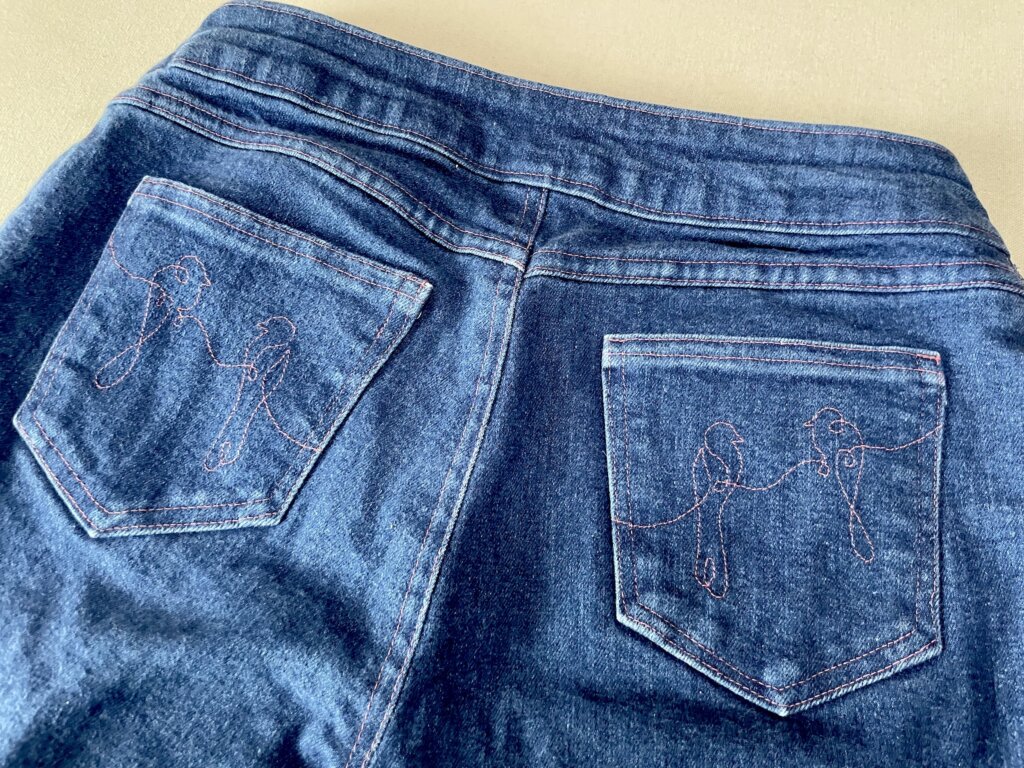
But the pocket bird thing was so fun and cool that I couldn’t resist snapping some photos- and I’m delighted to share how I made them.
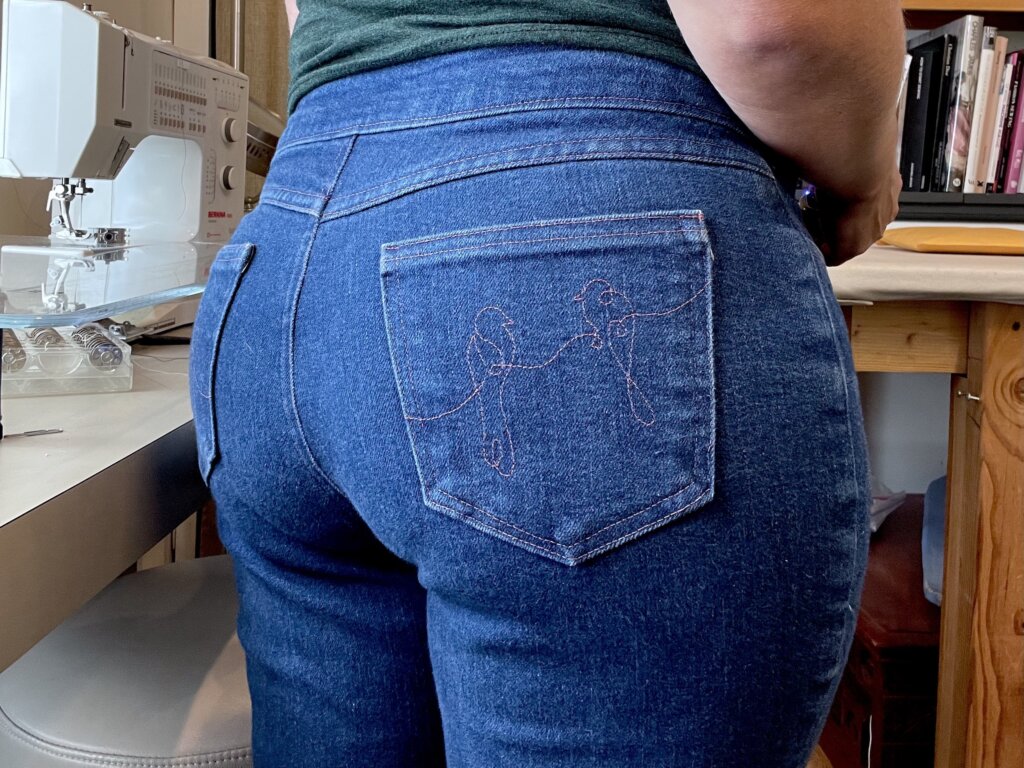
Here's how they look after lots of washes and wear. I love how they "break in" over time!
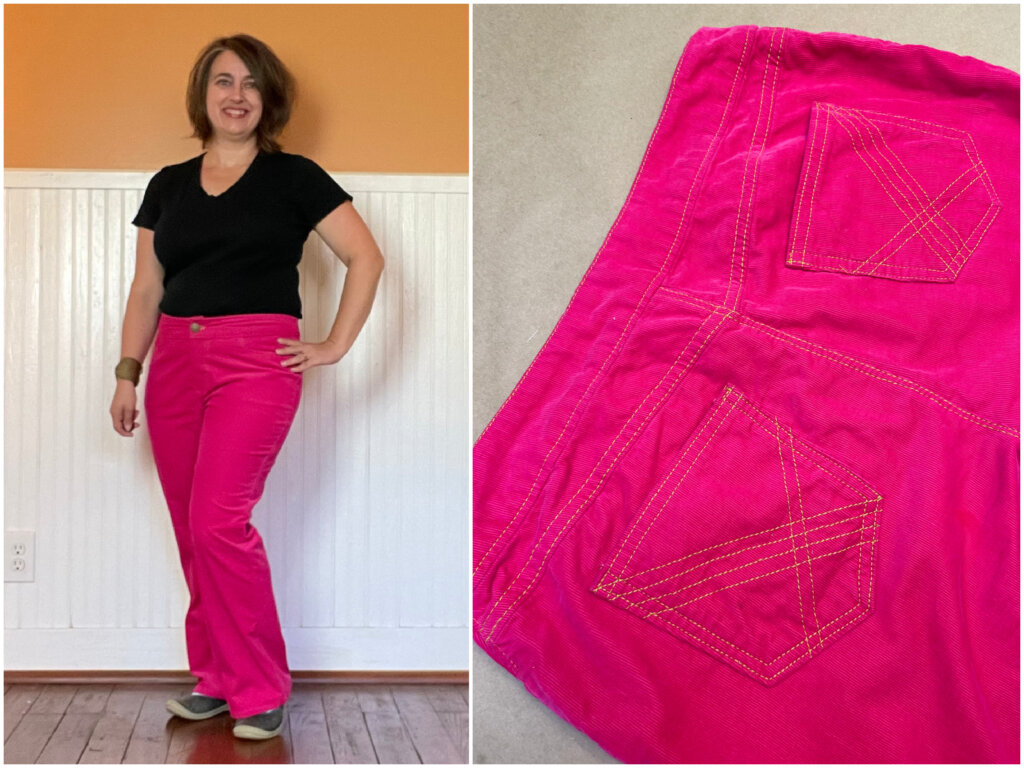
The most fun part of making your own jeans can be designing the back pockets. You can design pretty much anything and trace it with thread!
I decided I wanted a one-line design. And my husband loves birds. And he’s the one who will be looking at my butt the most!
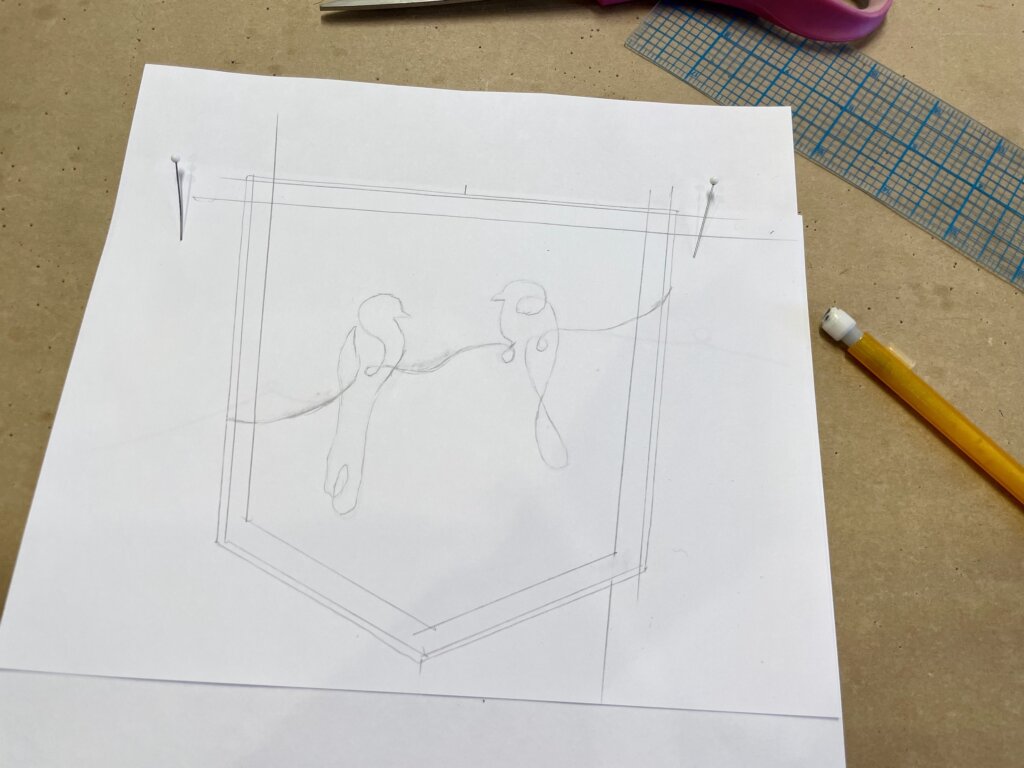
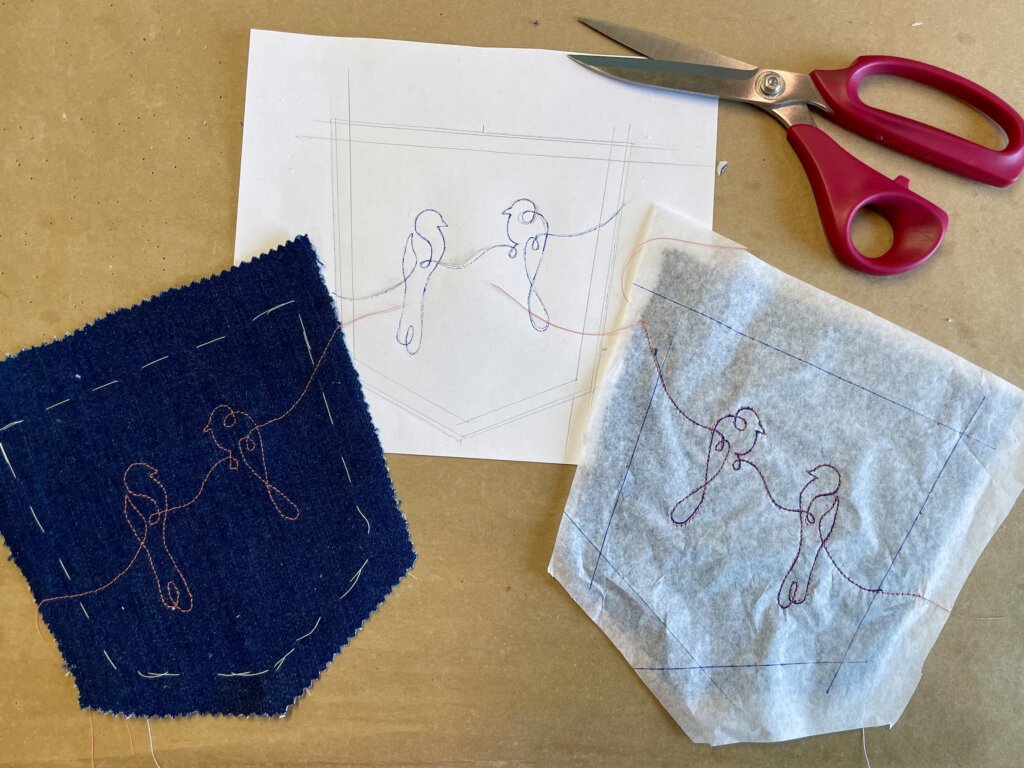
I started with an Adobe Stock photo I found online. I traced my pocket pattern onto piece of paper, including visuals of the future top-stitched construction lines.
With a full-scale visual of my blank pocket, I played around to determine the size I wanted the bird image. I’d do some measuring, scale the image, print out a test, then “try on” the printout with traced pocket.
After a few test prints and resizes, I found a “sweet spot” size and placement that made me happy. I traced the image onto the “pocket” while editing the lines to my liking.
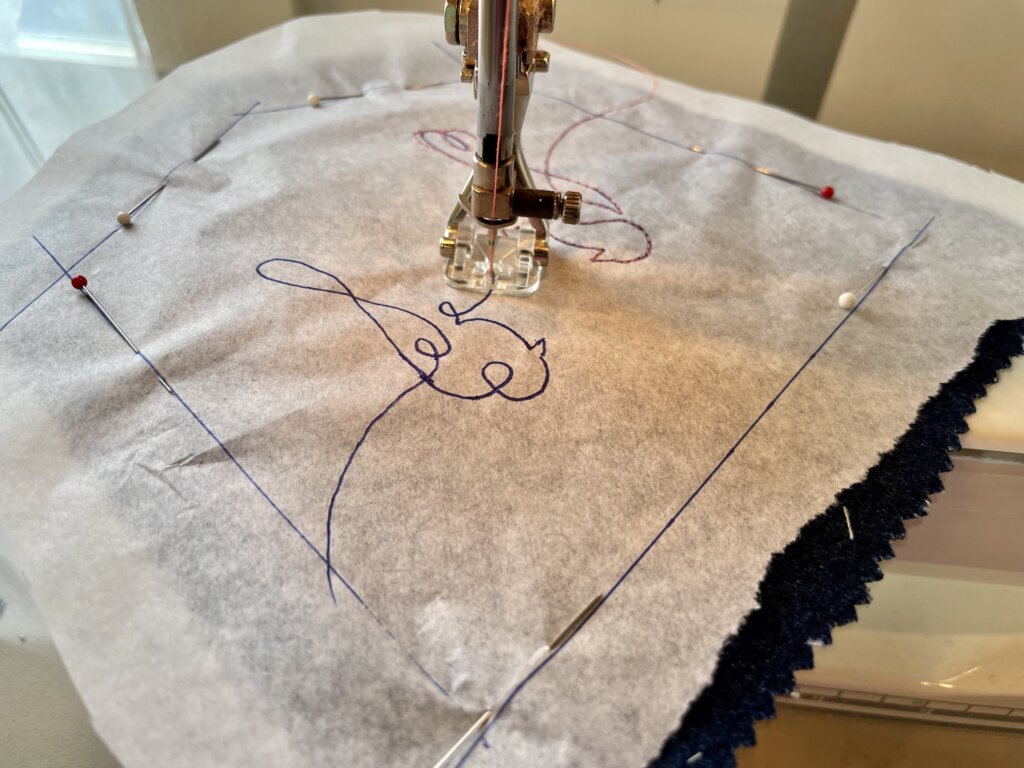
Then I noodled around with ideas for how to stitch the design on the pocket. And after some unsuccessful ideas, I came up with a tissue paper idea.
I traced my design onto the tissue paper, pinned it onto the denim pocket piece, then s-l-o-w-l-y followed the drawn line with my machine stitching, often sewing one stitch at a time.
When I’d come to a sharp turn, like the point of bird beak, I’d employ the “needle down” function of my Bernina. I’d stitch to the point of the beak, keep the needle down in the fabric, pull up the presser foot, and pivot the entire pocket on the needle. Then, I’d put the presser foot back down when facing the new desired direction, and start sewing again.
If your machine has a “knee bar” (which mine does not), you can raise and lower the presser foot with your knee, freeing up your hands to concentrate only on maneuvering the pocket.
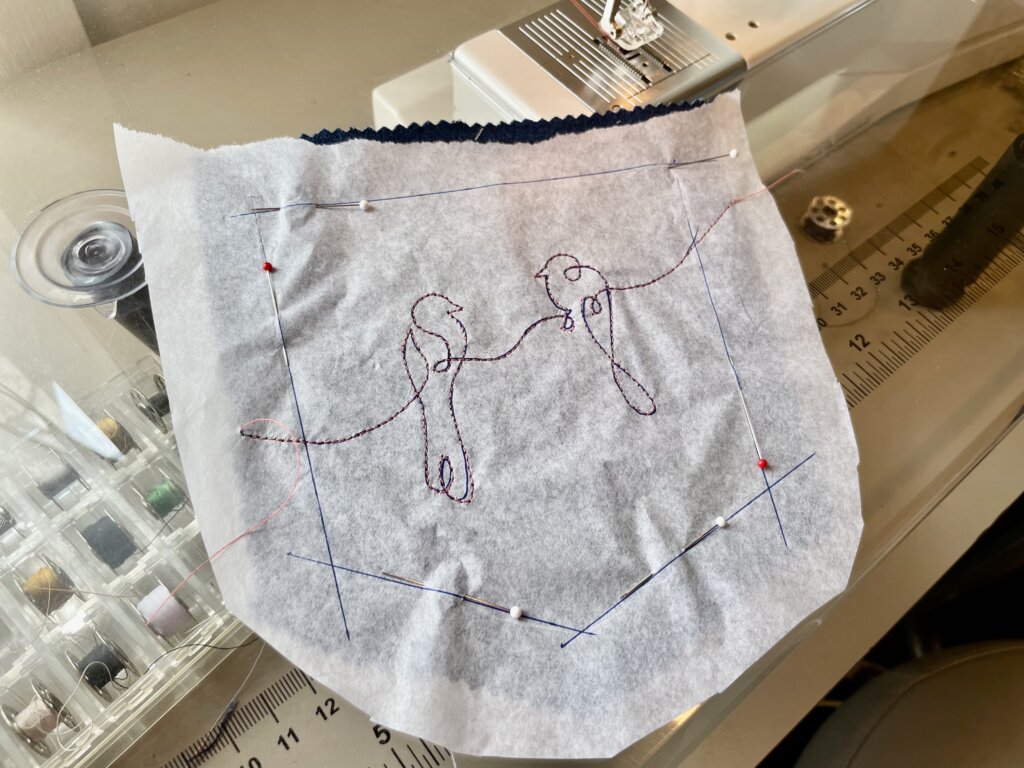
All stitched!
Once I made it all the way across the pocket with my line of birds, I used the perforation created by the needle to gently rip the tissue away from the thread. This part was especially fun.
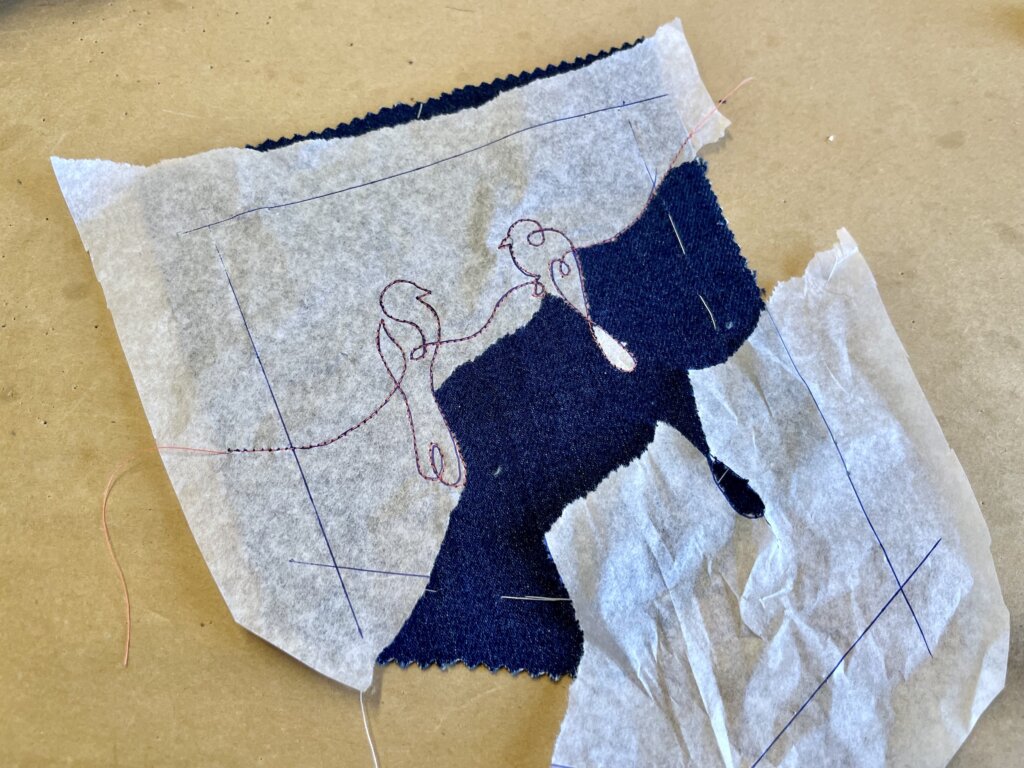
For the other side, I laid the tissue over my image and traced it again in pen. To add it to the pocket, I flipped it. The pen marks were dark enough for me to follow with my careful line of stitching, especially after the practice of the first pocket.
Fresh off the machine!
And here they are today- on my butt!
The end.
Have you ever had an epic project that took you much longer than you expected? Are you working something now where you feel like you might never reach your goal?
I’ve been there, y’all! I hope this blog post offers you the inspiration to push through the hard stuff.
You got this.
Take your time.
And let me know what you think! I’d love for these blog posts to be more of a correspondence than a broadcast. I encourage you to comment below. I’d love to hear from you!
NEXT POST: I plan to share another behind-the-seams personal project (or two) where I used the Procreate App as part of my design process!
Are you a Skirt Skills Alum?
Smarty Pants 2023 opens for enrollment Oct 6! The online classroom opens Oct 19.
Your jeans are fantastic, Brooks Ann! And what great evidence for the success of your pants design and fitting approach! Plus, such a doable strategy for super cool pocket stitching. Bookmarking immediately .
I haven’t pulled the trigger on Skirt Skills yet, but knowing it’s a prereq for Smarty Pants is making me reconsider my hesitation. And I always love an iconoclastic approach!
Awesome pockets! I’m planning to sew a pair of jeans this winter – now I’m having visions of poppies or leaves on the back pockets…
I just need to get my sewing room finished first, with a cutting table inspired by your post. We’ve completed the drywall, but there’s still a ways to go.
Yay! Have fun making those jeans in your new space with your new table!
I’m moving my studio (again) soon- and want to make another pair of jeans. I wonder which I’ll get to first… Good luck to both of us!
I’m a former professional costumer and couture dressmaker for one-of-a-kind bridalwear located in rural North Carolina, who teaches custom garment sewing to sew-curious solo-sewists online.
My blog mostly follows along with the couture process of how each heirloom-quality custom wedding dress was made from idea to wedding day, as well as personal sewing projects and other couture curiosities.
Welcome to my (temporary) Sewing Studio! Come on in! I love seeing other people’s workspaces and tools, so I thought I’d show you mine. I cleaned up after a big...
Duplicating the Vintage Dress’s Pattern (without taking it apart)
In my previous post, I introduced Jenn and the custom bridal wear project(s) for her wedding weekend. Check out the full story for all the deets, but to catch you...
I Made Myself the Coolest Dress pt. 1 – Pattern Design & Mockup
Though my personal wardrobe is mostly “the dressmaker has no clothes”, when I do make something for myself, it’s usually an epic project. I’m so excited to finally share this...
I’ve been blogging for TEN YEARS now, ya’ll! In “My 10 Year Blogiversary pt. 1”, I share links to each bridal blog series that I’ve created over the past decade....
It’s finally time to share about Deborah’s wedding day! HOORAY! Deborah and Blake were married in November 2017 at a church in Greensboro, NC with the reception at a nearby...
New Bridal Blog Series: My (kinda famous) friend Jenn!
Brooks Ann, Jenn, & Charles January 2017 Going Way Back… To begin my next bridal blog series, let’s head into the Way-Back Machine. And we’ll head farther back than this...
The bridal blog series is back! In each bridal blog series, you meet a new bride and I slowly post-by-post recount the process and share the behind-the-seams story of creating...
The bridal blog series is back! In each bridal blog series, you meet a new bride and I slowly post-by-post recount the process and share the behind-the-seams story of creating...
The bridal blog series is back! In each bridal blog series, I recount the process and share the behind-the-seams story of creating a one-of-a-kind custom couture wedding dress from start...
Sally is someone special. Back in December, I got an email from a dear friend named Sally that I had lost touch with. The subject line: “dear lord i’m getting...
As it starts to get cold, it sure is nice to think about summer! Gin and tonics… BLTs… beach trips… seersucker… Earlier this year, I worked with a bride who...
Welcome to Part 2 of the story behind making Andy’s 2019 wedding dress, where I’ll recount the testing phase of the custom process. If you’ve been following my blog for...
They say documenting the process triples the production time. (And I work more slowly than most.) My Nimbus was cold.She needed a new coat, sooner than later.
Welcome to Part Two! I’m back to share the nerdy behind-the-seams details of creating my Vanishing Tie Top for the Precious Fabric Challenge. But this photo-filled blog post doesn’t feature...
Do you have a fabric that you’ve been SAVING instead of SEWING? Yeah. Me too. So when Whitney Luckenbill of TomKat Stitchery asked me to be a part of her...
Welcome to my (temporary) Sewing Studio! Come on in! I love seeing other people’s workspaces and tools, so I thought I’d show you mine. I cleaned up after a big...
Welcome back! It’s the series finale! In this third and final post of My Warmup Jacket series, I share the behind-the-seams details of my jacket’s construction and finishing stories!
In this second post of My Warmup Jacket series, I share the behind-the-seams details of my jacket’s patternmaking and mockup stories! And after putting this patterning post together (which was...


4 Responses
Your jeans are fantastic, Brooks Ann! And what great evidence for the success of your pants design and fitting approach! Plus, such a doable strategy for super cool pocket stitching. Bookmarking immediately .
I haven’t pulled the trigger on Skirt Skills yet, but knowing it’s a prereq for Smarty Pants is making me reconsider my hesitation. And I always love an iconoclastic approach!
Yay!
Awesome pockets! I’m planning to sew a pair of jeans this winter – now I’m having visions of poppies or leaves on the back pockets…
I just need to get my sewing room finished first, with a cutting table inspired by your post. We’ve completed the drywall, but there’s still a ways to go.
Yay! Have fun making those jeans in your new space with your new table!
I’m moving my studio (again) soon- and want to make another pair of jeans. I wonder which I’ll get to first… Good luck to both of us!