

This post originally appeared as part of By Hand London’s Creators Collaborative series. An extended guide is available as an eBook titled “Figure It Out”.
Hi there!
I’m Brooks Ann Camper and I’m a couture wedding dressmaker who teaches custom garment creation to those who sew for themselves. I’m the type who loves delving deep to untangle puzzles- so when my custom padded dress forms inspired Elisalex to invite me to guest post, I accepted the challenge.
One of the most helpful tools I use to create custom-fit clothes is the custom body double! I learned custom padding techniques back when I worked in professional costume workshops, but since working for myself, I’ll admit my solo methods have been loosey-goosey.
To replicate my brides, I’d take a bazillion measurements (approximately) and a few crucial body photos. After the client left, I’d fiddle and ponder for hours until I could “make it work”. I hadn’t yet taught how to pad a custom dress form mostly because my methods and measurement sheet were so messy…
Don’t get me wrong: I like messy! And since I sew solo, I can work however I want. That said, I’ve discovered that breaking down my topsy-turvy thoughts into teachable tasks, allows me to learn a lot- which often evolves my style into something even more magical!
Elisalex’s inquiry was the kick I needed to manifest a few new revelations about how to make your own body double. I’m excited to share my discoveries and journey while making my first custom dress form for myself!
And my favorite part: No measurement sheet!!!
Sewing for yourself has advantages
Sewing for yourself has lots of advantages. For example: You only need to learn one body! And bonus: You have 24/7 access to this body!
And you only have to make this tool once! My methods (for this, and most steps in sewing) involve reversible adjustable processes. You can revise and reassess as your skills improve and/or your body changes. Pushing through the padding experience this one time, could pay off for a continually customizable form to replicate your changing shape for years…
There are challenges for sure, but whether you are crafting your own custom-fit patterns or learning to alter someone else’s patternwork for a custom-fit, a life-size replica of yourself can be a game-changer tool!
Examples
Like commercial sewing patterns, dress forms are designed to fit fashion sizing. This means they intend to fit every body in general, but no body specifically. When sewing for an individual, commercial patterns and standard dress forms are simply a starting point.
I think the path to understanding, fitting, and loving your body’s unique shape includes breaking free of traditional “sizes” as soon as possible.
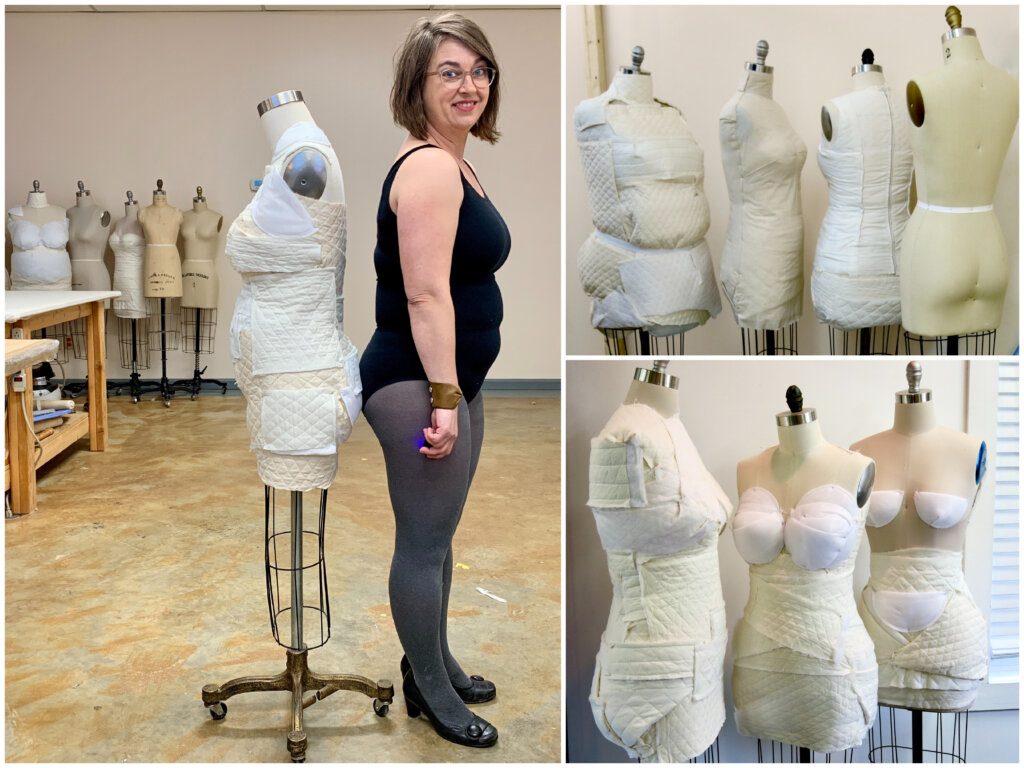
Since I sew for others, I’ve amassed a small collection of forms. I have two Size 2, two Size 8, and two Size 12. And, as luck would have it, currently one of each pair is padded to match a person.
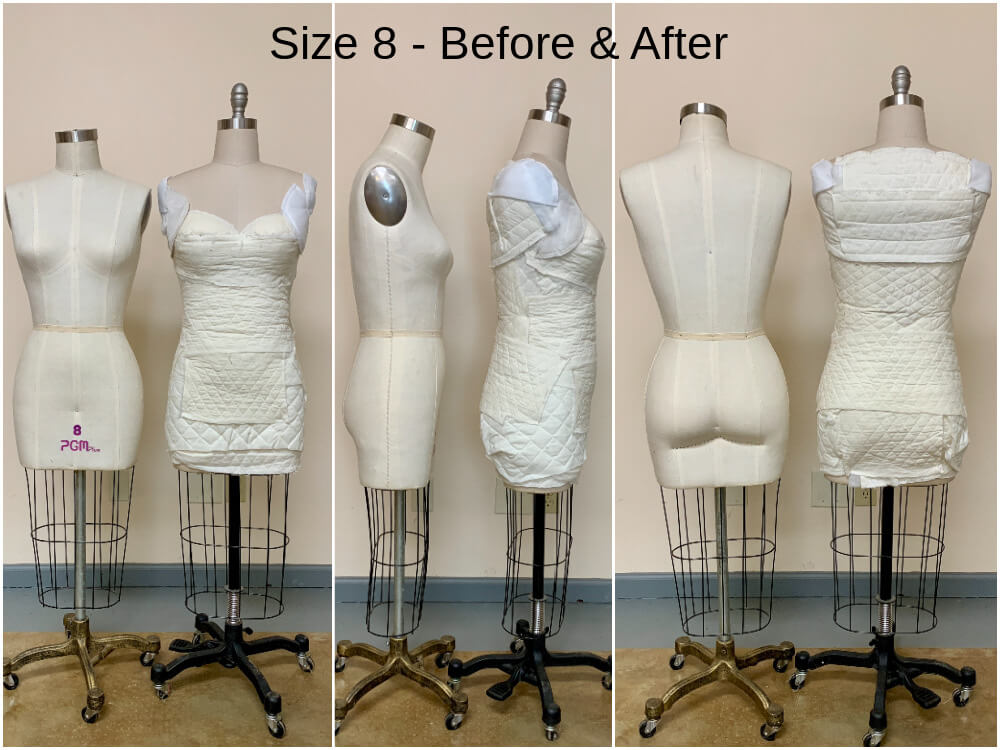
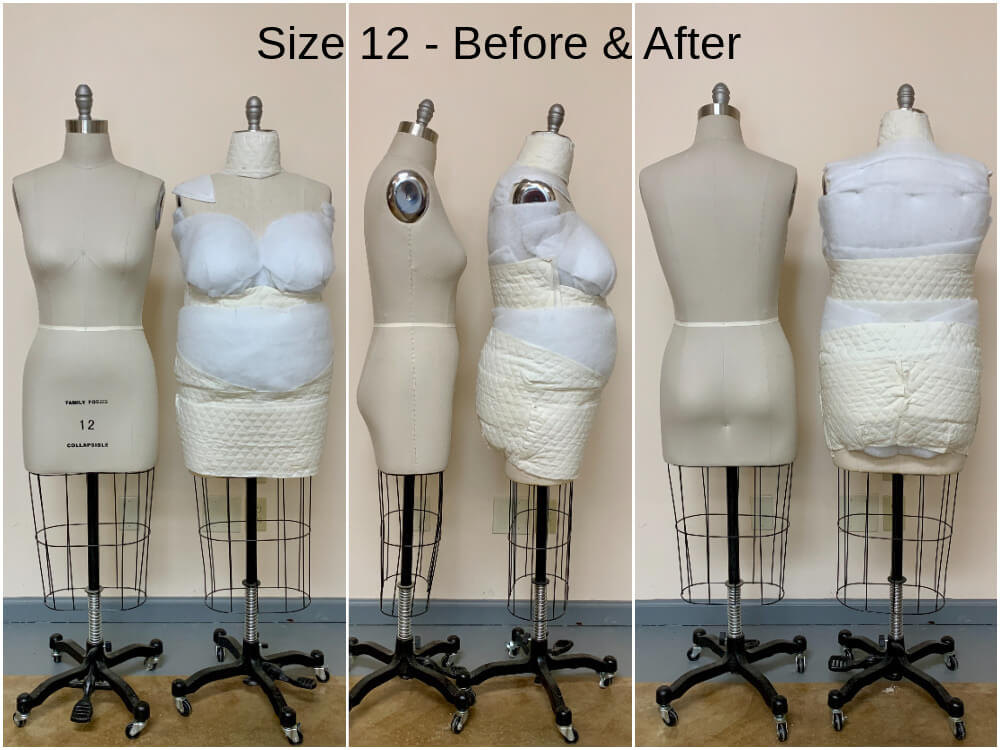
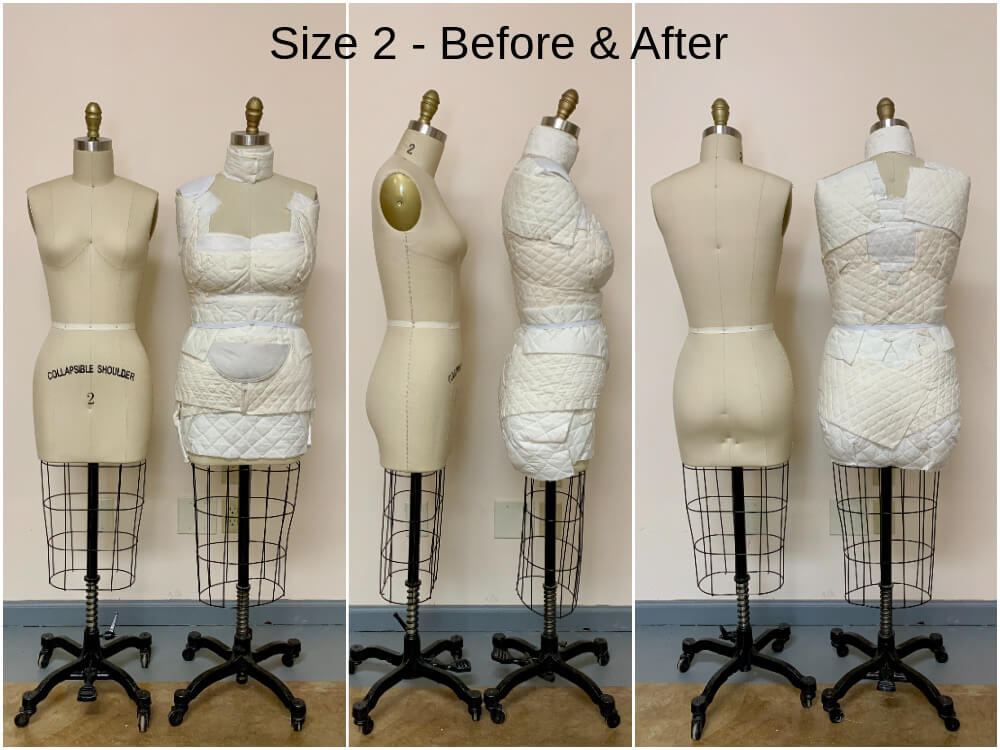
And these are just three random examples I had at the ready!
Re-sizing your pre-sized dress form into a “Size-You” sculpture means you’ll be able to store all your body’s beautiful uniqueness in the tool- offering a custom starting point for your future design and fitting adventures!
Tools
Your body + Full length mirror: If you want something to fit your body, then… your body is the most essential tool for reaching your goals! And to be able to map it, you’ll need to be able to see it. Get dressed (or undressed) in something comfortable that shows your shape and work in front of a full length mirror.
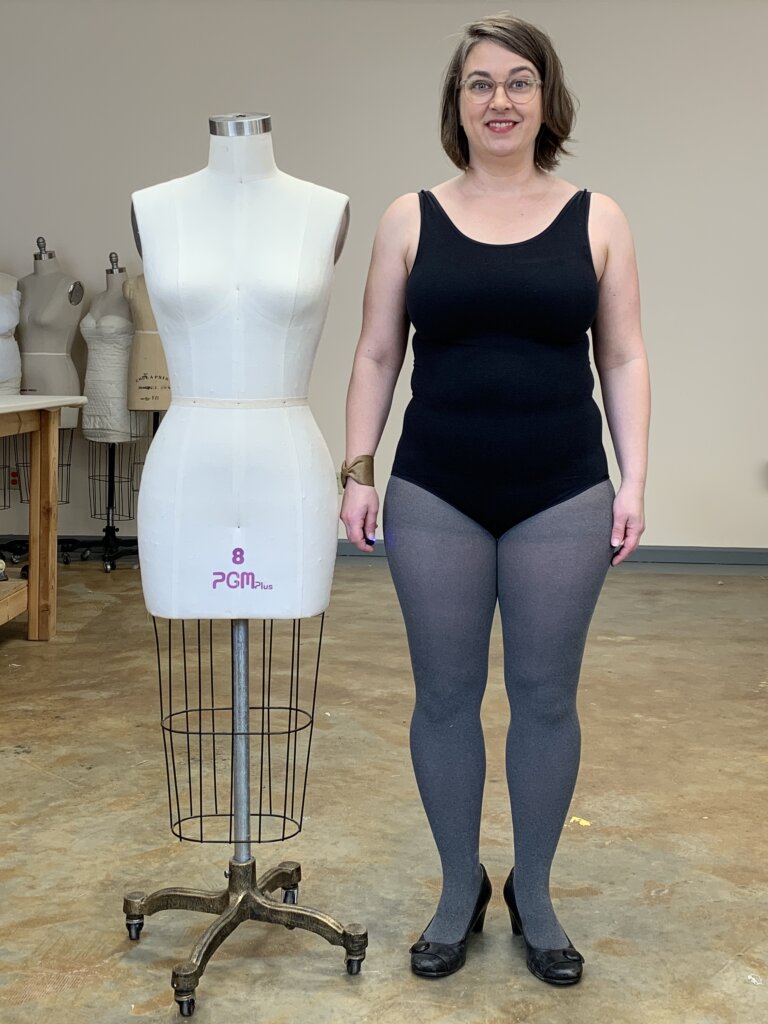
The Dress Form: There are lots of types of forms, each with pros and cons. But above all other considerations, when creating a body double, the shape will be the most customizable if the form is smaller than you everywhere. Sure you may need more padding, but padding is how you’ll make it you! As you sculpt your shape, you can add and add and add… but you can rarely take away even the tiniest sliver.
The smaller your dress form is compared to your circumferences, the more customizable it becomes.
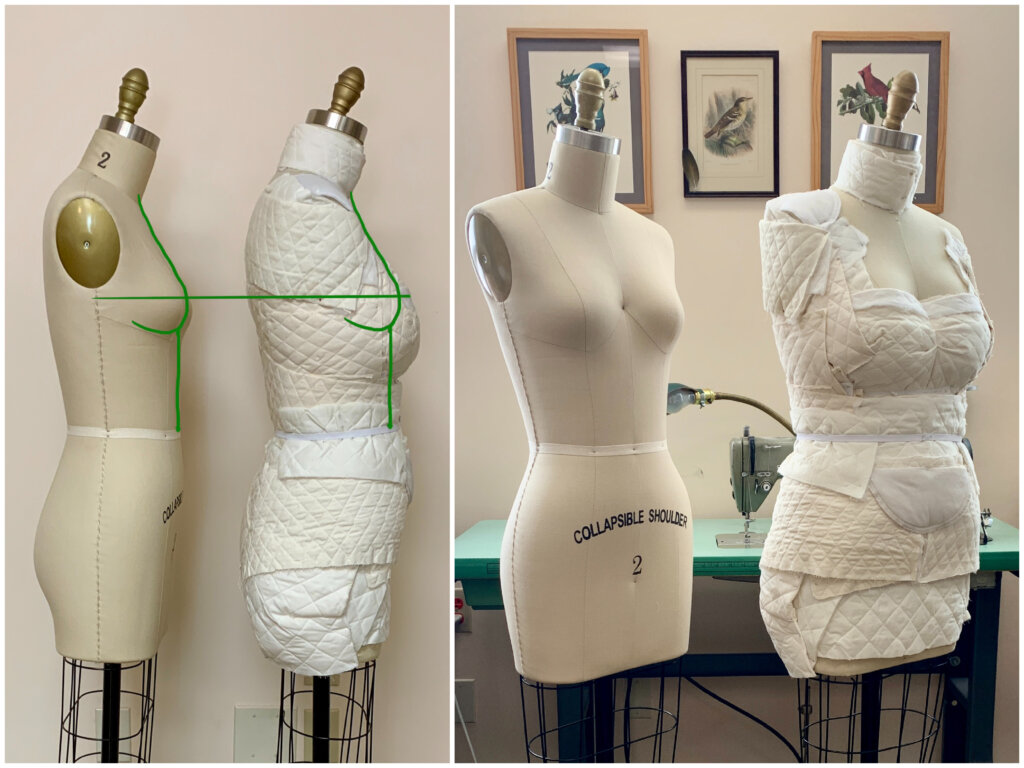
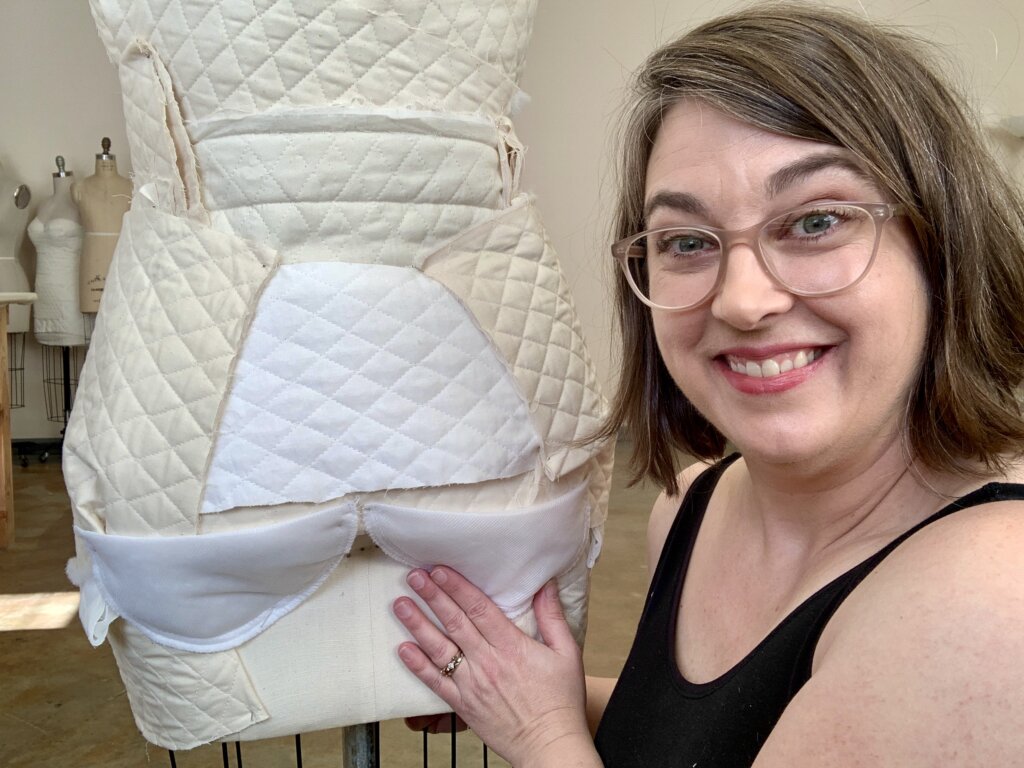
So let’s look closer at one of my examples:
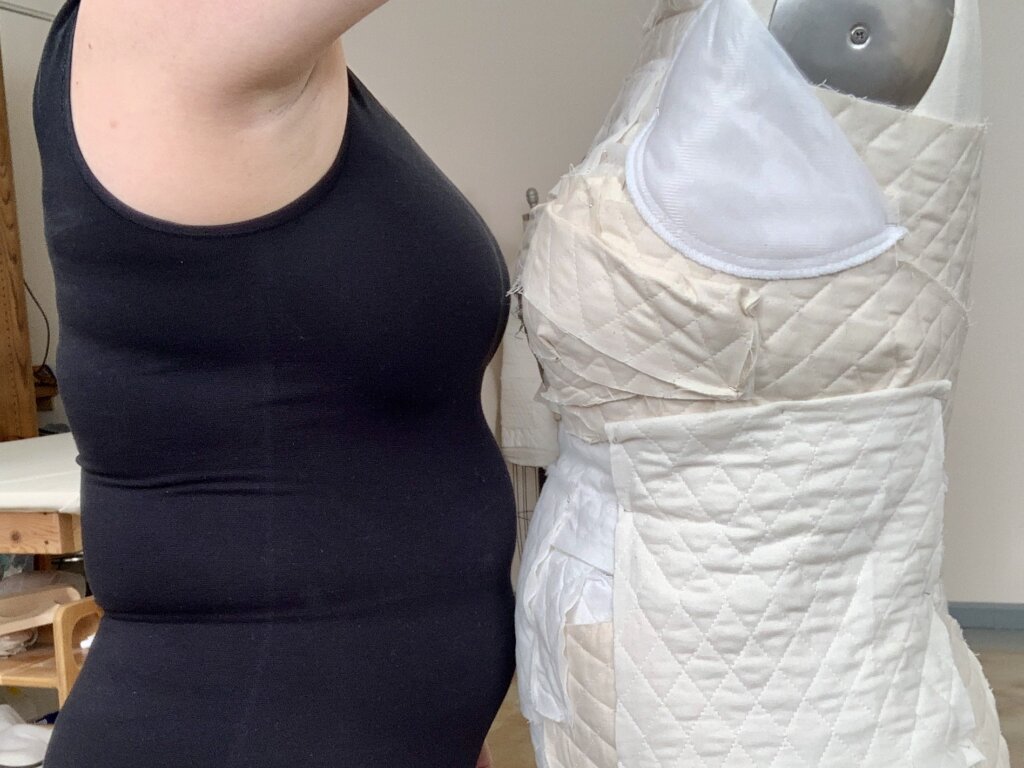
The person’s bustline is fuller and lower than the bustline on the form. This means, to make a match, the form’s full bust circumference measurement must be much smaller than the person’s full bust circumference- as its placement corresponds to a smaller upper chest area. This person’s bust shaping can be built up with the correct placement (below the form’s bust), if the form is small enough. The curvature of a back and/or the placement of a waistline etc. can also be reshaped elsewhere for a better match, if the form is small enough.
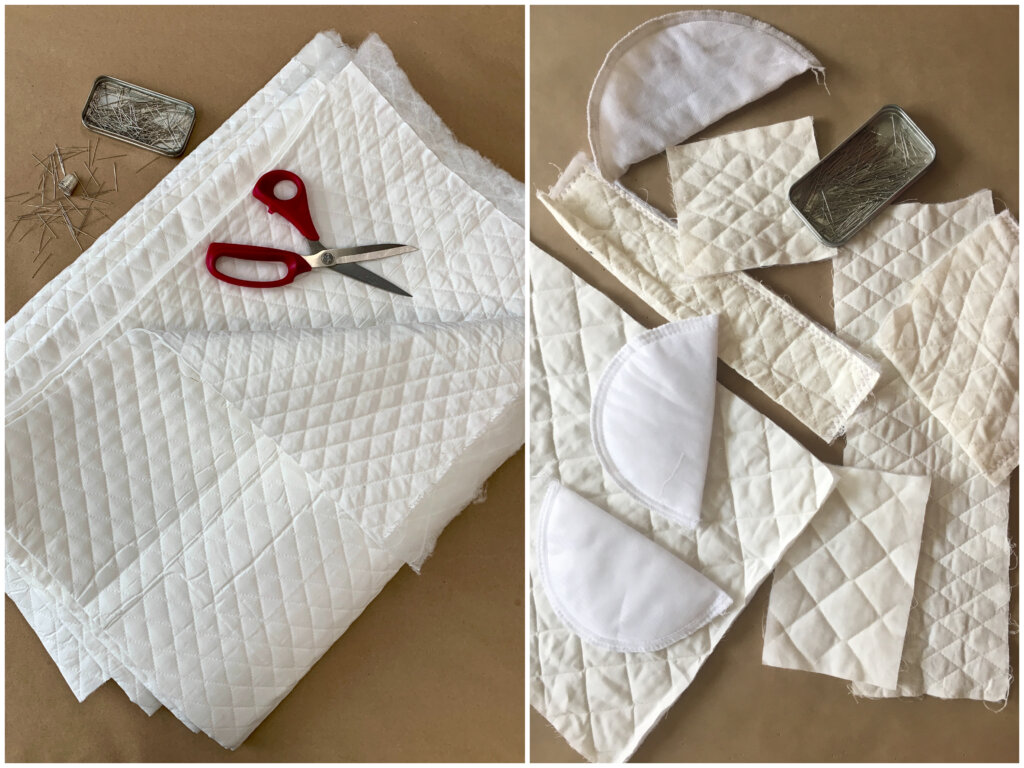
Padding: My preference for padding is a mixture of quilted muslin cut into strips and thrift shop shoulder pads.
Pins: Using pins with inconspicuous heads can keep your form from ending up with “pinples”.
A Measuring Tape: Though I used this much less than I expected.
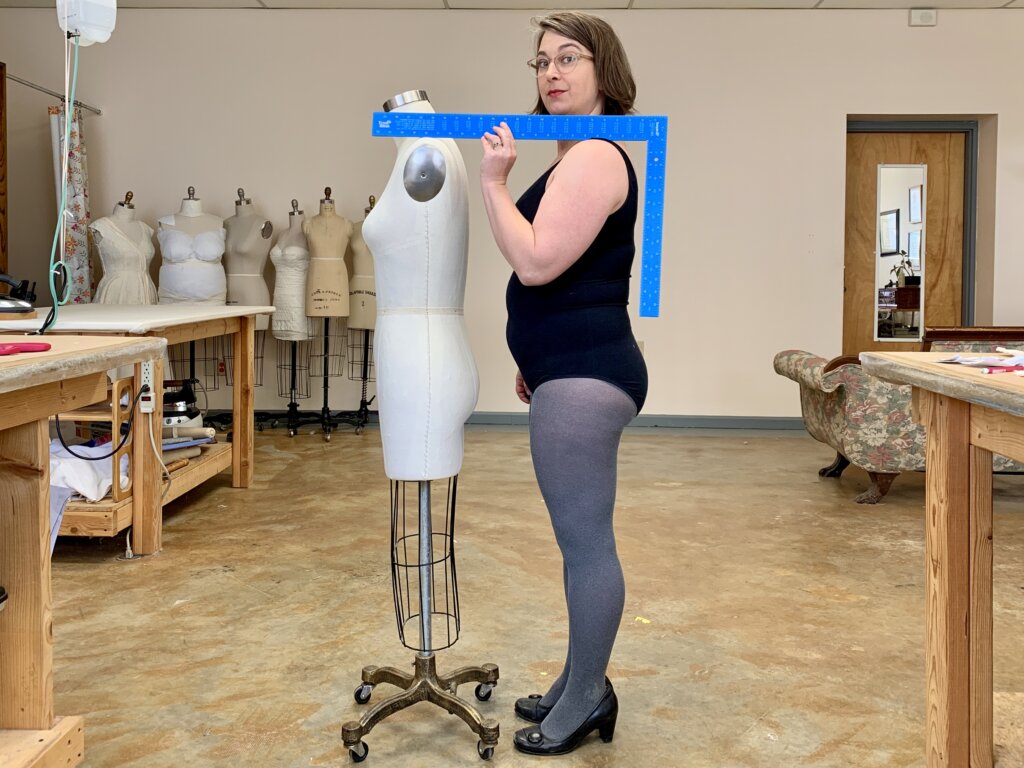
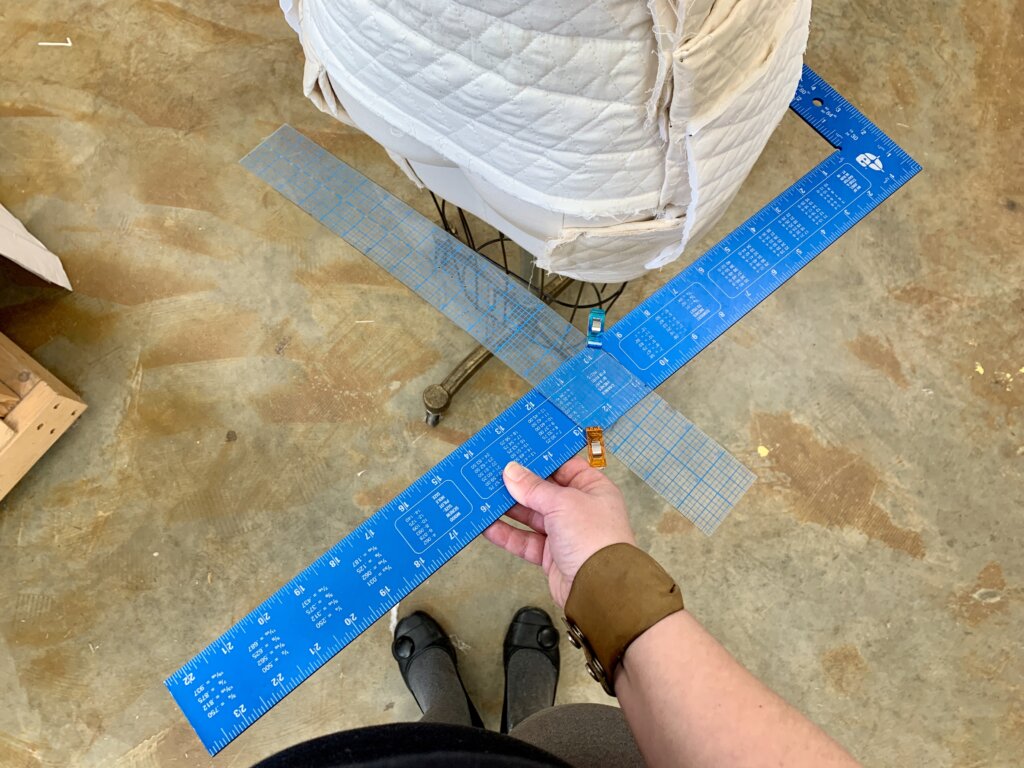
A Caliper Tool: I made myself a caliper tool with an L-square, a ruler, and some “wonder clips”.
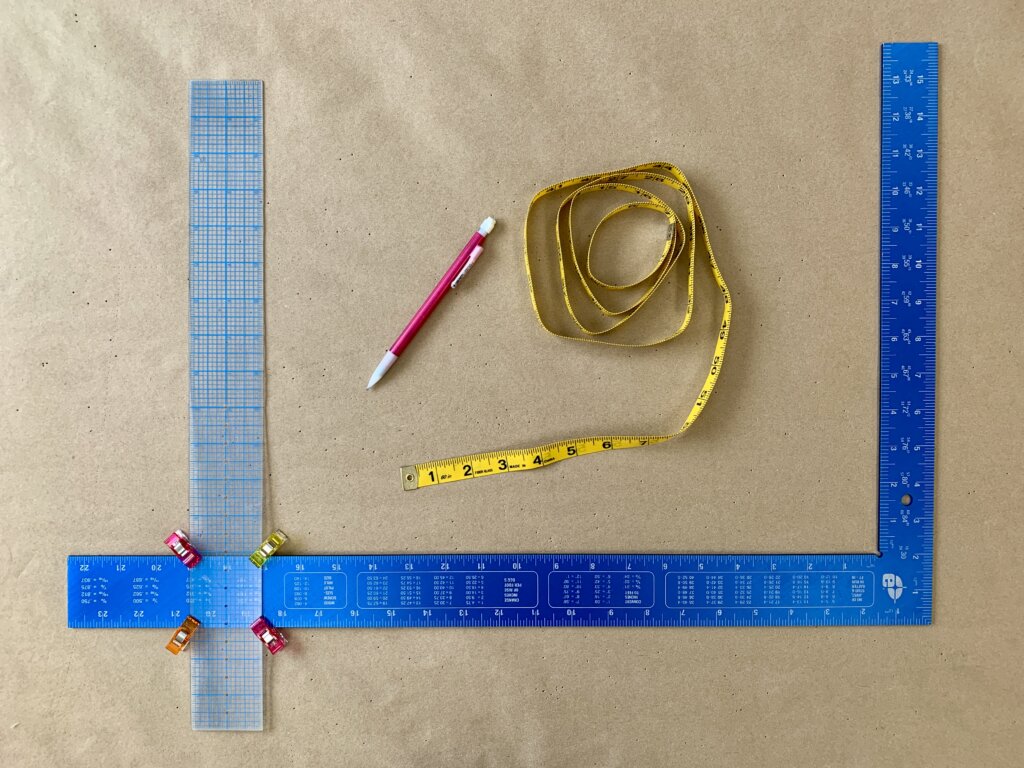
A Camera + a Printer: Photos have always been an extremely useful tool for me. Custom dressmaking is like sculpture, and I’ve found that creating a sculpture doesn’t happen with number data alone. Photos are my main source of information. The number data just keeps me on track.
With all tools, think about your goals and start where you are with what you’ve got. Progress doesn’t require perfection. Don’t wait around for something better/different… Let this post be your kick to get started now! Embrace this amazing opportunity for your fabrics and fashions to fit your figure!
Let's Do This!
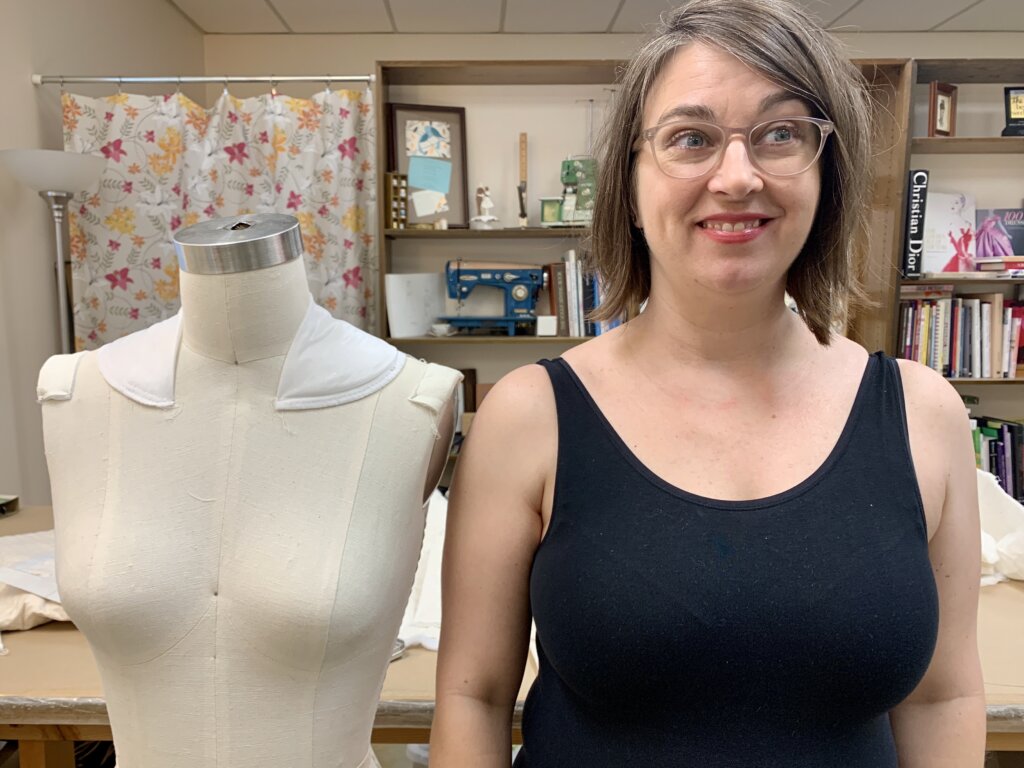
Step 1: Set the Height: Get started by setting up your form to more or less match your height. Adjust the level of the inner neck point and/or the outer shoulder point to be in line with yours. If you can only make one match, choose the option that offers the greatest distance between the two. Remember: you can pad up but you can’t take away.
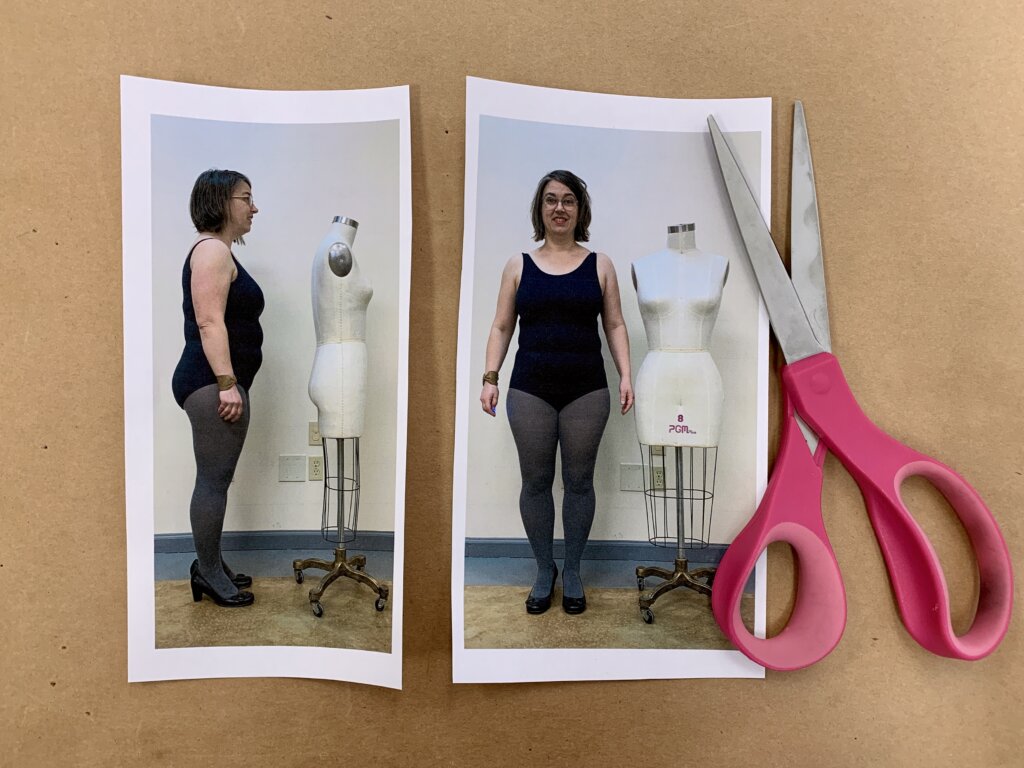
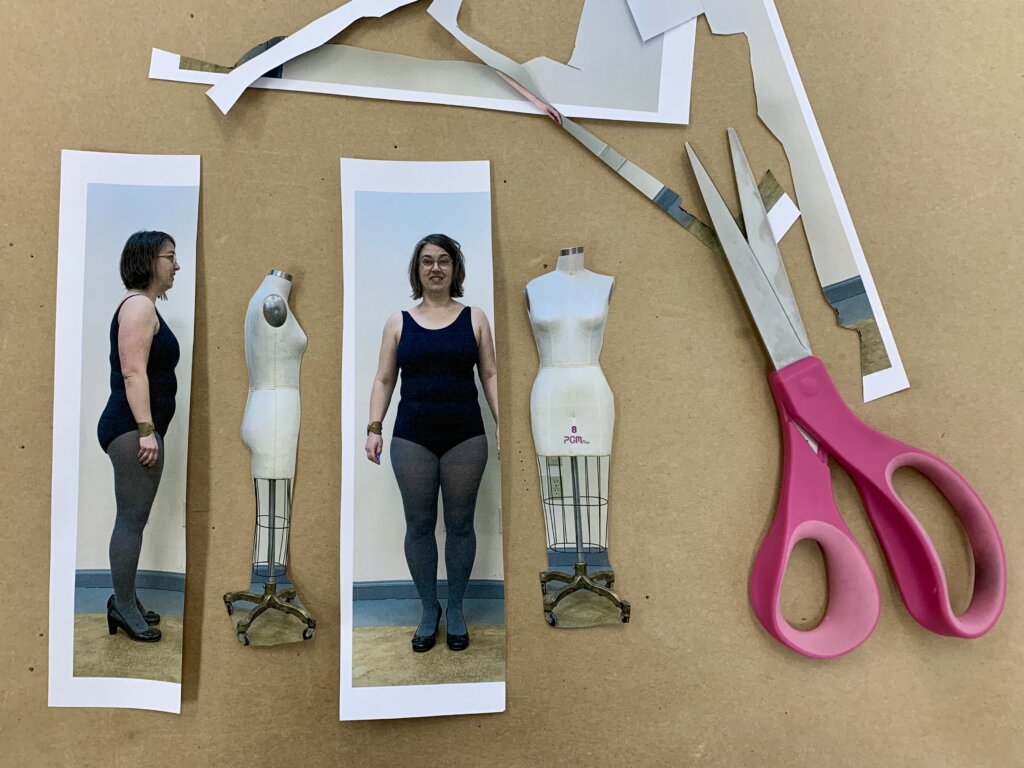
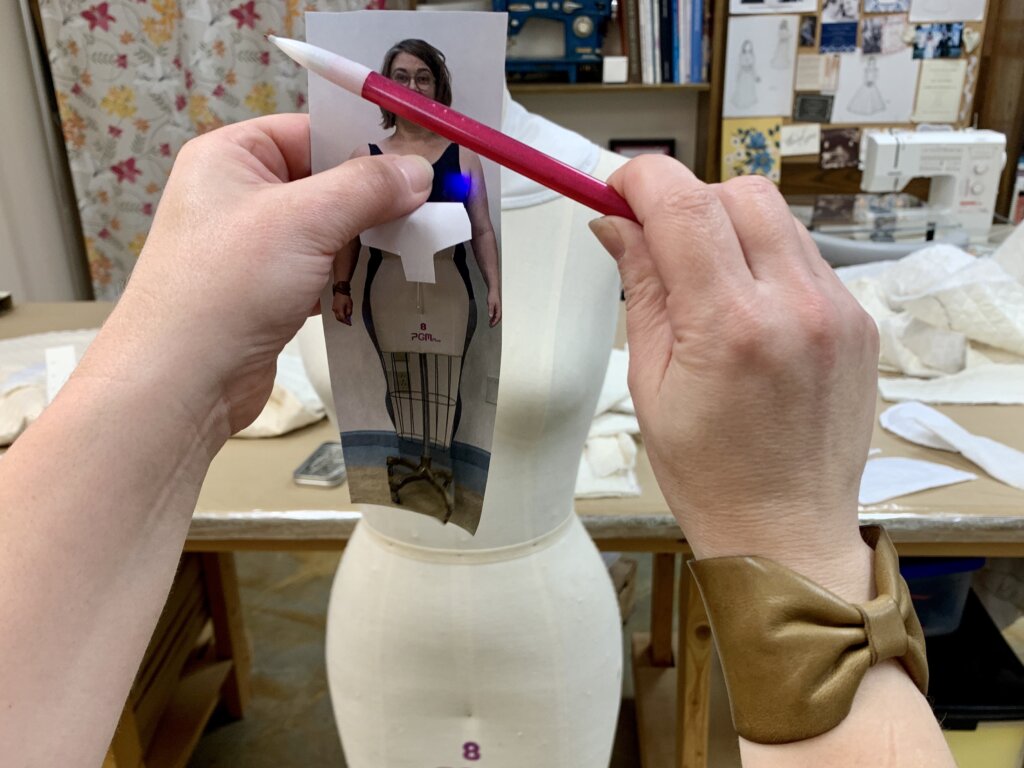
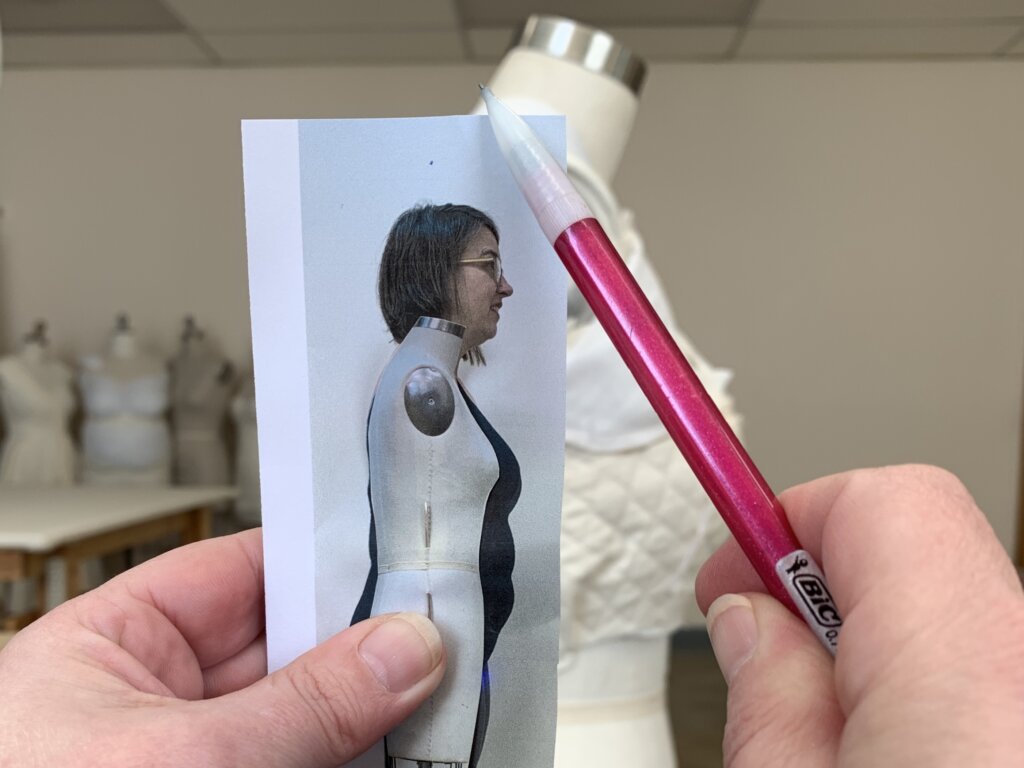
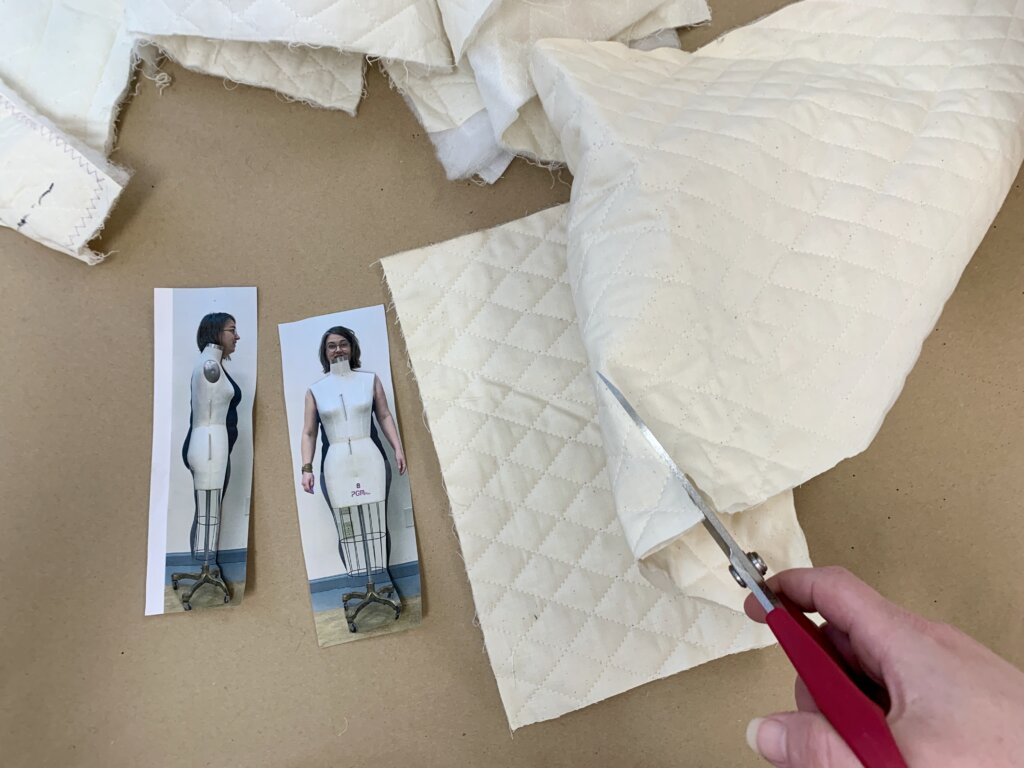
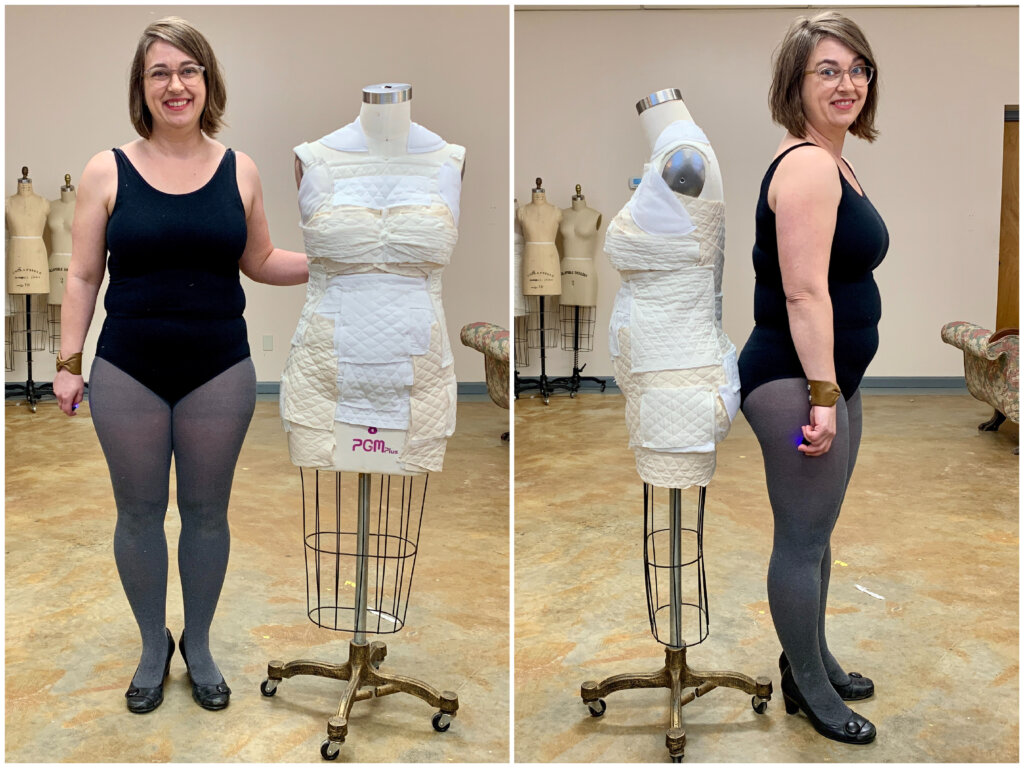
Step 2: Create a Photo Tool: Line yourself up next to your form. Take straight-on front and side photos and print them out.
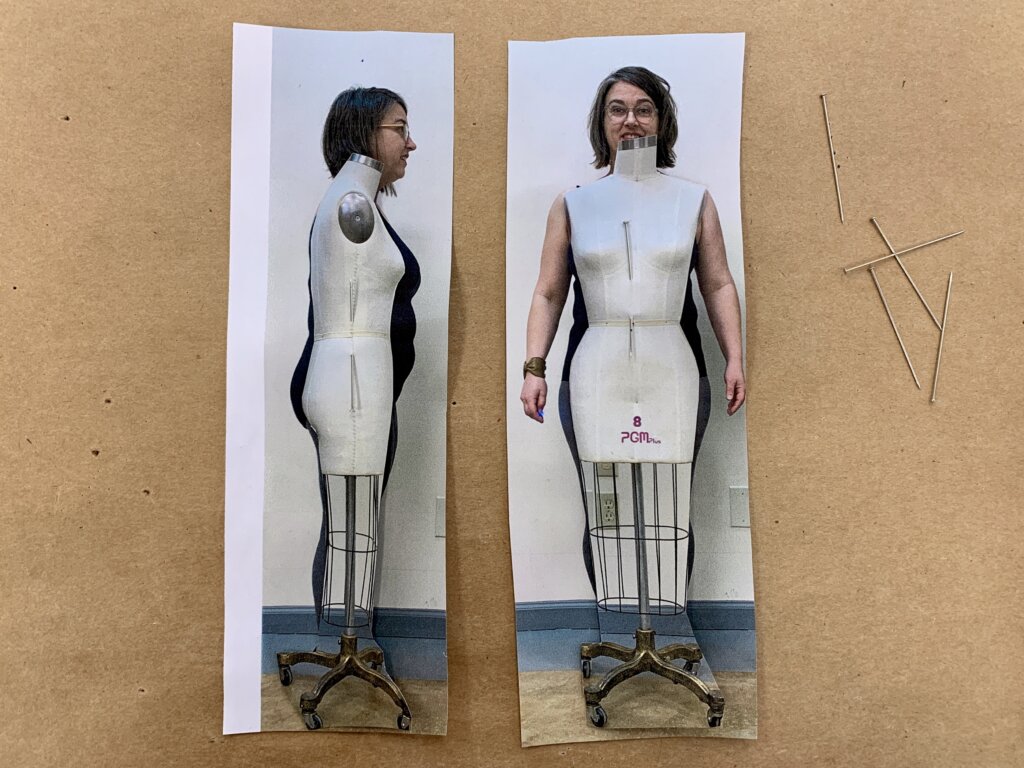
Cut out the dress form’s silhouette…
…and secure it on top of your body’s silhouette- lining up the lowest part of your shoulders. This will very literally reveal where your form’s shape fits inside your body’s shape and where extra padding is needed to make a match! Pretty neat guide, huh?!
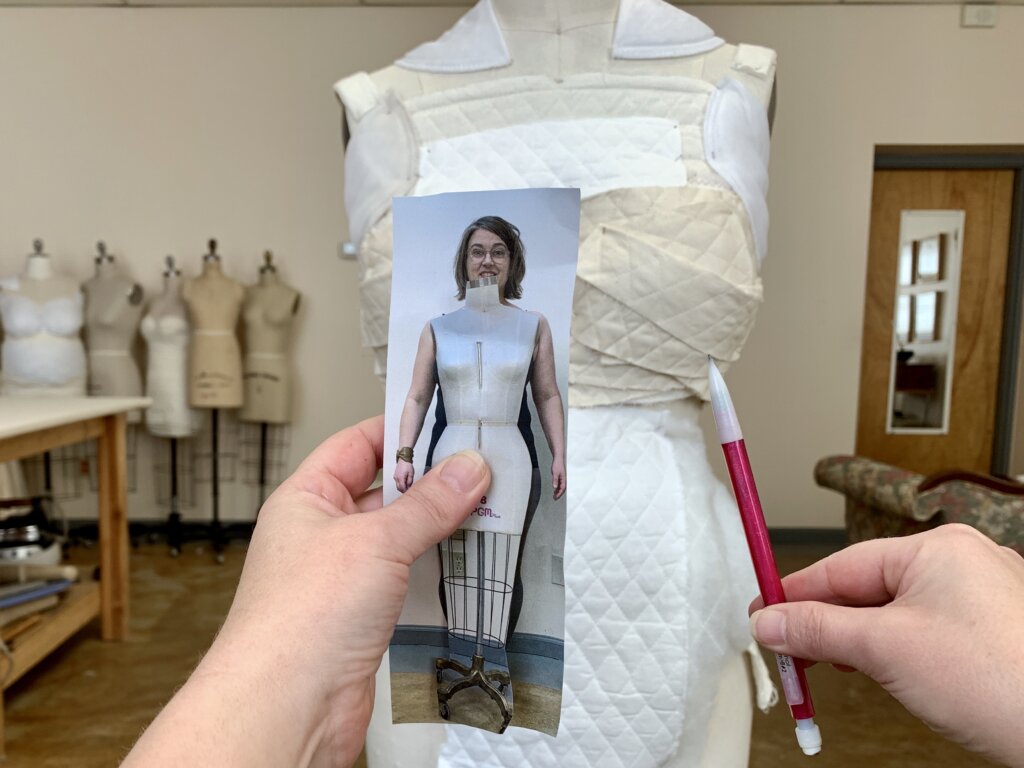
Step 3: Start sculpting at the top- then work your way down. Use your printout to help you determine your shoulder slope. I like to hold a pencil up to match the slope on the photo, then keep holding that same angle up to the form, to confirm a match or pad accordingly.
Then keep moving down…
Though my photos and my own body ended up being my most referenced tools, number data can also be helpful. And surprisingly, I ended up using my homemade caliper tool much more than my measuring tape.
To employ my caliper tool, I would slide and square my clear ruler along the L-square to match an area of front/back or side/side space on my body and secure it in place.
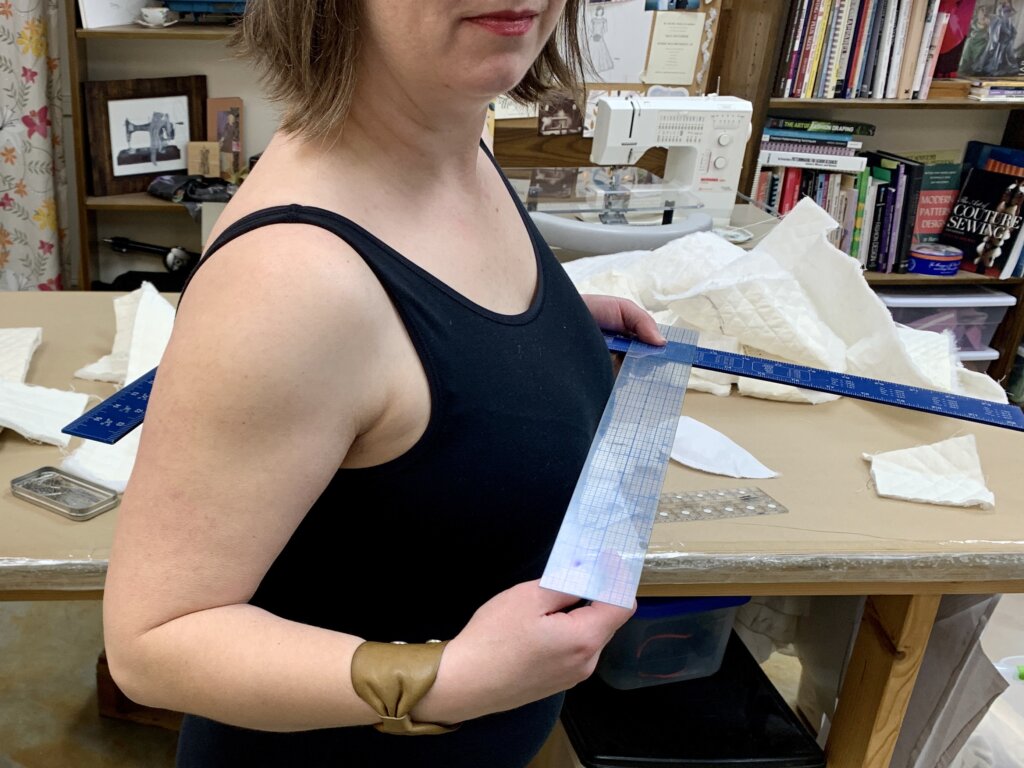
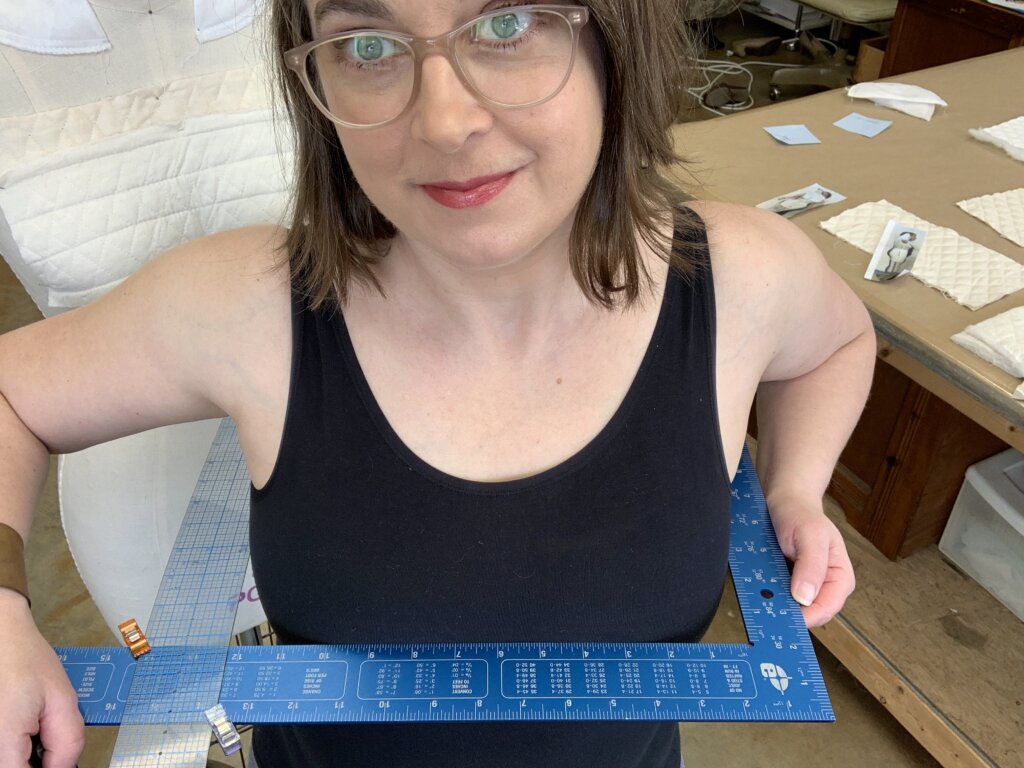
Then I’d move the squared tool to hover over the same area(s) of the form to see how much more volume was needed to fill out the same space. A circumference would offer a single data point measuring the total of an oval, but a caliper tells you more about how each circumference is distributed.
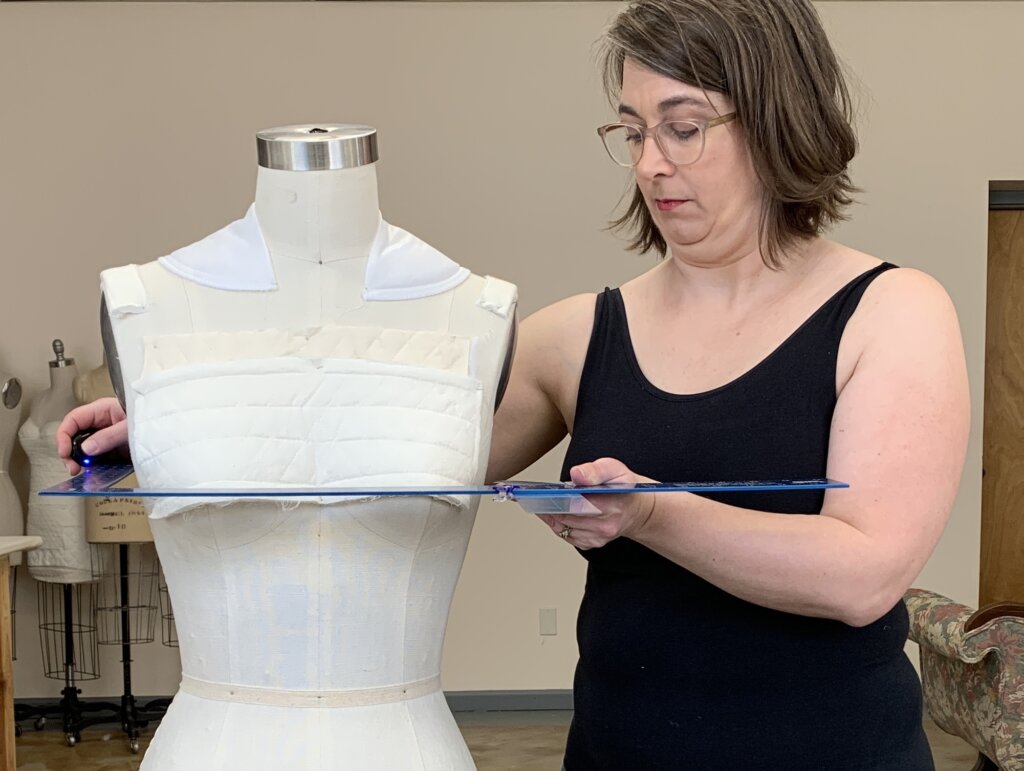
Note: Though the two tools I used to make my caliper were both rulers, I didn’t really reference the numbers much. I used the squared space created quite literally. Feel free to get creative when making your caliper tool!
Use the photo tool to help you figure out which areas need a little or a lot of padding and try to replicate the angles and shapes that they create. Use your body next to the form and in the mirror to check your levels and your work.
My self-sculpting process involved a lot of chest bumps…

backing it up…
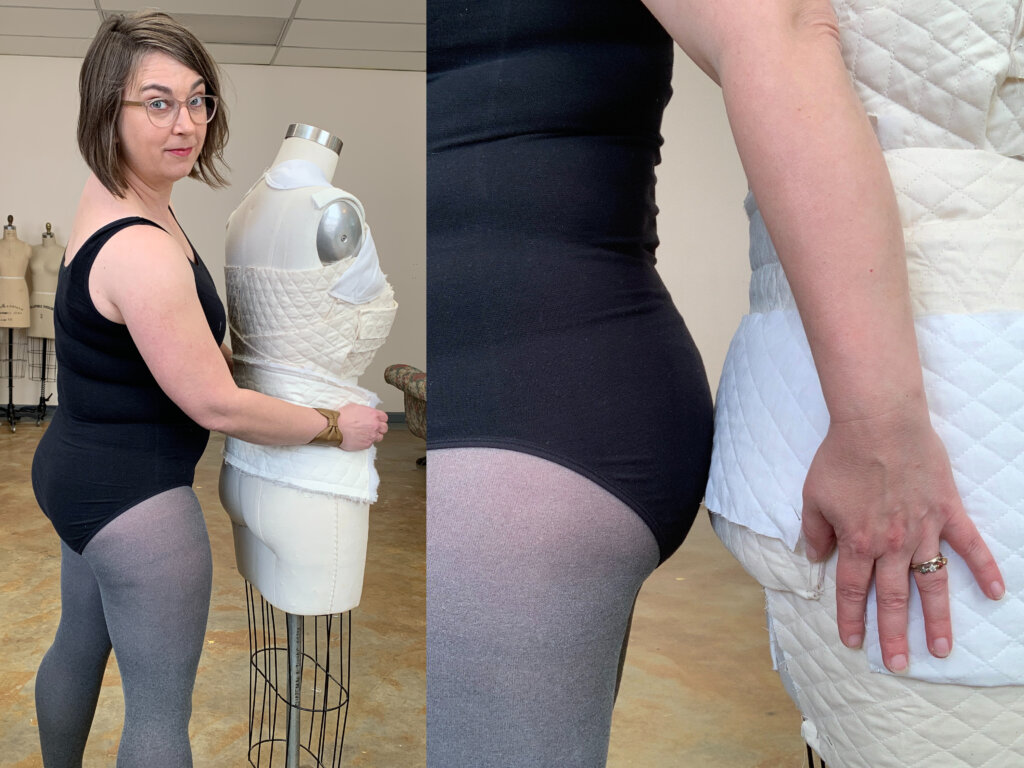
hip checks and booty bumps…
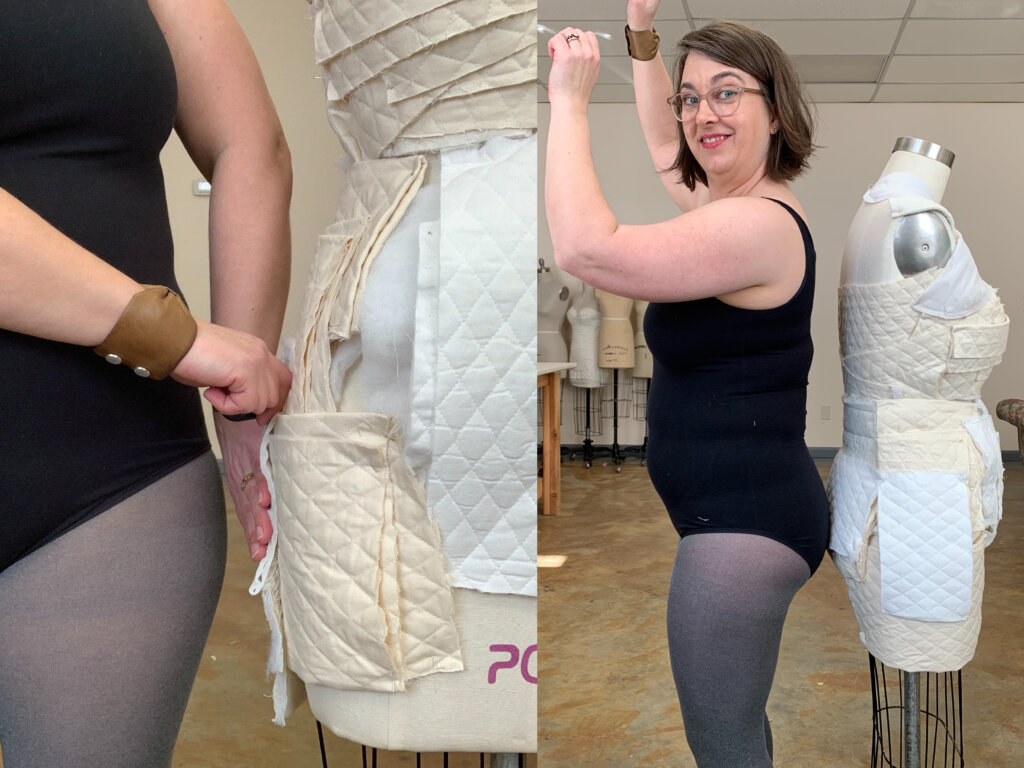
but it was mostly serious business…
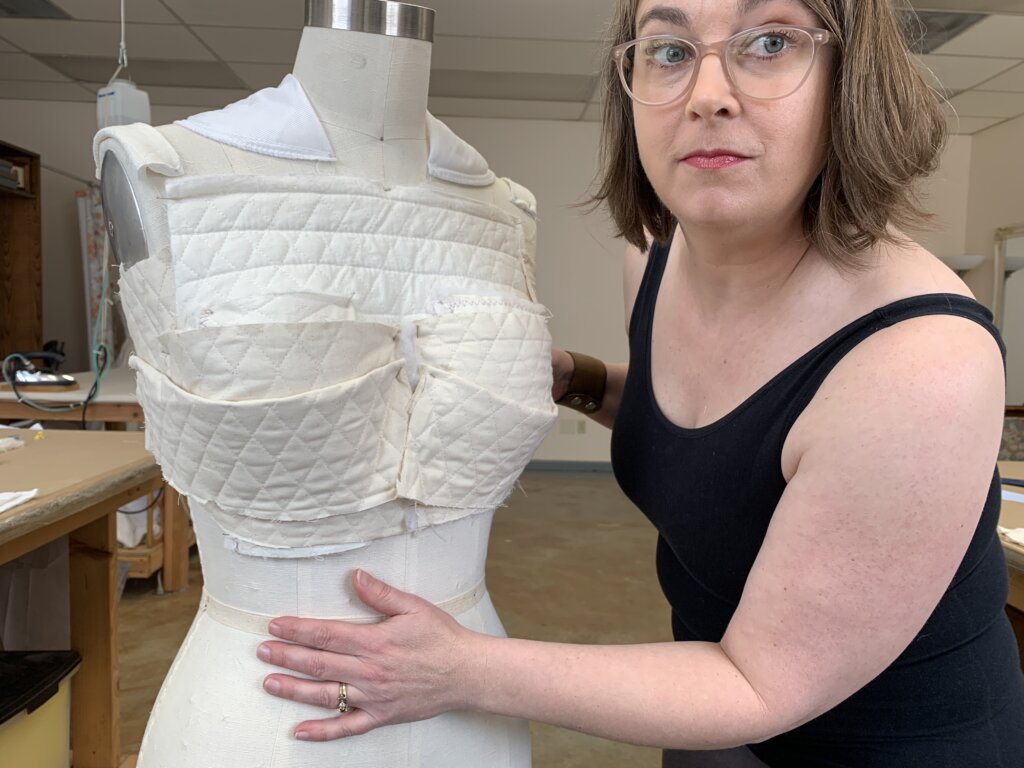
Give your own top-down first draft a go as you cut, fold, layer, pin, sculpt…
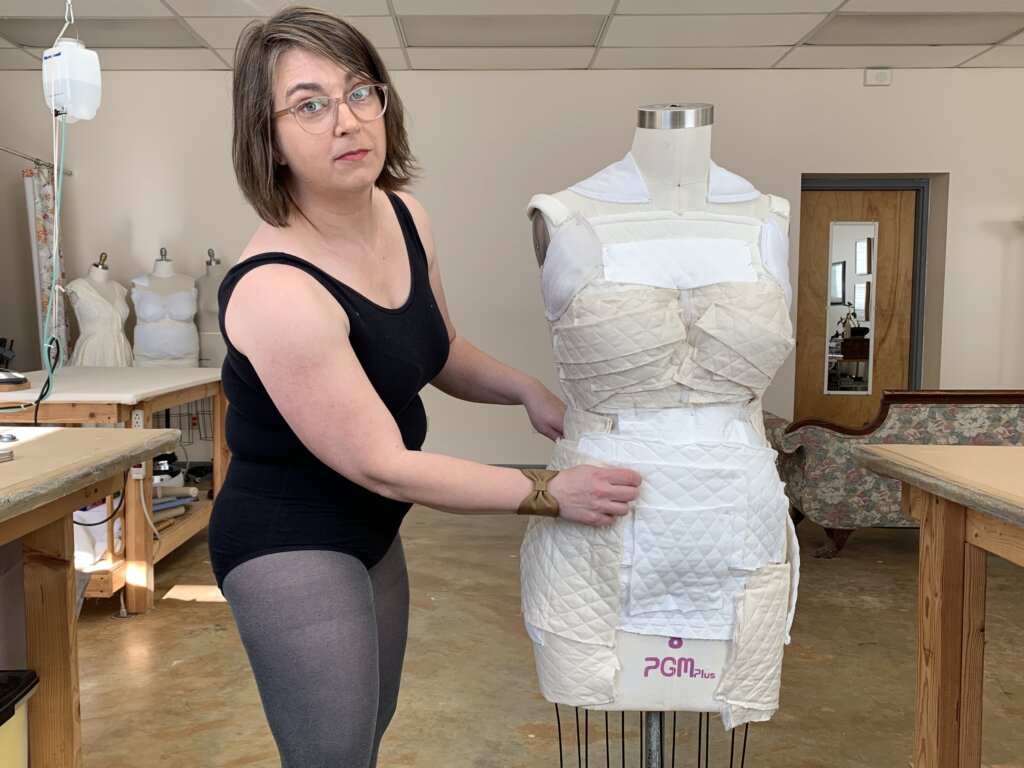
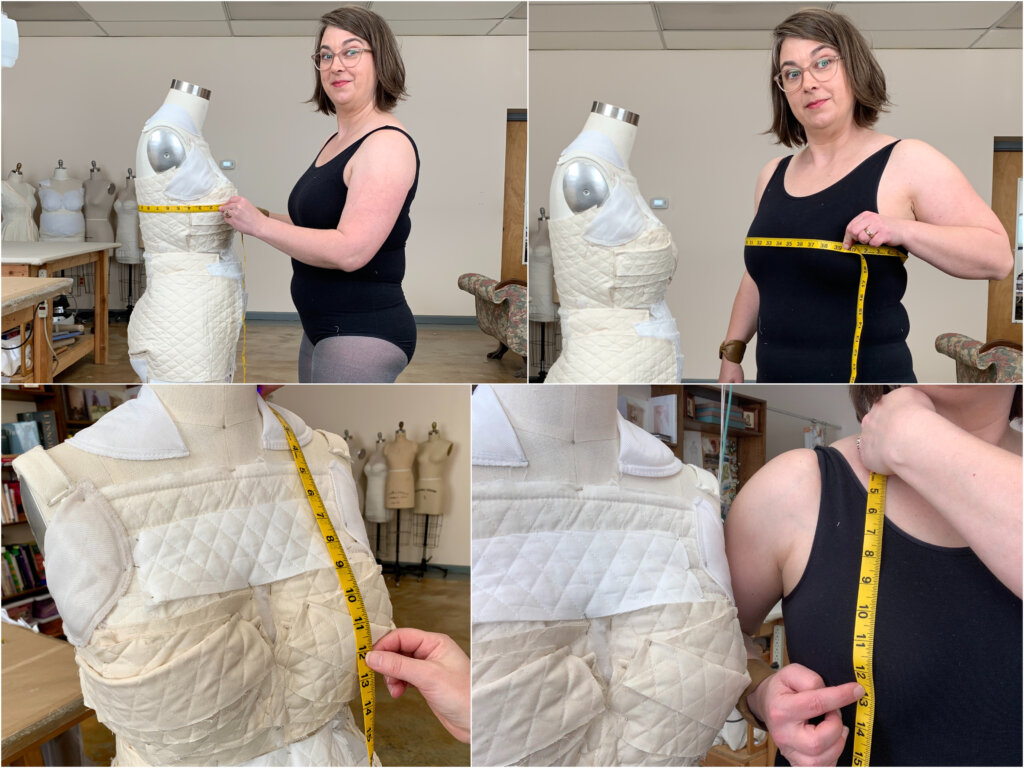
Step 4: Measure, Assess, Revise: As I sculpted my way down my body and my body double, I used all my tools to reassess and revise. Dance around from tool to tool, move, shift, add, take away…
Use padding and pins generously anywhere and everywhere! And my advice (even if adding a cover) is: No sewing. Make nothing permanent. Leave everything easily adjustable forever.
I found myself reaching for the photo tool for angles and padding strategies…
The caliper helped me distribute volume…
My body and mirror allowed me to check my levels and shapes….
…and my measuring tape helped with double checking and fine tuning. I’d drape the tape along the body, then mimic the placement as I draped the tape along the form in the same spot. Anywhere and everywhere is game for a quick measure. Jot down some numbers, or don’t! (I noted no numbers during my solo sculpting session.)
I also found a lot of helpful clues for a better match when referencing all these process photos I took! Evaluating photos is such a helpful tool…
Like every project, there’s probably going to be a moment (or several) where you think “This is terrible. I’m not getting this right.” But also like every project, if you keep revising without giving up, you will get through it.
Take your time, take breaks, and plan on working hard through several serious sessions. Nerdy body mapping is my jam, but even for me, padding a custom dress form is not quick and easy. Instead, it’s slow and worth it.
And remember: Attaining a perfectly exact replica is not the goal. Bodies are moving changing flexible complicated sculptures. “A perfect match” is unattainable- so pressure is off! You can’t get it right. So you can’t get it wrong…
Evolving and Changing
One of the leading reasons why I choose padding over other methods (duct tape, 3D scan, stuff a custom cover, etc.) is that it’s so adjustable, changeable, and reversible. Just like with my custom sewing methods, it’s never important that you get things perfect on the first (or fifth) try. You can constantly evolve and make improvements.
I’m so thankful that Elisalex and the Sewing Community inspired me to evolve and upgrade my previously precarious process!
While you won’t pull me too far away from my natural loosey-goosey style, I hope some of these tools and techniques will eliminate some of the guesswork from your experience and offer a little framework and confidence to get you started making your own custom dress form. I think you are going to learn a lot while earning a fancy new foundation for your fitting future! I’m super-excited to use my new tool… Thanks for the kick, ya’ll!
The End. For now...
Have a bazillion questions? Curious for lots MORE? Composing a single blog post on such a whopping topic was a challenge for me and my thorough teaching style. So… I’ve begun putting together an eBook that will delve deliciously deeper into this substantial subject. Use this link to find out more! Or take the condensed ideas I’ve shared here and run with them!
Go ahead… make your shape!
NEXT POST: Though subject to change, I plan to begin my next bridal blog series following my “behind the seams” creation stories of wedding day millinery and rehearsal dinner outfit for a beautiful bride, my friend Jenn!
Wanna learn more about the unconventional way I sew?
I teach online at LearnWithBrooksAnn.com!


27 Responses
I’ve been helping clients pad out their bodyforms and teaching the process for several years now. A class I took from Pamela Leggett and several articles in Threads helped me acquire the basics, and your information has added to my “body” of knowledge. (Sorry, couldn’t resist.) Especially, your idea of using the two photos. None of my previous resources mentioned this, and it is BRILLIANT.
Here are a couple of my aha’s which may be of interest to you:
When I started out, I acquired two tools which helped me immensely. First, I borrowed (until he made me buy my own) a carpenter’s level from DH’s workshop. This is the kind with a bubble level and at least 2′ long. Second, I purchased TWO L-squares. If you connect them into calipers, as you’ve done, but use a couple of fat, ponytail elastics, then you have instantly adjustable body-sized calipers with SLIDING ARMS (!).
I start, as you do, with Step 1, but I use the carpenter’s level to make sure the shoulder height is the same. AND, I make sure that it is the client’s LOWEST shoulder that is used as the starting point. As you say, the higher/bigger dimensions can always be padded out.
And I totally agree, from there on out, it is mostly the calipers at work. (Except now I will add the photo comparisons to my process!) Any time I employ a tape measure, it is for half circumferences only or just to establish a reference point – a piece of string would work just as well. As in, NO numbers needed.
I like your suggestion of quilted muslin. I use poly batting and upholstery batting (when torn, it leaves a nice beveled “edge”), but the quilted muslin would make a nice sturdy base to pin into. Also, an idea from Pam Leggett that I use is stretchy self-stick bandaging to secure padding and demarcations of tissue contours (aka lumps and bumps).
Lastly, for sewists who want to use the bodyform for general purpose fitting, I find one of the biggest challenges is getting them to choose what kind of undergarment-shaped body they think will be of the greatest generic use. The shape produced by a sports bra is not the same shape as that of an uplift, underwire bra. To say nothing of how bodies change in and out of Spanx. For a special occasion, like wedding sewing, undergarment choice can be locked down, but it gets more challenging for general purpose fitting. (Just went through this myself, actually. I re-engineered my everyday bras, and found that I had to make a significant change in the chesticle area of my own bodyform!)
Thanks for posting this topic!
Thanks for all the tips Judith! I’ve been professionally padding custom dress forms to match bodies for over 20 years now and I’ll share a lot of the tips you mentioned in the ebook. It was so hard to whittle down all I have to share into a 2000 word blog post! (My assignment for the Creator’s Collaborative was “approximately 1000 words” – so double was about all I could get away with…) It wasn’t until I dreamed up the Photo Tool idea that I agreed to do the post. It makes everything so much clearer and simpler! So glad you enjoyed it. In the eBook, I’ll share dozens of examples and share alternate tools and methods and how I create my covers… It’s such a gigantic and wonderful topic! Thanks for following along!
Such great ideas on here which I would never have arrived at myself. Inspiring post. Thank you!
Brooks Ann…..thank you for this blog post. I literally gasped when I read your idea about taking pictures of both my body outline and the dress form, then overlaying them to see where to pad. Simple but brilliant idea! THANK YOU! I’m so excited to begin padding. Off to look for quilted muslin!
Yay! I’ve always used printed photos for the angles etc, but when I recently thought of the overlay idea, I knew it would be a really helpful tool… Good luck with your padding experiments!
Brooks Ann…..I thought that it would be easy to find quilted muslin at a local Joann’s, but no luck. Where do you find it?
I get it at JoAnns. I bought several yards there just a couple of weeks ago, so maybe your store is just out at the moment? This seems to be the link to buy it online: https://www.joann.com/diamond-double-faced-quilt-fabric/prd18961.html Hope this helps!
With a padded dress form body double, I think I would feel more comfortable approaching draping as opposed to flat patterning. Do you approach draping in top class?
That was my plan originally. Personally, I drape more than I flat pattern (but mostly use a combo). But after I created Skirt Skills, I polled past students and they overwhelmingly wanted to create a full set of blocks instead of learn draping so…. I developed new flat pattern drafting systems! I hope to be able to finally teach draping in a new class soon…
I got a dress form for Christmas and have been frustrated with the padding process to the point that it’s just been standing in the corner with one of my dresses on it, mocking me every time I enter or pass my sewing room. I haven’t touched it in several weeks, granted I’ve been busy sewing seeds instead of clothes.
Thank you so much for this! I finally feel like I have good grasp on what needs to be done. I’ll definitely make time in the coming week to start again. Glad I just upgraded my full length mirror. Unfortunately I think maybe I should have gotten and even larger one!
As always your posts are so inspiring. Looking forward to seeing the ebook!
Hooray! I hope this post gives you the info you need and the kick to get through the padding process. Thanks for following along!
Im so excited to try your techniques to help create custom fit for myself and clients I work with. I have looked for resources to purchase dress forms. I was wondering what your best places to find used ones have been or is it just better to bite the bullet and invest in new ones?
I’ll talk about this more in-depth in the ebook but all of my forms have either been from Amazon, Overstock, or eBay for ~$200. Hope this helps! Happy to hear you enjoyed the post.
Thank you so much for creating this guide. I have a dress form that I spent way too much money on and have not been able to match up to my measurements at all. It stands there in the corner staring at me, shaming me for never using it. You’ve brought some hope back to this project for me, thank you so much.
My pleasure! I hope it helps you make your shape!
This guide really sucked me in! I bought your e-book. My poor old adjustable form is broken down and now too big. I’m looking at this form on Amazon: https://www.amazon.com/Display-Mannequin-Natural-Rolling-TSC-Medium-Bronze/dp/B08H554C1Z/ref=sr_1_24?crid=3V2XP7BAQV5TE&keywords=petite%2Bpinnable%2Bdress%2Bforms&qid=1660447055&sprefix=petite%2Bpinnable%2Bdress%2Bforms%2Caps%2C262&sr=8-24&ufe=app_do%3Aamzn1.fos.18ed3cb5-28d5-4975-8bc7-93deae8f9840&th=1
Can you let me know if you think this would work for sewing only for myself? I would pad it out, cover it and hopefully be able to get a better fit than I usually do. I put in a question asking the circumference of the neck on a small. My neck is 14″ and I’m petite, though not tiny. Your opinion on this would be wonderful. Thank you, Kathy
Hi Kathy! I’m super excited to hear you are interested in padding a form to match your shape!
The form you linked is a “display mannequin”. I’ve personally never used one as a dressmaker’s tool, so I can’t say from experience what the advantages/disadvantages would be. But as far as display forms go, it seems like it might be a pretty good one. The base looks somewhat sturdy and the surface seems pinnable…
If you can get yourself a professional dressmaker’s form with collapsible shoulders and a sturdy base, that would be my personal recommendation (as it’s the only kind of form I’ve personally used). Otherwise, the form you linked might be the next best thing. I go into this topic a little more in the book and I hope this helps too!
Hi Brooks Ann! Thanks so much for your reply. I really wanted the kind with the collapsible shoulders, but my budget objected very vociferously. The one I linked is what I can almost afford… They replied and the neck is 14″. The back shoulder measurement is 15.5″, so those measurements work for me. They advertise that it is also useful for sewing. It’s pinnable if you insert the pins at an angle. There’s light foam under the fabric. By the time I get it padded, I may be able to insert pins straight in since it’s a small and I am not! LOL!! It is due to arrive on Monday, the 22nd and I can’t wait!!
Do you have any recommendations as to size and shapes of strips of quilted muslin to cut? I have a 3 yard length of 43″ wide quilted muslin and not sure where to begin cutting it up. I’m trying not to stress over cutting up all that fabric without pattern pieces…50 year old sewing habits are VERY ingrained.
Thanks so much for writing your E-Book. It is very helpful!
Kathy E.
Yay! I think the mannequin you shared will work fine. The prices on the pro collapsible shoulder kind went way up since the pandemic started.
And the size and shapes of the strips can be cut willy-nilly on the fly! You can just cut as you work- based on what you need for the spot you are padding. You can look at my example, if you need guidance- but there’s nothing to stress about. Have fun being loose and wild! You can always move pieces to other places and/or get more fabric, if you need it. There’s no way to mess it up. Shaking your ingrained habits of stressing over precision could be a really fantastic challenge for you!
Keep in touch!
Do you have a recommendation as to how much smaller your base form should be than your own measurements? I understand that the smaller it is the more flexibility you have, but trying to make up a difference of say, 10 inches, seems like a big hurdle.
Good question! And it will really depend on your shape!
For example, if your lower back has a deep inward curve, you’ll need a much smaller form than someone with your same circumferences but whose shaping is more similar to the form. If you are shorter or taller than the model, you’ll need extra room for adjustability. If your fullest bit or smallest bit is located at a different level than the model, you’ll need to go much smaller in order to replicate your shape. That 10″ of play could be exactly what you need to create a true body double!
So I advise that you evaluate your shape. If you have similar proportions to the form, no deep curves, no significant length discrepancies, etc., and your differences are truly about adding different amounts of volume to the shape provided, then you don’t have to go a whole lot smaller. Padding for you, will be relatively simple!
Otherwise, choosing a form that is several sizes smaller than you everywhere is what gives you the best guarantee that you’ll match your shape. And you only have to work through the initial padding process once. So it could be worth jumping that hurdle of adding the extra padding.
The padding is the advantage, not the problem. The bit of extra time and materials could pay off in the long term. The risk of a not-quite-small-enough form is that you’ll still be putting in work but you won’t be able to make a really close match.
If you have the form, you can try the Photo Tool Exercise to find out whether you fit inside, and/or whether you’d benefit from investing in a larger form in order to reduce the work that it will require to pad it. All of this is, of course, more difficult if you don’t have the form.
Hope this helps! I share more in the ebook.
How do I allow for a longer than standard neck to waist measurement please?
The front neck placement is one the harder places on the dress form to change, so I’d make the waist lower on the form (rather than the neck higher). Hope this helps!
This is amazingly helpful; thank you so much for the practical, simple write-up. I was gifted a dress form for my first ever paper patternless project and while a dress form is better than the puffy vests and old shirts I was stuffing my dress with before, it’s most definitely *nothing* like my body shape. While I don’t have time to do this for my current project, I’ll absolutely do it before my next. I’ve felt so at sea working on this dress and it’s comforting to know that next go around I’ll be able to make the fit aspect of things less daunting.
What an insightful and practical guide! I loved how you framed dress form padding not just as a measurement tool, but as a creative extension of the wearer’s body. The step-by-step on adding fleece or foam, marking seam locations, and smoothing out transitions really brought the process to life. I especially appreciated the tip to update the form over time—it makes sense that our bodies shift, and your method helps keep the garment fit true. This post feels both technical and personal—perfect for sewists aiming for pattern excellence.
I purchased a dress form second hand. I was wondering how to make it where I can stick pins into it. It’s pretty good on my size. Hopefully you can help me figured out if this can be done. Thanks so much.
The forms I’ve worked with in the past have all had pinnable surfaces. If your form doesn’t have a pinnable surface, maybe you could drape and sew up a fabric cover for it? I don’t have advice from personal experience, but hopefully this helps you brainstorm ideas to get your dress form in action.