During the process of working with my friend Jenn to create custom bridal millinery and transform her mom’s wedding dress into a rehearsal dinner top,the steps of my custom process got all mixed up.Jenn is a professional actress whose schedule wouldn’t allow for much in-person time before her October 2019 wedding, but we didn’t want that to stop us. So I customized my custom process! Good thing I love custom!
So even though we’d already completed our first mockup fitting, I was only now ready to start sketching the designs!
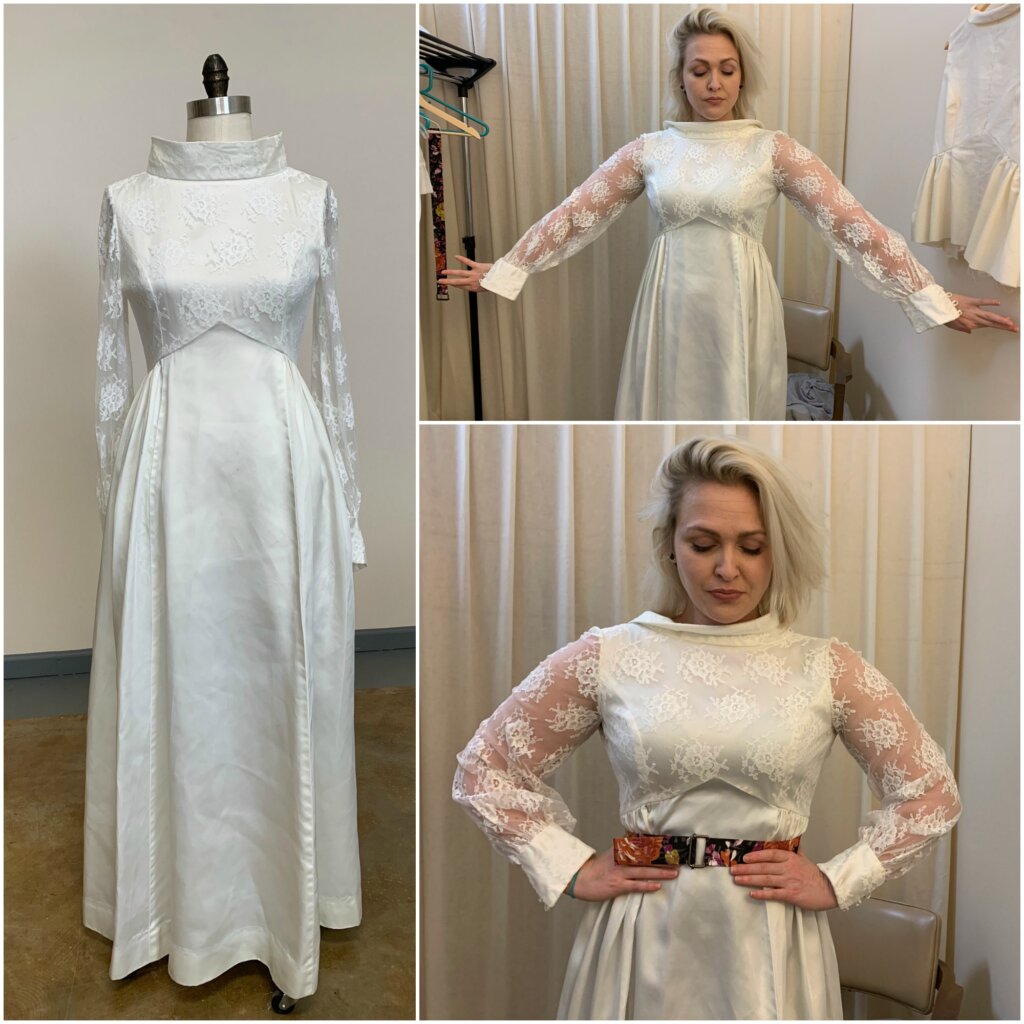
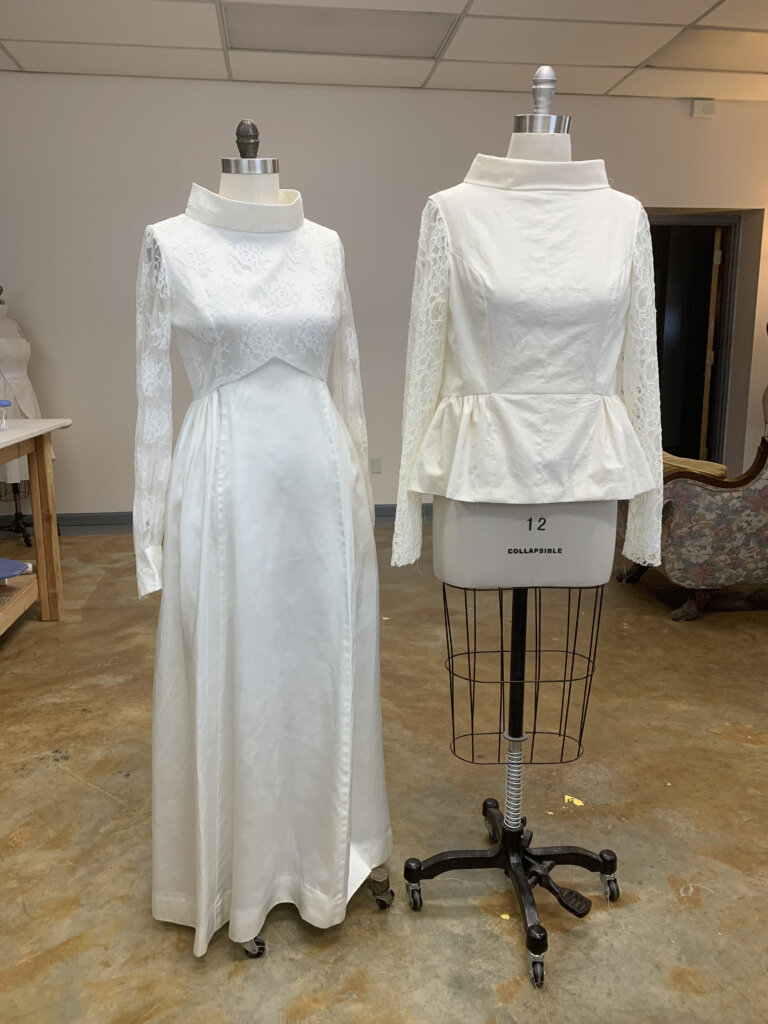
Here’s the inspiration dress that would also be providing the fabrics for Jenn’s top:
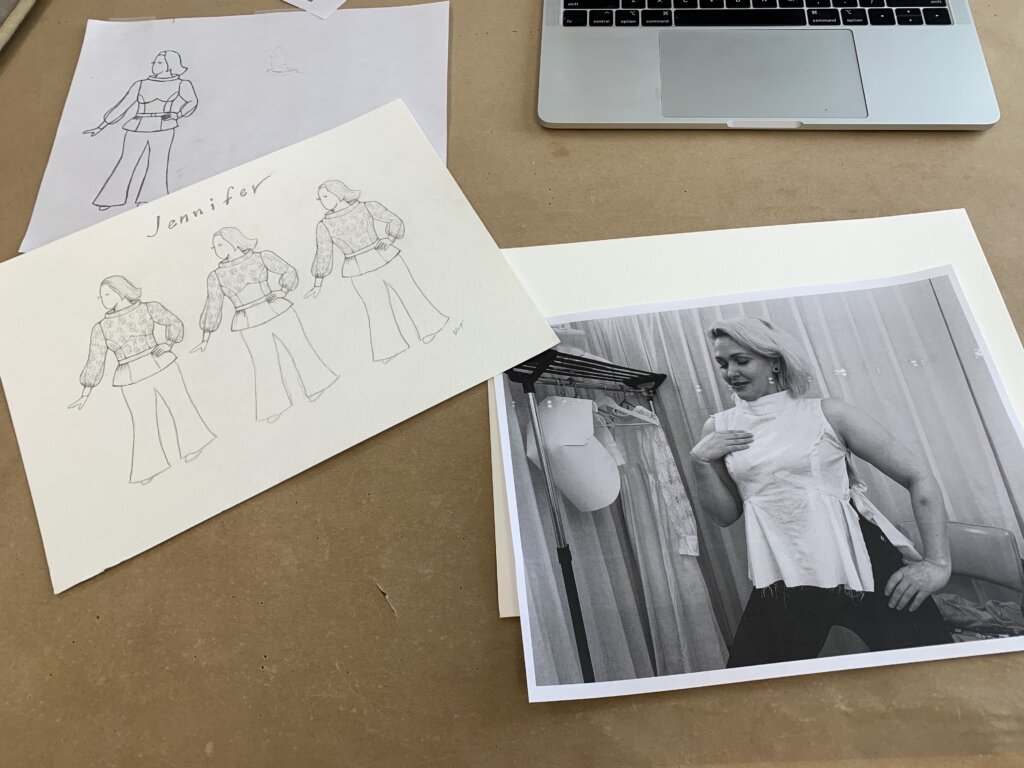
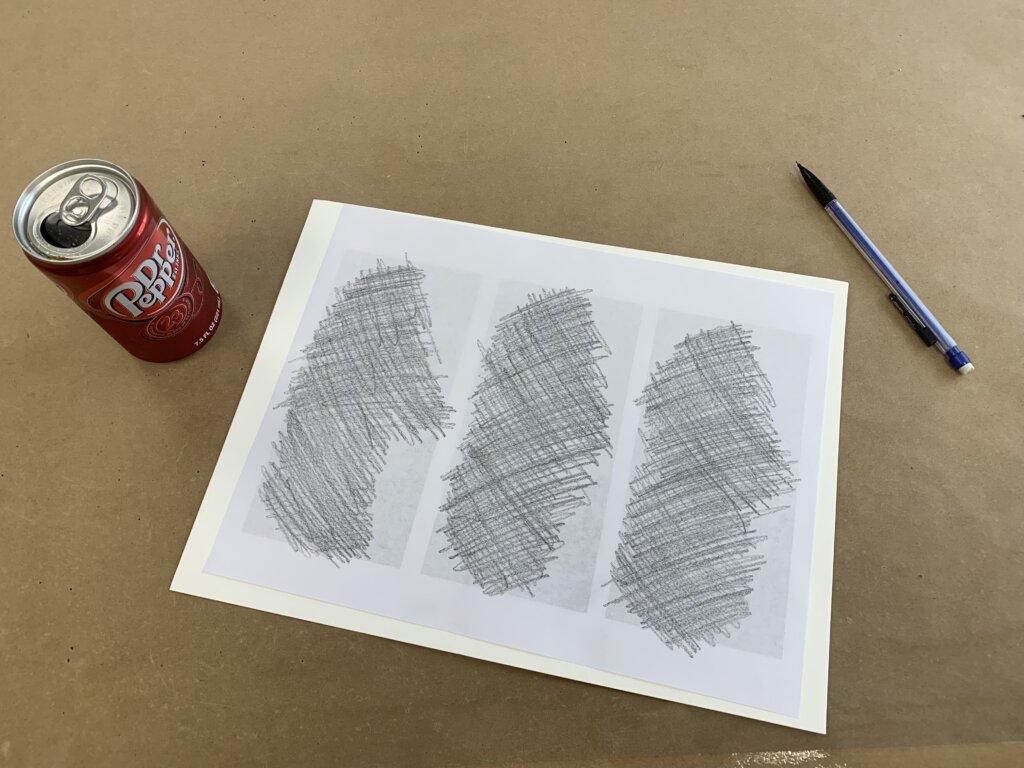
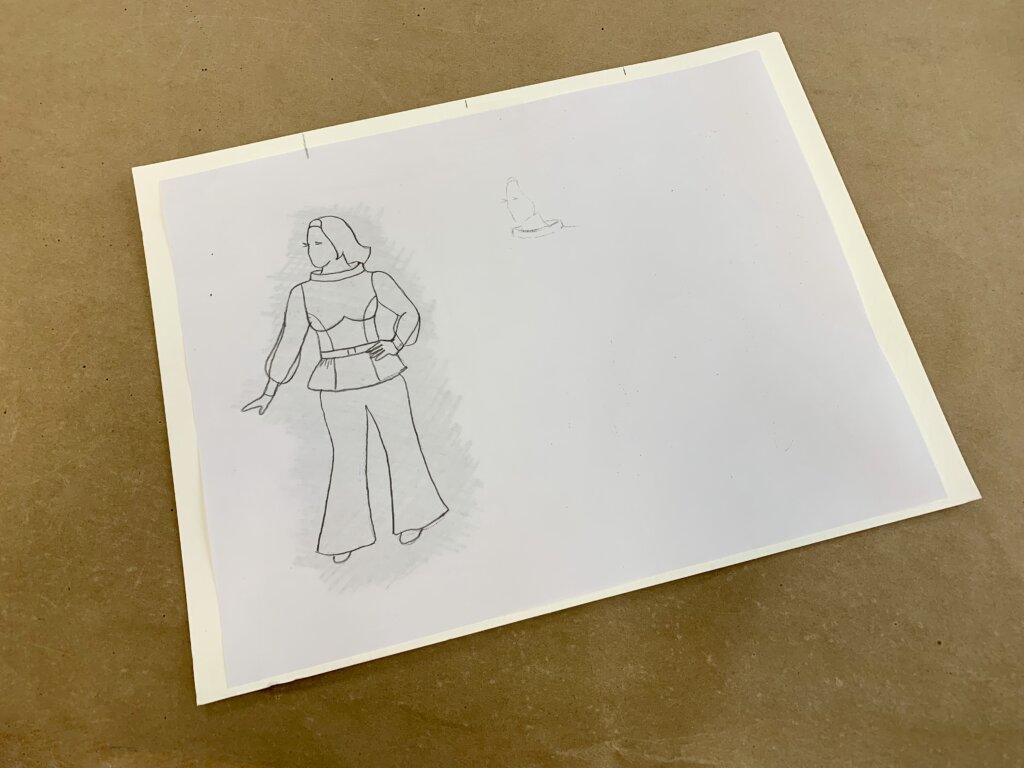
Using her unique silhouette as the basis for my sketch would allow us both to quickly observe how each design would look on Jenn. Fulled by a tiny can of Dr. Pepper, I printed a trio of the same photo of Jenn on the same piece of paper. (She wasn’t fully dressed- so I’m not sharing the front side.) On the back side, I added scribbles behind each photo.
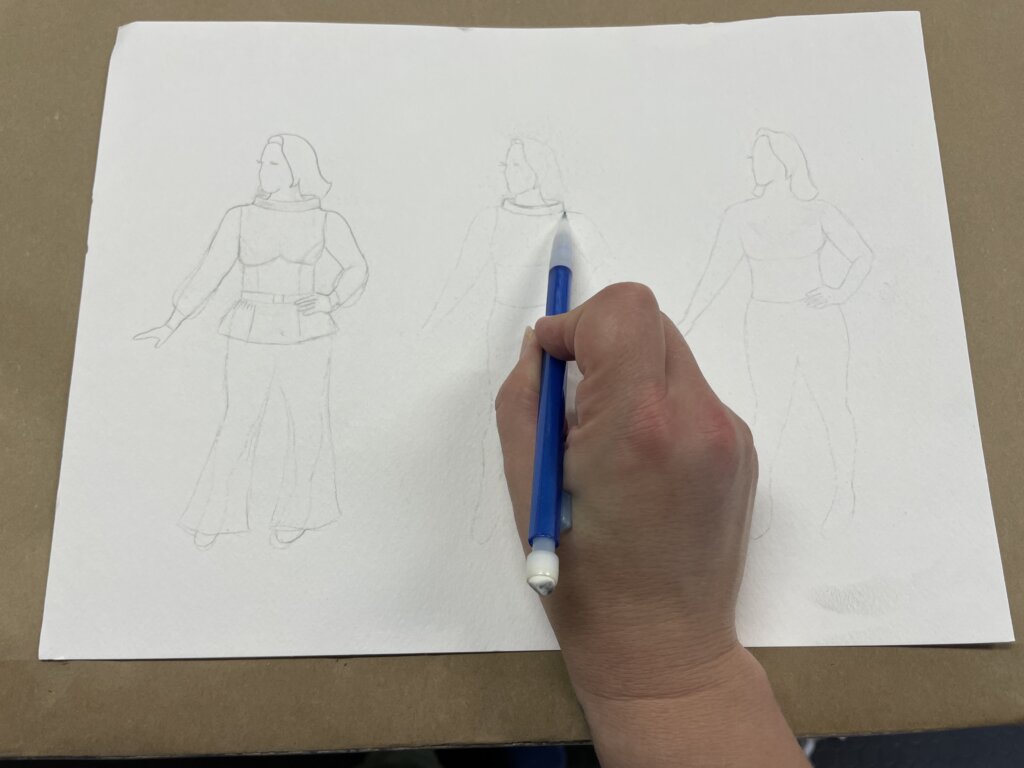
Then, scribble side down on a clean piece of paper, I traced around Jenn’s three silhouettes. After drawing the first design and while working on the second, I thought of an even better sketching plan…
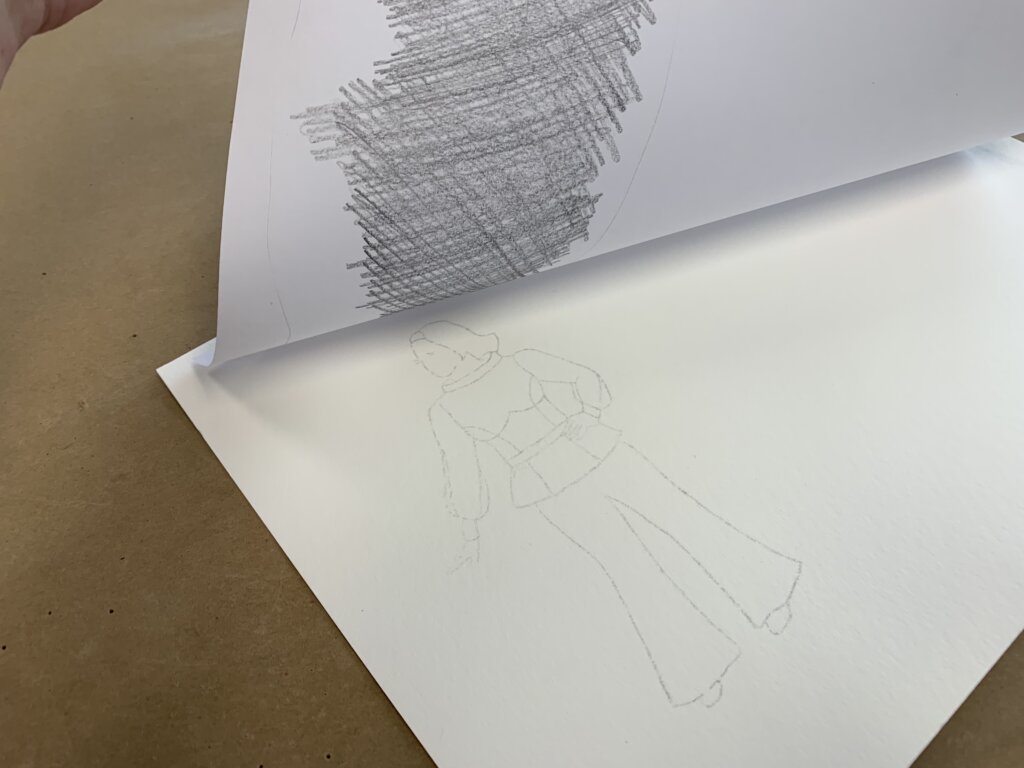
Since the design changes between the three would be slight, I realized it would be easier to trace the whole first design and make changes from there, instead of draw the basic design on the silhouette three times.
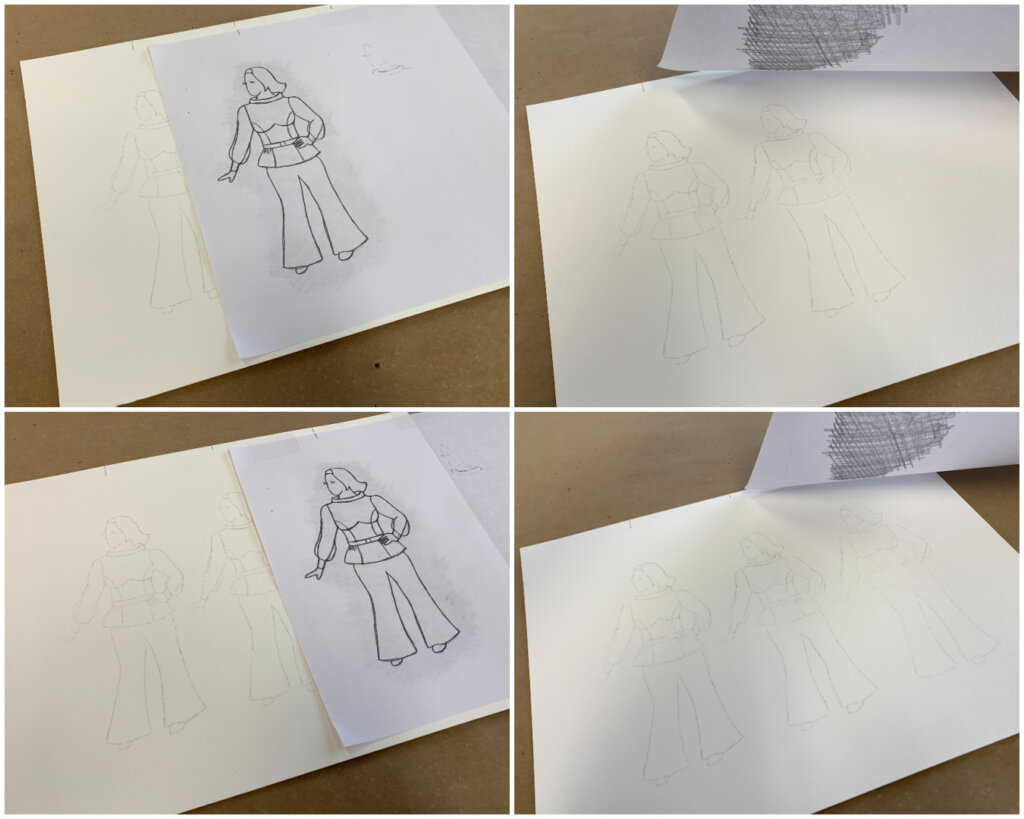
I made a copy of the sketch above and scribbled on the back of it. Then, scribble side down, I traced every line…
…leaving a faint outline of the design on the sketching paper.
I repeated this process for the other two, until I had a faint (and fully dressed) trio of Jenns on my paper.
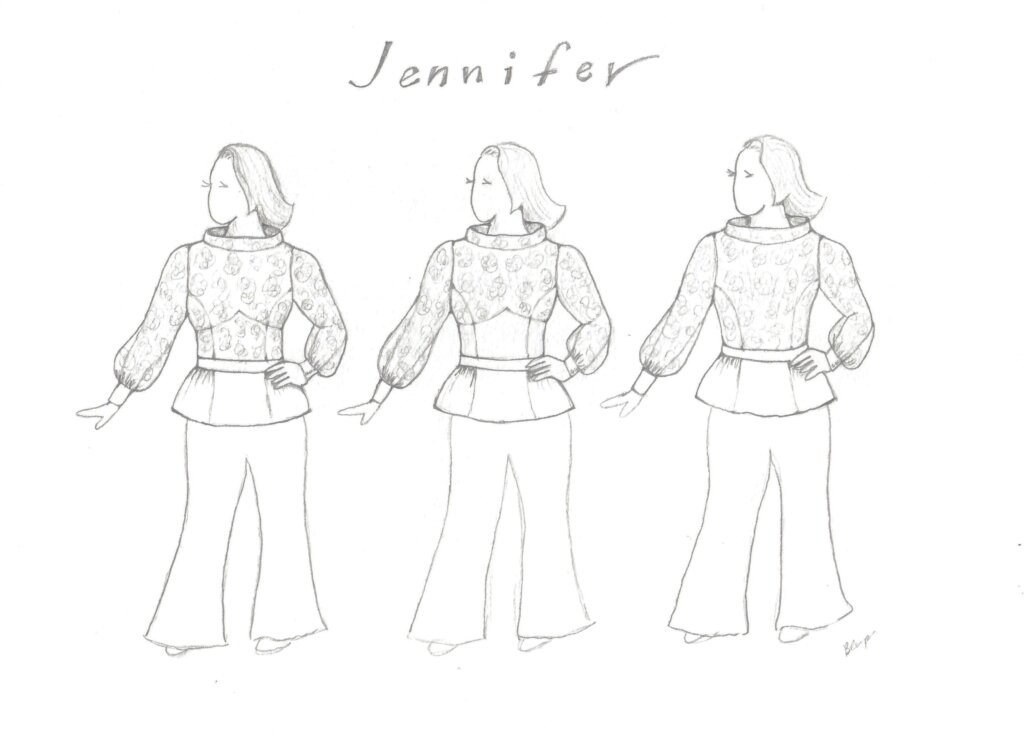
Then I erased or darkened the faint lines as I drew three options onto her body!
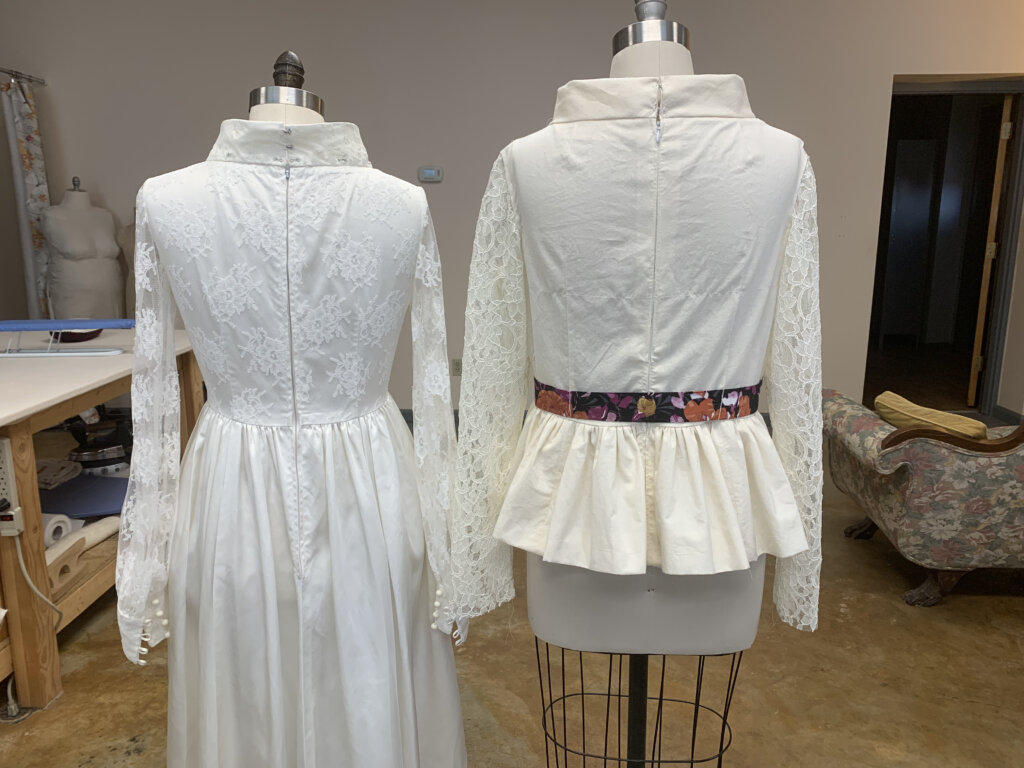
During the consultation, we decided to keep a similar sleeve and collar design from her mom’s dress. Each sketch also included the same belt and solid white peplum. The differences were in the bodice seaming and lace placement.
Which design do you like best? Which do you think Jenn chose for her wedding rehearsal outfit?
The Millinery Design
In addition to the top I would be making for the rehearsal, Jenn would have two wedding dresses and needed two headpieces. I’m a former Broadway milliner, so this was right up my alley!
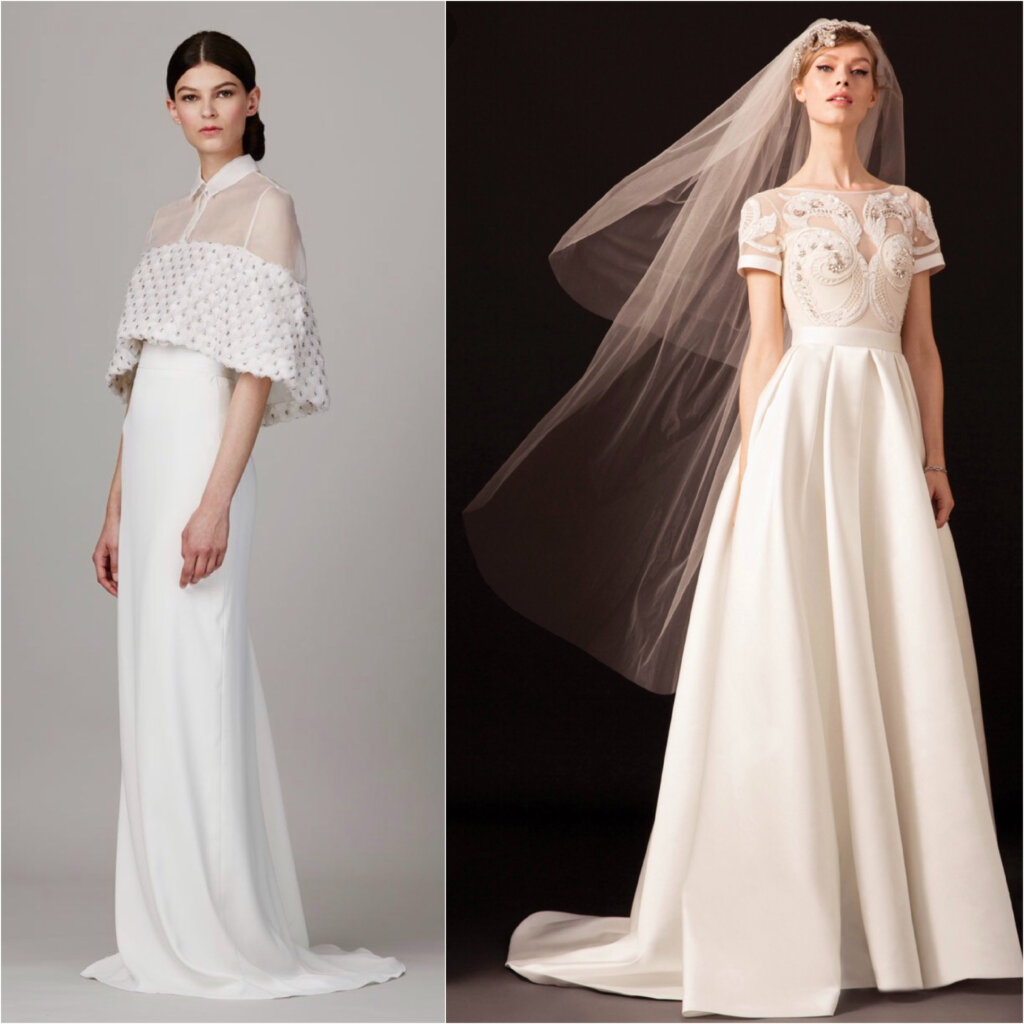
One look would be for her wedding day and the other would be for a photoshoot with People magazine. We did not yet know which dress she’d wear for which event, but she shared these images of the two options. Aren’t they both cool?
Left: Lela Rose / Right: Temperley London
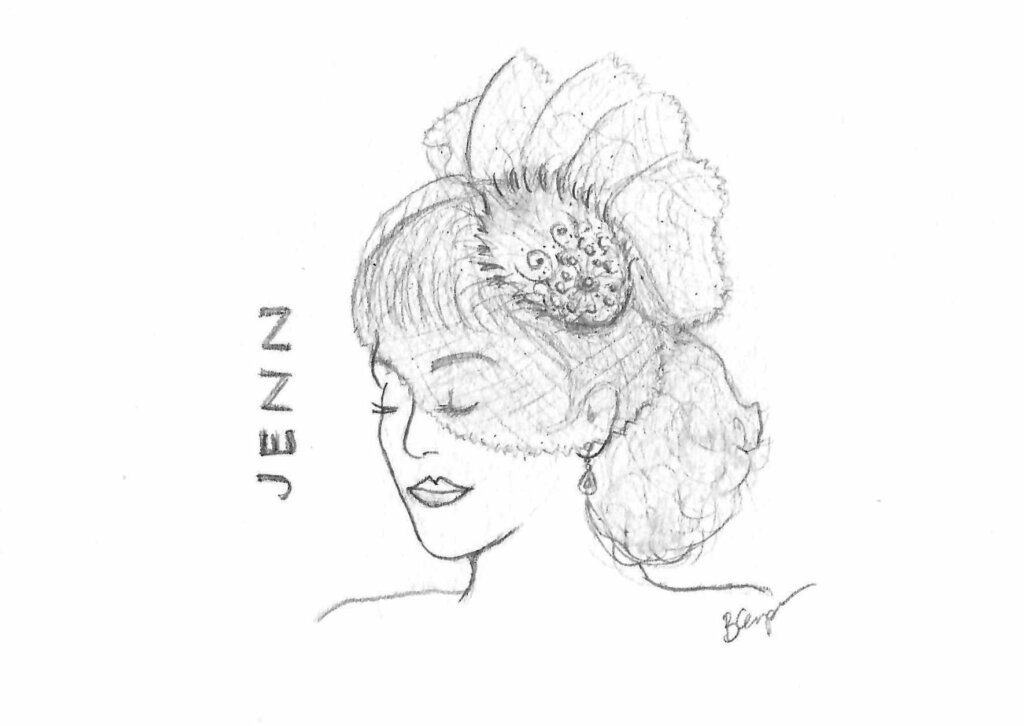
For the Temperley London dress on the right, we considered a shorter version of the long veil on the model, but with a stiff horsehair hem.
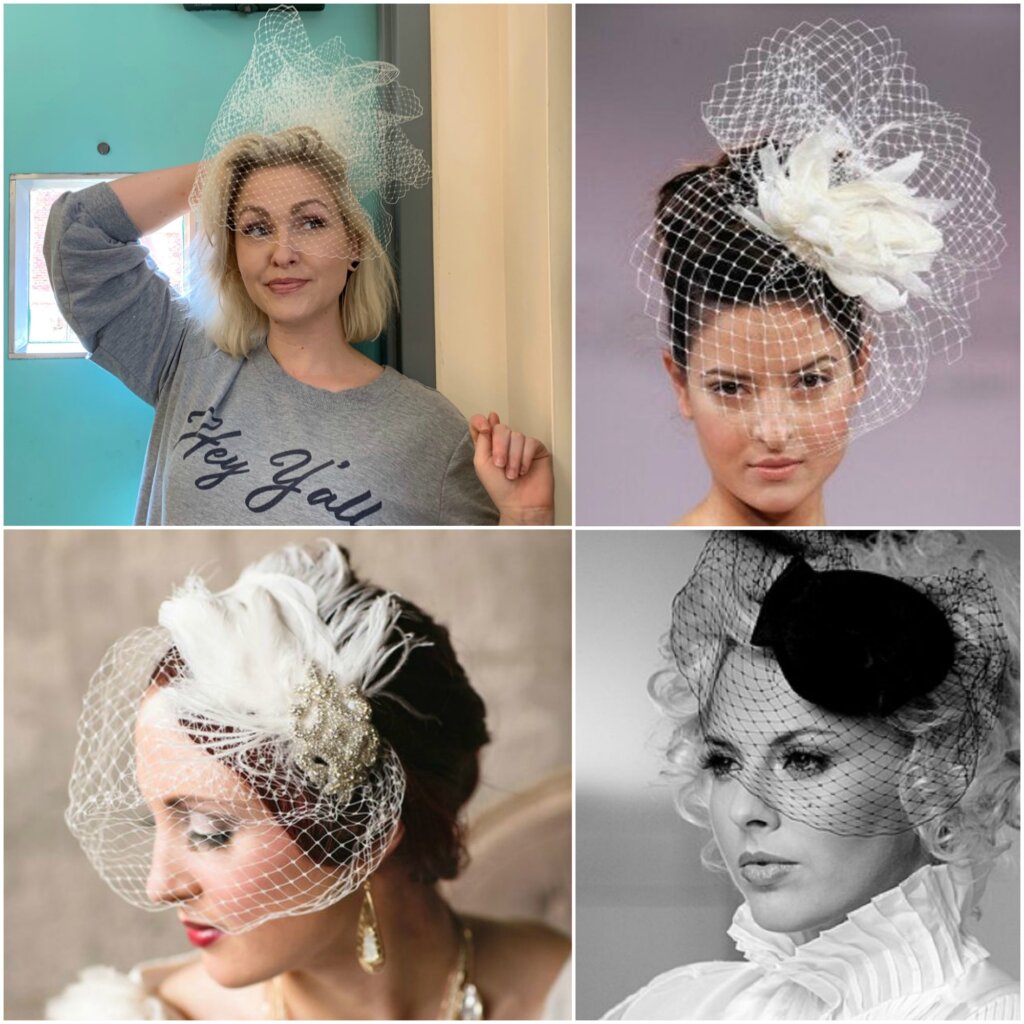
But for the capelette style on the left (which has a gorgeous off-the-shoulder dress underneath), we wanted something fun and festive. Here’s a few of our inspirations:
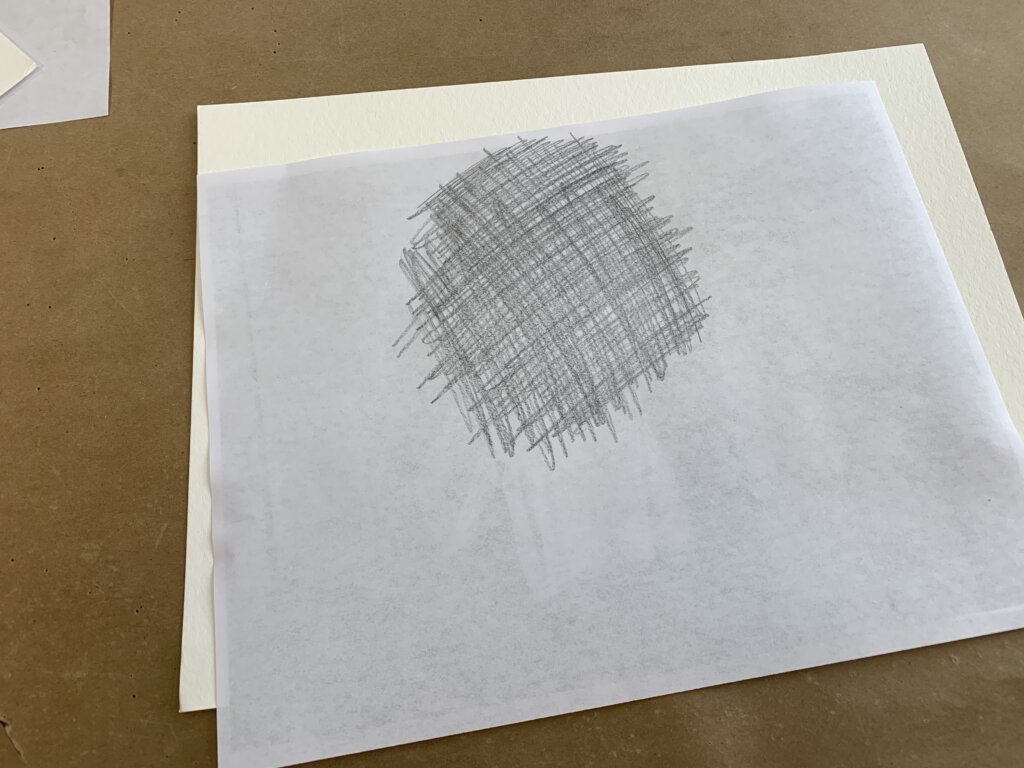
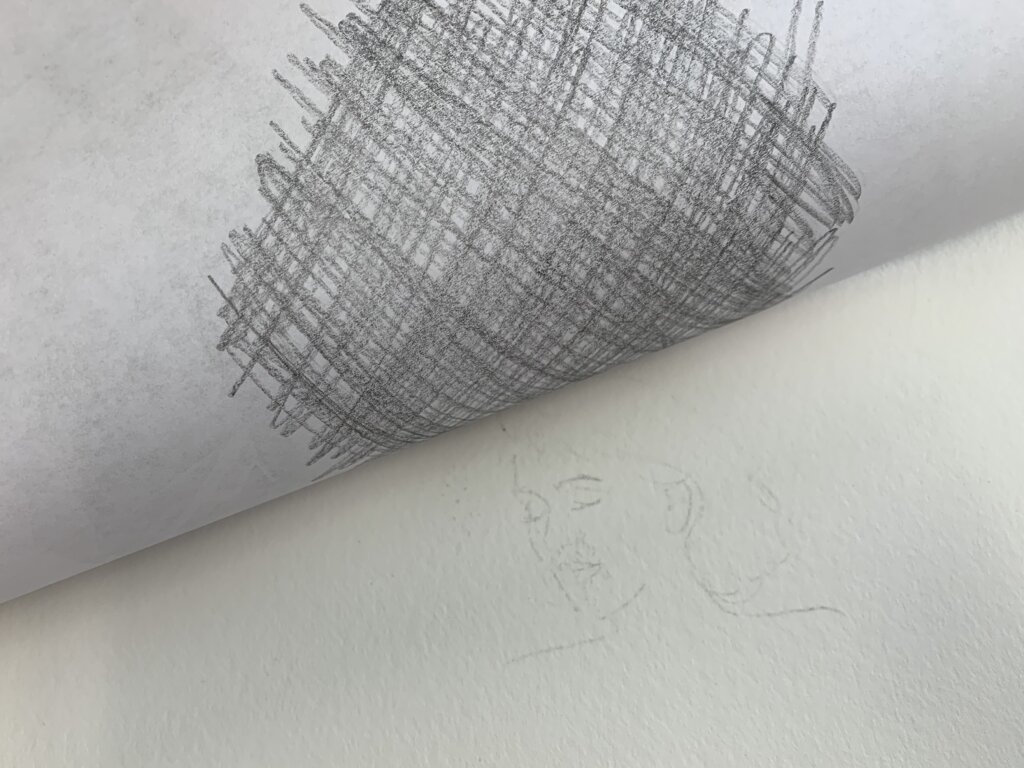
Since I had so much fun sketching the three Jenns, I decided to go ahead and do a sketch for the festive veil as well. I chose a photo of Jenn’s head from our mockup fitting as my starting point.
I scribbled behind her face on my print-out…
…and traced around her face and hair.
Lifting the photo reveals a faint pencil version to start my sketch.
I was excited to share these sketches with Jenn and to work on these gorgeous projects!
Tracing and Truing the New Pattern
Jenn picked design #3 (from the sketch trio above) for her wedding rehearsal top! It would be all lace, with clean princess seams down to a belt and peplum, instead of mirroring the underbust peak from her mom’s 1970 design. With the decision made, I was ready to allow information from our first mockup fitting to inform how to create a new pattern and create a new mockup for our second mockup fitting.
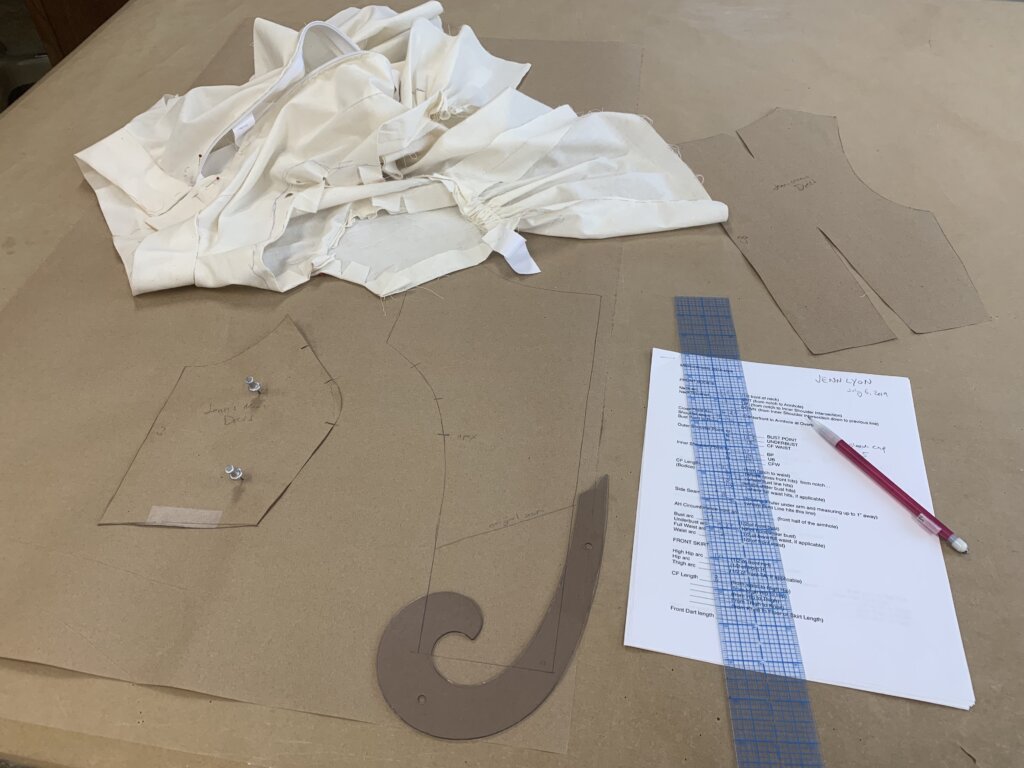
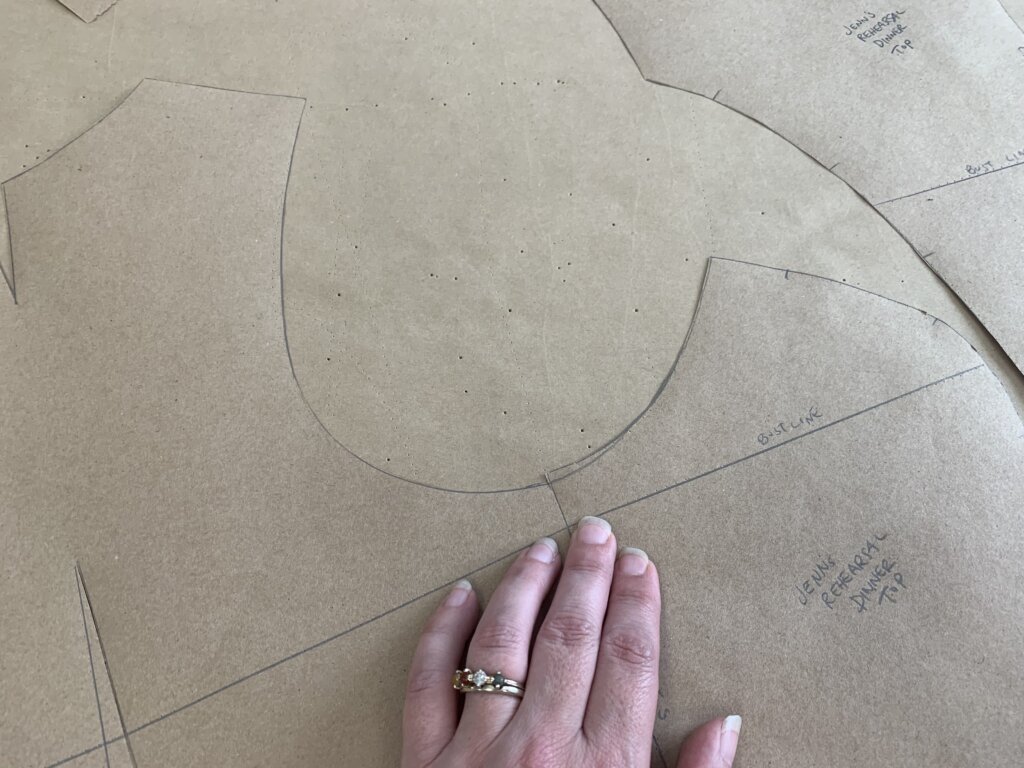
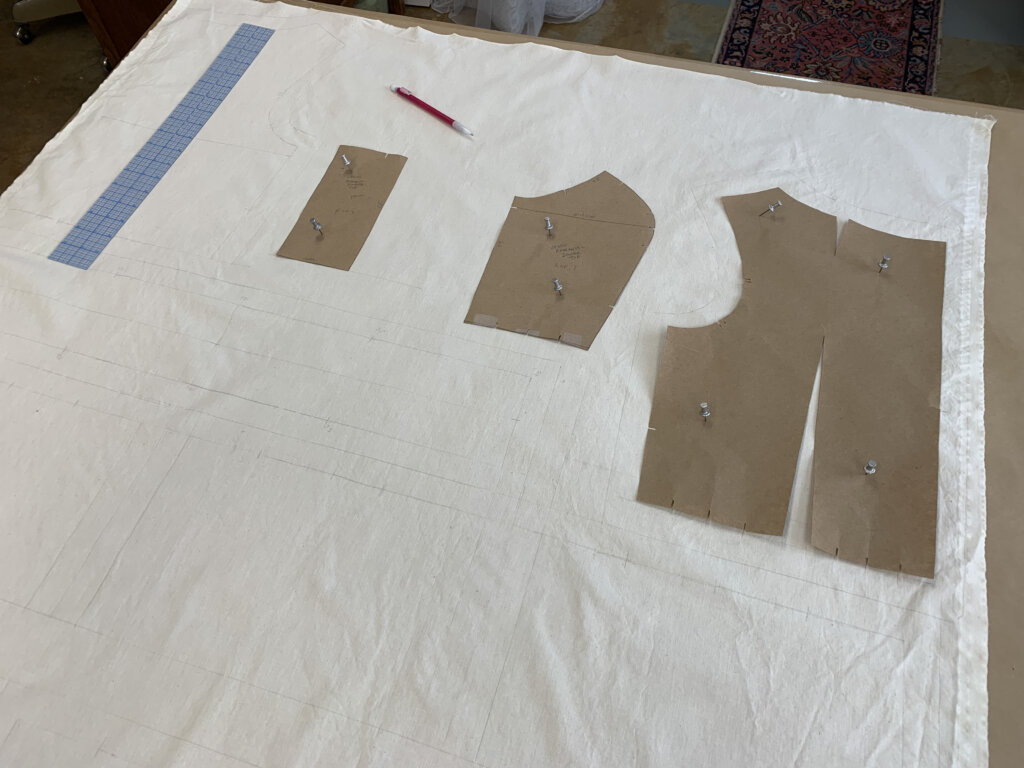
I started by tracing each of the original pattern pieces onto a large piece of clean paper (with plenty of border around each edge).
Then I added the design and fit changes to each piece.
The puzzle-solving part between the mockup fitting and the corrected pattern is one of my very favorite stages of the custom process. I love it when the original information gets transformed into something even better!
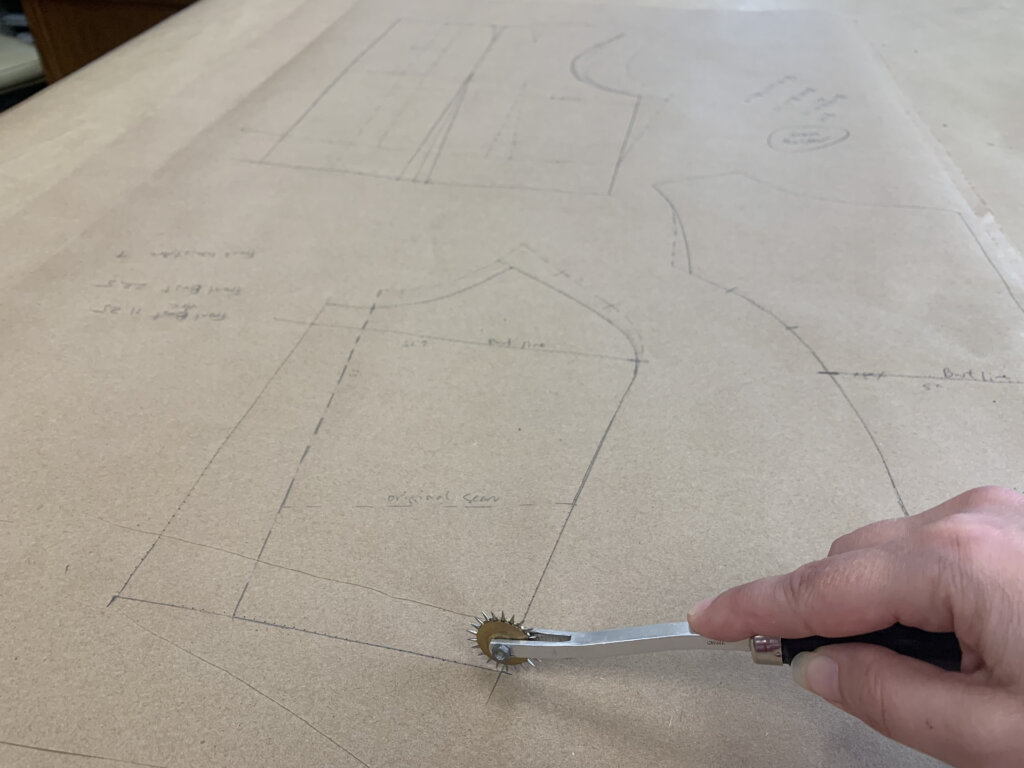
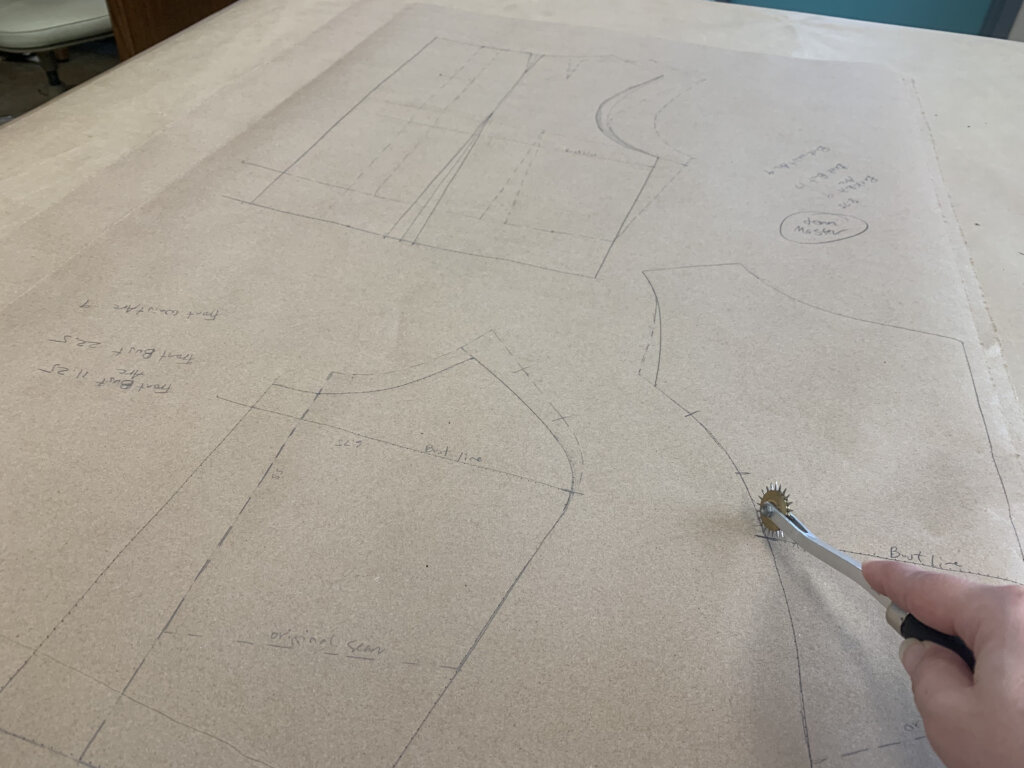
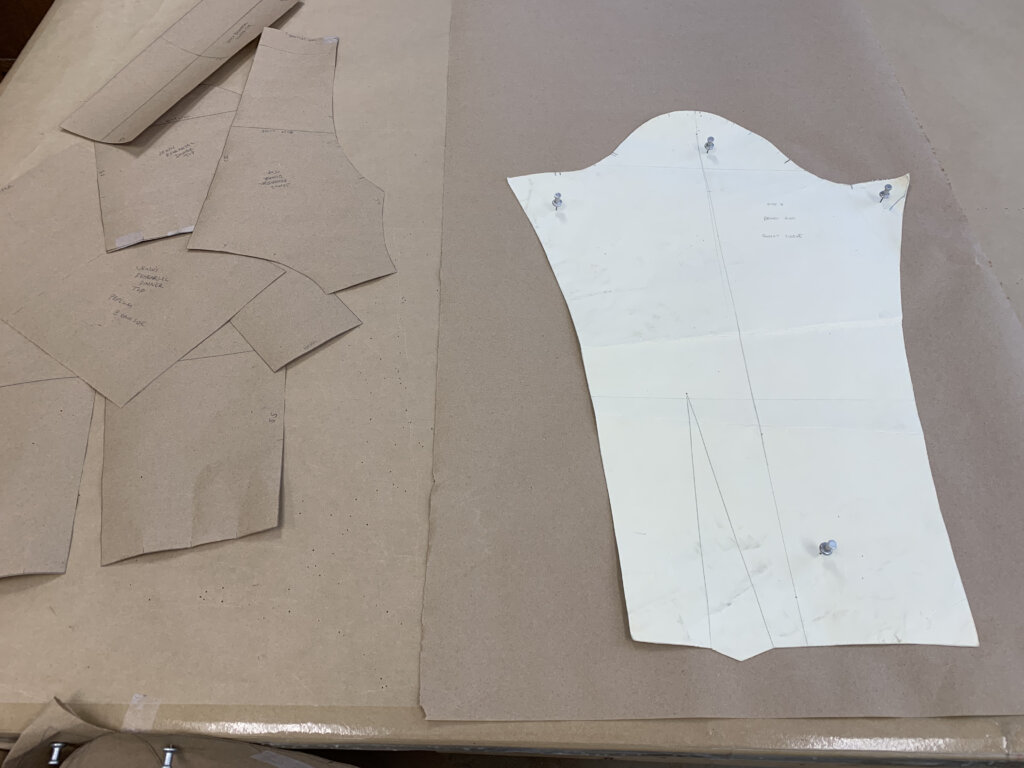
Each pattern piece took on a cool new shape! My “Master” showed the “before and after” of each piece. Having a record of the edits would be potentially helpful in the future (and also looked really cool and inspiring to me), so I put a clean piece of paper underneath…
…and traced around only the new pattern lines with my spiky wheel.
This added a faint dotted line of each pattern’s silhouette onto the clean piece of paper, which I traced with my rulers and pencil to create my new-and-improved pattern. Like in my sketching process, I love how easy and helpful tracing can be!
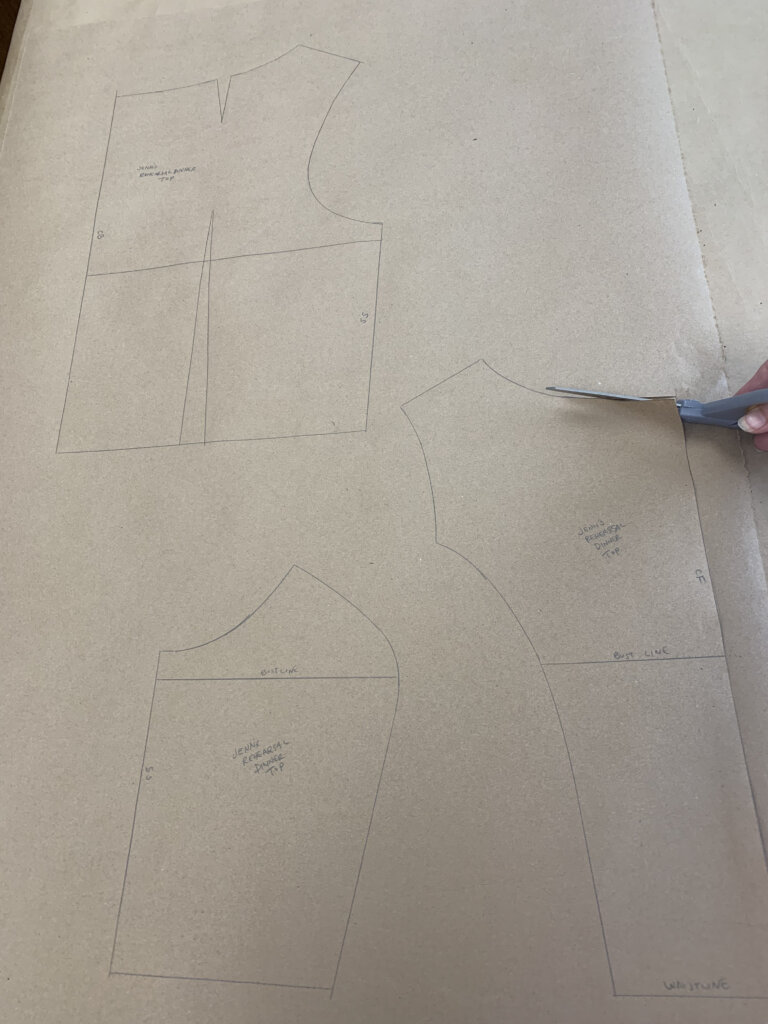
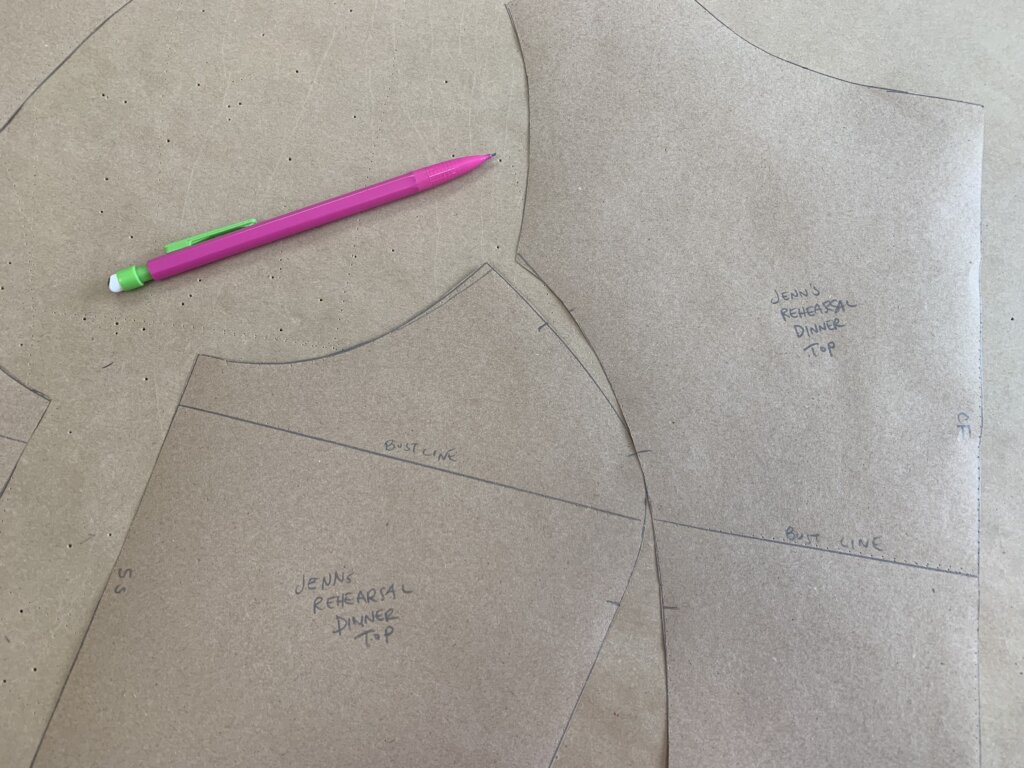
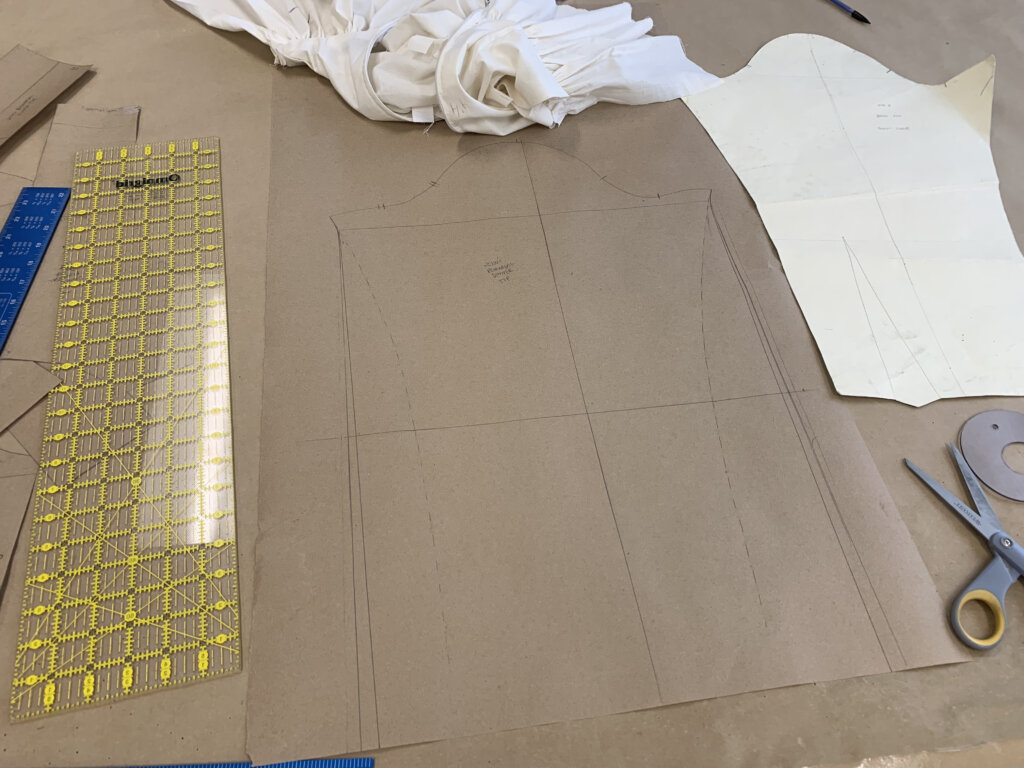
Once each new pattern piece was cut out on their stitching lines, I was able to “blend and true” them for accuracy and elegance.
For every stitching line that will be joined to another, I make sure they are the same length- which will allow the seams to stitch together accurately. This is called “Truing”.
But sometimes cleaning up is just about making a neatness. Lines can be drafted with seams that are “true”, but not in a particularly clean or beautiful way. This is when I “blend”.
Here you can see a couple of my tiny improvements where the curved seam met the armhole…
…and a little neatness made at the bottom of the armhole. The refined edges become the stitching lines for my garment.
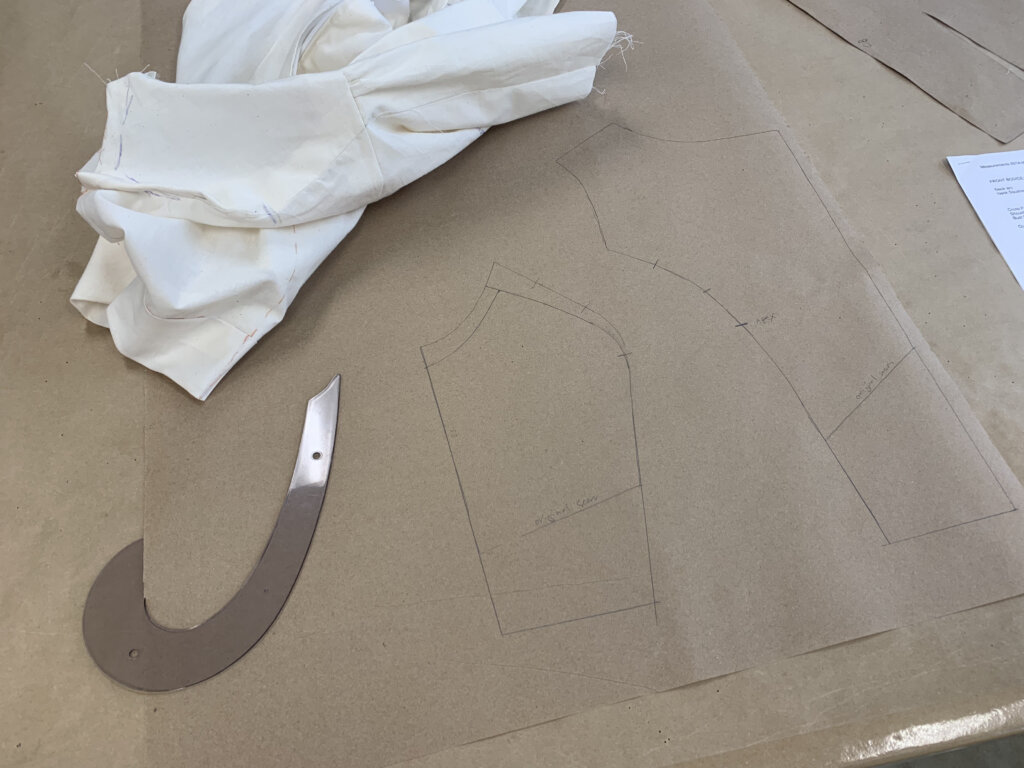
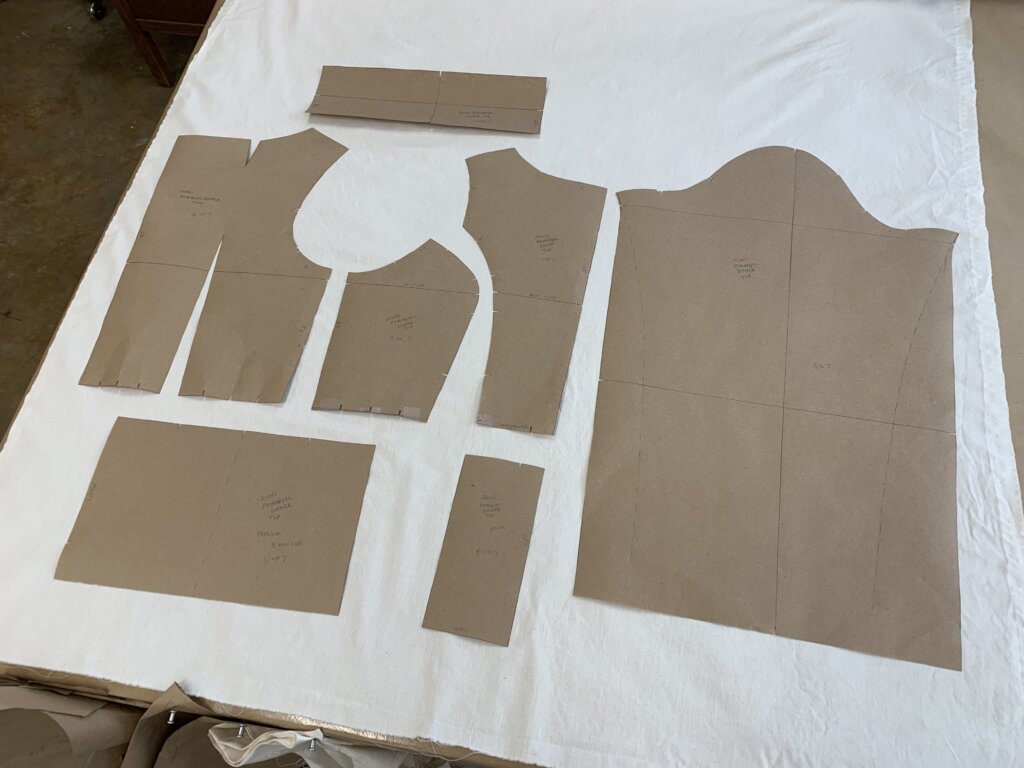
The last pattern piece to create was the sleeve. In most cases, there is no use fitting a sleeve until you know the armhole fits. So for our first mockup fitting, I didn’t even start a sleeve.
But now, it was time! I used the gusset sleeve template that I made during graduate school (MFA Costume Production, Class of 2001) which I have used for possibly every set-in sleeve I’ve patterned since then.
After adjusting the template’s lines to match Jenn’s newly patterned armhole, I added my own design lines to keep the boxy full sleeve style from Jenn’s mom’s dress. I’d gather the bottom of the lace into the original cuffs (sewn by Jenn’s grandmother)!
With my full set of paper pattern pieces cut out along their stitching lines, I was ready to start marking and cutting a new mockup!
Making Jenn's Second Mockup
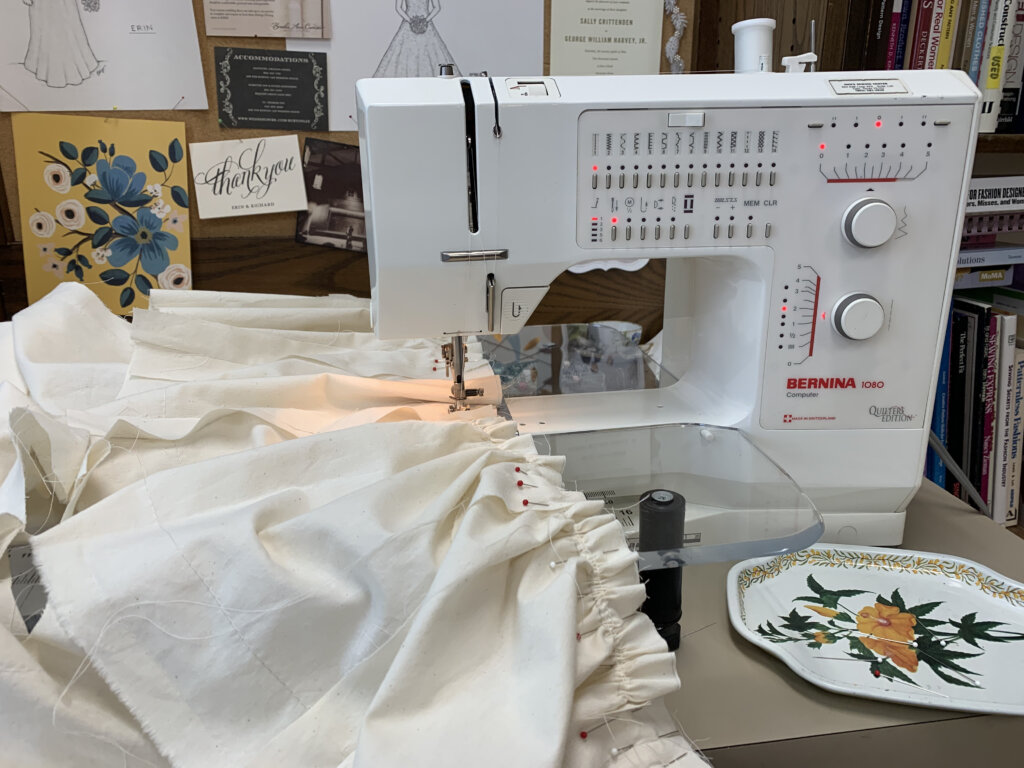
To get started making Jenn’s next mockup, I used my pencil to trace around the edges of each side of each piece onto muslin. I also drew a 1″ border of allowance around each piece using my clear ruler.
One of the challenges of this project is that I have limited materials. The commission is specifically about reusing the fabric from this vintage dress to create the new garment.
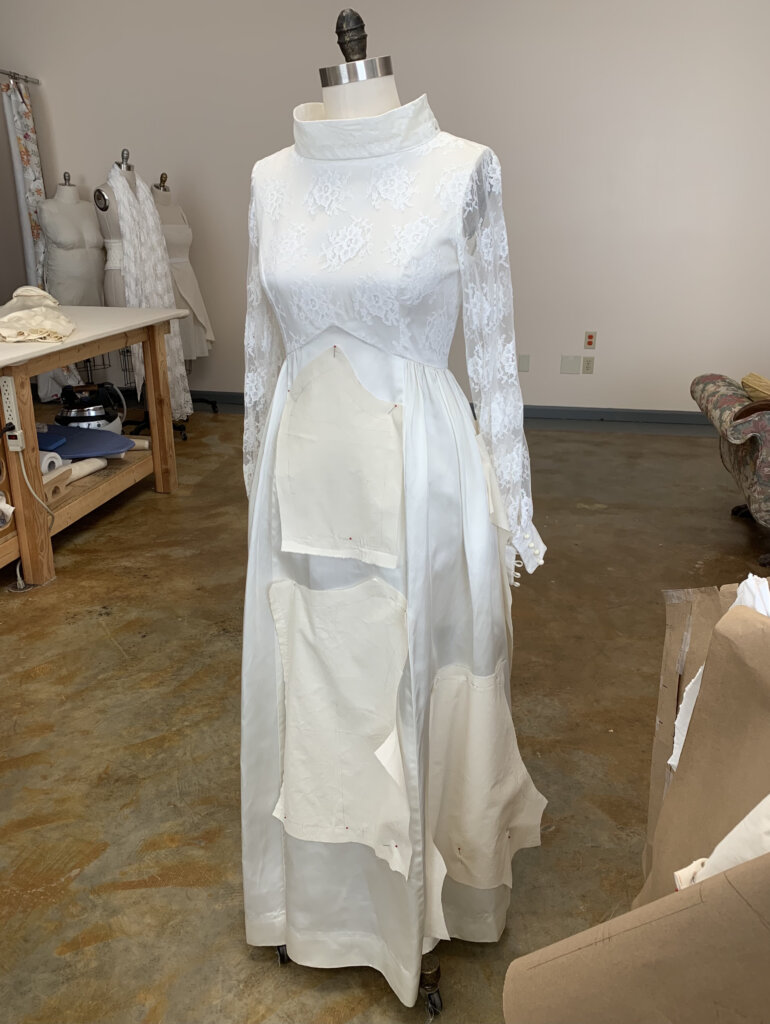
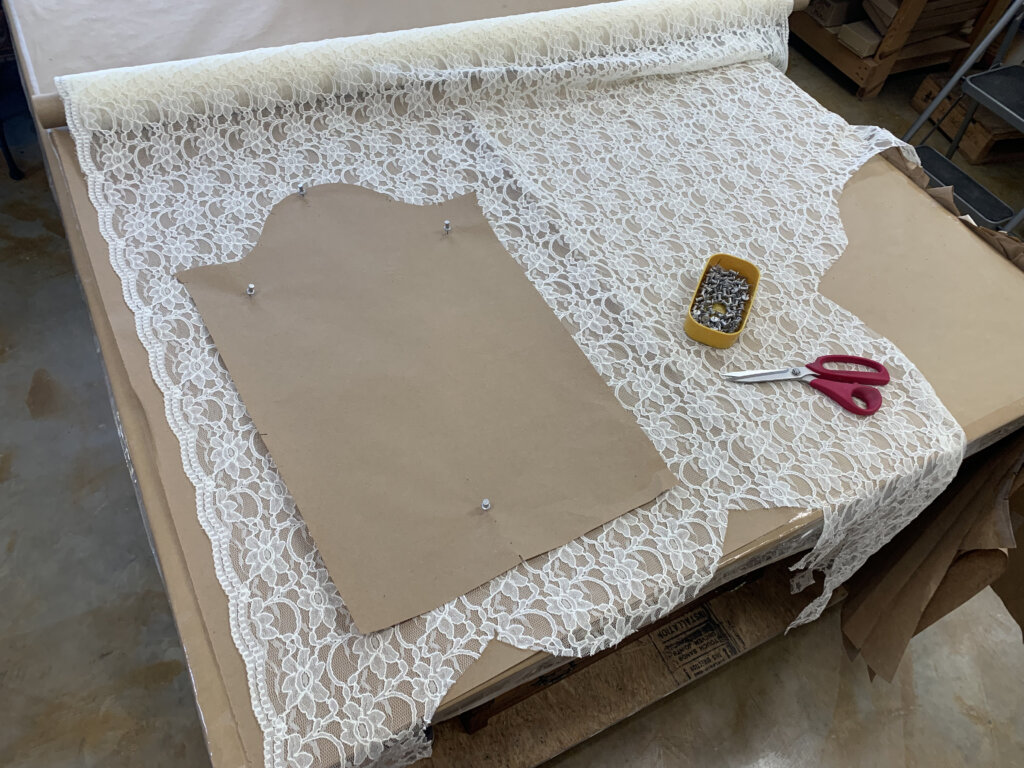
Once the muslin was cut, I pinned the mockup pieces onto the dress to explore where I might end up cutting each. Almost all of the satin would be cut from the skirt and almost all of the lace would be cut from the veil (which you can see hanging on a form in the background.)
I marked and cut the sleeve mockup out of some lace from my stash (leftover from Caitlin’s wedding dress.)
(Though these dress forms were not a match for either of these garments,) Here’s the vintage wedding dress next to the mockup of the top it will become!
Pretty cool, huh? I was extra excited to reach this stage because I’d be seeing Jenn (and Lydia) again really soon for a second mockup fitting (right before her wedding shower)!
NEXT POST: Jenn’s second mockup fitting shenanigans + I take this mockup and this dress completely apart!
Another great story, and I love seeing how you solve things. This ones needs to be filed under ‘working with clients’.
The underbust is the defining feature of her mom’s dress. So it seems like you went to a whole lotta trouble replicating that pattern, when what she really wanted was a DIFFERENT STYLE.
If you read the full story following each post from the first post (or even just the beginning of this post), you’ll see that I instead file this under “Working with Friends”.
Even two years before our first fitting, we knew we’d be using the fabric while creating a different style from the original dress. In fact, I insisted on it. (I prefer to create original designs- I do not alter other designers’ patterns/dresses.) I would have never accepted this commission if it weren’t for a good friend- especially since Jenn wasn’t going to be available for my required amount of fittings! (At the time, Jenn was filming a TV show– splitting her time between New York and New Orleans. I live in North Carolina.) That’s why the steps of my process got mixed up in a way that had our first fitting before design and measurements. Needing to mix up the order of my steps to accommodate her schedule was a challenge, but we made it work! And had a blast doing so!
I’m a former professional costumer and couture dressmaker for one-of-a-kind bridalwear located in rural North Carolina, who teaches custom garment sewing to sew-curious solo-sewists online.
My blog mostly follows along with the couture process of how each heirloom-quality custom wedding dress was made from idea to wedding day, as well as personal sewing projects and other couture curiosities.
Welcome to my (temporary) Sewing Studio! Come on in! I love seeing other people’s workspaces and tools, so I thought I’d show you mine. I cleaned up after a big...
Duplicating the Vintage Dress’s Pattern (without taking it apart)
In my previous post, I introduced Jenn and the custom bridal wear project(s) for her wedding weekend. Check out the full story for all the deets, but to catch you...
I Made Myself the Coolest Dress pt. 1 – Pattern Design & Mockup
Though my personal wardrobe is mostly “the dressmaker has no clothes”, when I do make something for myself, it’s usually an epic project. I’m so excited to finally share this...
I’ve been blogging for TEN YEARS now, ya’ll! In “My 10 Year Blogiversary pt. 1”, I share links to each bridal blog series that I’ve created over the past decade....
It’s finally time to share about Deborah’s wedding day! HOORAY! Deborah and Blake were married in November 2017 at a church in Greensboro, NC with the reception at a nearby...
New Bridal Blog Series: My (kinda famous) friend Jenn!
Brooks Ann, Jenn, & Charles January 2017 Going Way Back… To begin my next bridal blog series, let’s head into the Way-Back Machine. And we’ll head farther back than this...
The bridal blog series is back! In each bridal blog series, you meet a new bride and I slowly post-by-post recount the process and share the behind-the-seams story of creating...
The bridal blog series is back! In each bridal blog series, you meet a new bride and I slowly post-by-post recount the process and share the behind-the-seams story of creating...
The bridal blog series is back! In each bridal blog series, I recount the process and share the behind-the-seams story of creating a one-of-a-kind custom couture wedding dress from start...
Sally is someone special. Back in December, I got an email from a dear friend named Sally that I had lost touch with. The subject line: “dear lord i’m getting...
As it starts to get cold, it sure is nice to think about summer! Gin and tonics… BLTs… beach trips… seersucker… Earlier this year, I worked with a bride who...
Welcome to Part 2 of the story behind making Andy’s 2019 wedding dress, where I’ll recount the testing phase of the custom process. If you’ve been following my blog for...
They say documenting the process triples the production time. (And I work more slowly than most.) My Nimbus was cold.She needed a new coat, sooner than later.
Welcome to Part Two! I’m back to share the nerdy behind-the-seams details of creating my Vanishing Tie Top for the Precious Fabric Challenge. But this photo-filled blog post doesn’t feature...
Do you have a fabric that you’ve been SAVING instead of SEWING? Yeah. Me too. So when Whitney Luckenbill of TomKat Stitchery asked me to be a part of her...
Welcome to my (temporary) Sewing Studio! Come on in! I love seeing other people’s workspaces and tools, so I thought I’d show you mine. I cleaned up after a big...
Welcome back! It’s the series finale! In this third and final post of My Warmup Jacket series, I share the behind-the-seams details of my jacket’s construction and finishing stories!
In this second post of My Warmup Jacket series, I share the behind-the-seams details of my jacket’s patternmaking and mockup stories! And after putting this patterning post together (which was...


2 Responses
Another great story, and I love seeing how you solve things. This ones needs to be filed under ‘working with clients’.
The underbust is the defining feature of her mom’s dress. So it seems like you went to a whole lotta trouble replicating that pattern, when what she really wanted was a DIFFERENT STYLE.
Oh no! I think you got the wrong impression.
If you read the full story following each post from the first post (or even just the beginning of this post), you’ll see that I instead file this under “Working with Friends”.
Even two years before our first fitting, we knew we’d be using the fabric while creating a different style from the original dress. In fact, I insisted on it. (I prefer to create original designs- I do not alter other designers’ patterns/dresses.) I would have never accepted this commission if it weren’t for a good friend- especially since Jenn wasn’t going to be available for my required amount of fittings! (At the time, Jenn was filming a TV show– splitting her time between New York and New Orleans. I live in North Carolina.) That’s why the steps of my process got mixed up in a way that had our first fitting before design and measurements. Needing to mix up the order of my steps to accommodate her schedule was a challenge, but we made it work! And had a blast doing so!
Thanks for following along!