

Last week, I sent an email to those on my free newsletter subscription list featuring a clever solution for making a small sewing space feel like a large professional studio. It was about adding an extender to your work table (that can double as an ironing station) to be pulled out for large projects and tucked away when not in use. It created a bit of buzz.
People wanted to know more about professional sewing room tables! That got me excited because I love my work table and it is something that (if you have carpentry skills) you can make yourself and can completely customize to your needs.
This post will assume that you have some carpentry knowledge/tools and is not a step-by-step tutorial. It’s just a general peek into what we did to create my custom table. Hopefully it will inspire you to use your favorite building methods to execute and customize your own table.
♥ Like in custom dressmaking and pattern making, knowing some measurements and seeing some details can inspire you to make something uniquely yours with your favorite methods and design choices. ♥
DIMENSIONS:
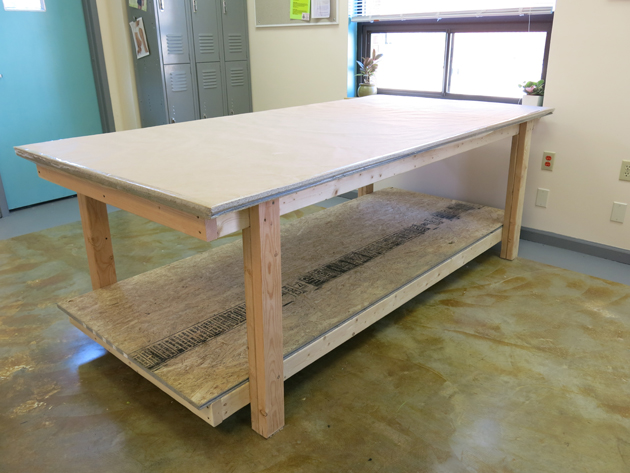
My table is 4′ by 8′ wide and 34″ high (all customizable dimensions) and is modeled after the tables that have been in every professional shop that I have ever worked in. When it comes to custom sewing, this is what the pros use.
I chose 4×8 because that is the size of the sheets of plywood and homasote used to make the top. If that is too big for your space (like it was for mine before I moved into my new Sewing Room) you can rip the sheets to your customized dimensions using a table saw or a circular saw.
I chose 34″ high because that is what feels comfortable to me. Warning: I am VERY short! Less than 5′ short! So your table might feel comfortable at a taller height. (Most surfaces feel too tall for me, so I’d often wear platform shoes or roller skates to work.)
To decide what height you’d like your table to be, pretend to draft or cut or sew standing at different surfaces. Is the height of your kitchen counter a comfortable working height for you? Maybe the kitchen table? Or bathroom counter? Somewhere in between?
For me, what feels comfortable is a height that is pretty much right where I hinge at my hips. I want to be able to lean far over the table without getting on my tippy toes. 34″ high puts my hip bones right against the edge of the table’s top. If I am standing up straight, my elbows are about 3″ above the surface.
♥ Once you’ve decided on dimensions that work for your body and your sewing space, you can start designing and building your table! I’ll show you how this table was built, but if you’d like to build it or design it a different way, have at it!
The important bits (for me) are that it has a pinnable paper covered top, that it is a good size/height, and that it is sturdy/stable. ♥
MATERIALS YOU MIGHT NEED:
- 2 sheets of 3/4″ plywood or fiberboard
- 1 sheet of homasote (ask your local lumber yard to order this for you. One sheet costs about $35)
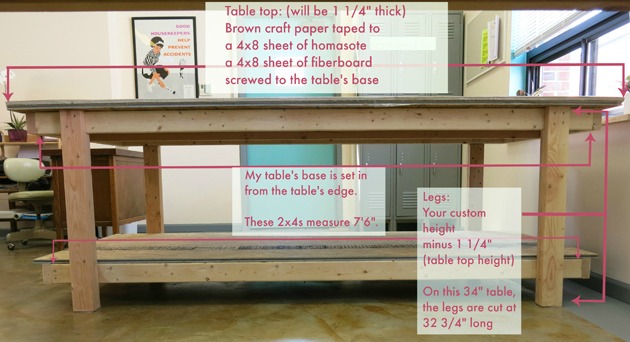
- 2x4s (my custom cut list was 5@7’6, 2@42″, 2@39″, 4@32 3/4″, 4@29 1/4″)
- a box of 2 1/2-3″ screws
- 4′ roll of brown craft paper (if you are making a skinnier table, you might want skinnier paper)
- clear packing tape
TOOLS YOU MIGHT USE:
- a power drill for screwing
- marking tools
- measuring tools
- a circular saw (you can use other saws too- such as a table saw for the sheet goods and a chop saw for the 2x4s. My husband did all his cuts with a circular saw.)
THE TOP:
Let’s start with the top, since that is the most important. If you have a top like this, you can add it to any table base you’d like. In my last email I added one of these to the base of an ironing board!
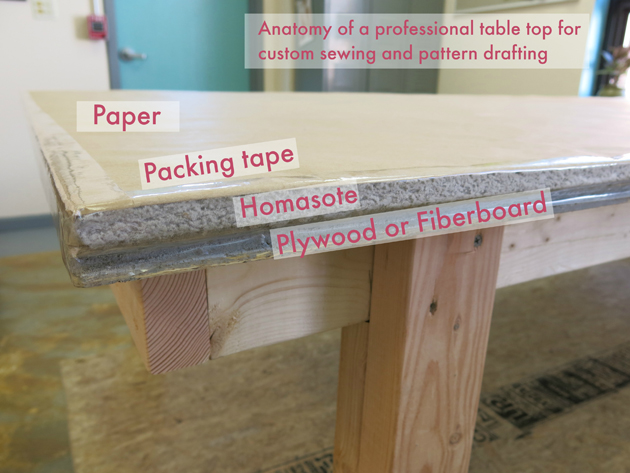
The top is made from a 4×8 sheet of 3/4″ plywood (or in this case fiberboard) with a layer of homasote laid (not screwed) on top.
The homasote is then covered with brown craft paper (which is exactly the same paper I use to draft all of my patterns) by simply taping its edges to the table with packing tape. No need to worry about scratchy edges of the wood or that the homasote might slide off the table. The tape does all the work! Each time you want to refresh your paper, just add it to the top and then add more tape. My old table has layers upon layers of paper on its top and layers upon layers of tape around its edges.
I kind of like knowing that all that history is stored in the table…
Since this table is brand new, I recently added my inaugural paper and tape layer. The first time it doesn’t stick super great, but if you can get it to stay in place you are good. I like to keep my paper exactly the size of the table top, rather than folding any edges around the sides.
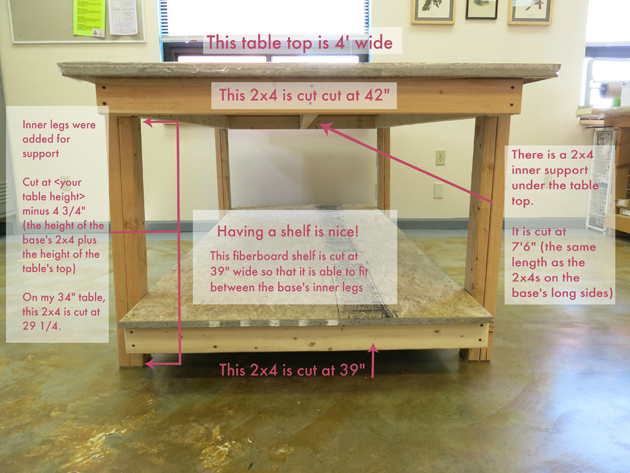
THE BASE:
This type of top can be added to any base (maybe something from the thrift store?), but here’s a glimpse into how my husband built the base for my 34″ tall table:
That’s a quick detailed look into my custom work table with a pinnable top! This type of table is really helpful (and fun) for custom pattern drafting, cutting, and sewing as you can pin and stabilize your project directly to your work surface.
I hope this helps you build your dream table and opens new sewing and drafting possibilities for you! If you are building your own Sewing Room table or have any questions, please leave a comment!
♥ Interested in learning how I use this table? Check out my interactive online course Skirt Skills! I teach you the basics of pattern drafting and sewing custom designed clothes for unique bodies all from the comfort of your own home. More information can be found at www.SkirtSkills.com.
Starved for images of brides and weddings? I recently updated my Portfolio and Testimonials page! Check out the new galleries and hear the amazing things these women had to say about their experience working with me. They honestly make me either blush or tear up… My brides are the best… ♥


21 Responses
Thank for sharing. I am in the process of redoing my studio and am making these decisions right now!
i was curious what the purpose of the homasote is? so that you can pin to in? can you use a rotary cutter on it?
thanks
Hi Kimmy! You are right! The homasote is so that you can pin into it. I use this feature a lot when patternmaking, cutting, and sewing. I would not use a rotary cutter on it. Doing so would ruin your paper cover and the homosote underneath. If you like cutting with a rotary cutter, you’ll want a cutting mat. Thanks for your question!
Which Homasote product did you use? They make so many different products from sound-barriers to underlayment for floors.
I’m not really sure Neena! There was only one option at my local hardware store, so that is the one I got. It comes in 4’x8′ sheets and is 3/4″ thick. Hope this helps!
My aunt has worked as a drapier for many years and has always had a table like this with the homasote. I love it and appreciate these directions as I am looking to make my own!
The only thing she did differently, and I think I will do, is add a layer of duck cloth over the entire top and mark lines all the way across for measuring (inches). We use the top for ironing, cutting (our rotary cutter has a protective guard), pinning/marking patterns, etc.
The duck cloth is replaced every 5 yeas or so but holds up really well to pins and heat.
I think her table is also reinforced along the top sides with metal brackets and is a deeper (about 3 inches) to secure long widths along the sides.
I’m happy to help and thanks for sharing how your aunt’s table was made. Sounds awesome! My ironing table is made a little differently than my cutting tables. It does not have the homosote like my cutting table, but it does have the duck like your aunt’s table. You can read all about how made my ironing table here: https://brooksann.com/diy-professional-ironing-table/
Hi,
I’ve been curios about using homosote. Do you iron on it? How well could it hold up to heat and moisture?
Hi Isadora! Great question! I use the homasote for its pinnable quality when patternmaking, cutting, and sewing. If you plan to iron on a surface topped with homasote, make sure that you make a thick protective cover (quilt batting and canvas works nice) to catch all the heat and moisture. You’ll most likely need to change the paper covering pretty often, but if you need your table to do double duty as a pinnable surface and an ironing table, it will do in a pinch! https://brooksann.com/small-sewing-space-solution-portable-ironingcutting-table/
Thanks for the great pictures and detailed measurements! I made 3 of these and did them 5’X8′ for an upholstery school I’m starting. That way it will be wide enough for upholstery fabric (54″) They are very sturdy and heavy. We plan to cover the top with vinyl fabric instead of using the homasote, since we will only be cutting fabric on them and need to keep them clean. They turned out great!!
In our shop at work we do the Homosote layer covered in a drill or duck and then paint it with a gloss or semi gloss paint so we can wipe it off easily. I like the construction method used here utilizing only 2x4s rather than adding in 4x4s as the supports. It’s seems like a very simple way to construct the frame.
Cool! I’ve seen the homosote tables with the painted canvas covers before. How do you like it?
I prefer the paper covered top (when the paper gets messy or ripped, I simply add a new layer) but maybe that’s just because it’s the kind of table I’ve always used. There have been paper-covered homosote-topped tables in every professional costume shop I’ve worked in over the years and it’s what I’ve used for my own studio for ~15 years. I also don’t use anything wet on the table, so wiping isn’t a concern. I’m also sentimental, so I adore all the history stored in all paper layers that are hidden in my table top.
I love it! I like that it is water resistant to a certain extent and it’s simple to pull up the muslin and recover/repaint if it’s getting too worn. I also like that I can choose the color. A darker grey so pins show up easy is great.
I want cork but it was cost prohibative. I saw this and decided it was okay to be reasonable!
The homasote I used for my table tops were ~$40 for a full 4×8 sheet and they will likely last a lifetime (and then some)! This is the same material used for the tops of tables in the professional costume shops where I’ve worked (including Broadway). I’ve never seen a table topped with cork, probably because it is so expensive!
In the closeup picture, the Homasote looks to be about three-quarters of an inch thick. Can you specify the thickness, and was it Homasote 440 SoundBarrier?
I just measured and my Homasote tops are 1/2″ thick, but 3/4″ would work as well. I bought the Homasote so many years ago (special ordered from my local mom-and-pop hardware store) that I don’t know the exact name/type. What you mentioned sounds like the stuff though! If its not exactly what I have, I think it will work just as well. Hope this helps! Thanks for following along!
Hi Brooks!
I have really enjoyed your skirts skills class and got a lot out of it. I just went back and reviewed again and decided to make my own sewing room table, I went with kitchen cabinets because it was just the right height for me and i can have drawers and shelves to store a lot of my sewing stuffs! From what I’ve learned from you I was able to make a custom wedding dress mock up for my daughter (I’ve had previous sewing experience) and just sent it to her (she lives in another state) and guess what? Got a good fit! What I did was have her visit me and I made a plaster cast of her body, water sealed the inside of the cast and then made another cast inside to get a more accurate measurements and then peeled off the first cast. was is a lot of work? Yes. Was it worth it? Yes because I got an accurate form of her body. Is it feasible on a regular basis? No lol! I wanted to ask if you have a story on someone who had an open backed dressed made, down below the waistline. I think I got it good but if I can pick up any tips for a better and snug fit I”m all for it. Thanks, Patricia
PS. I plan on taking more classes when things slow down a little more for me
Hi Patricia! Congratulations on your daughter’s engagement and for you making her wedding dress! Katie’s dress (my first wedding dress) is the closest I’ve come to making an “open-backed dress” “down below the waistline”. Not sure if it at all resembles the design you are attempting or not, but this brief blog post is about all I got on the topic. Good luck!
I am building another 5’x12′ workroom table. On my last one, I used ceiling tiles, but this one I’ll use 4×8 sheets of 1/2″ Homasote. Do you secure the homasote to the plywood with adhesive? If so, what do you use?
Congrats on your new table! No adhesive. It just sits on top. I tape the paper cover around the vertical edges. The homasote is loose, but it doesn’t shift around. Hope this helps!